Linux BSP User Guide for T536 Series buildroot-202205
1. Introduction
This document provides comprehensive instructions for building and deploying Linux BSP for T536 series platforms running buildroot-202205 . The guide covers environment setup, source code acquisition, building processes for multiple processors platforms, and deployment methods.
2. Linux BSP Version
- OS: Buildroot-202205
- Kernel: 5.15.147
3. Build Environment on Host
Currently, we adopt Docker as build environment.
You can get the latest version of advrisc/u20.04-awt536lbv1 Docker image for developing AllWinner T536 projects.
3.1 Docker Installation Command
sudo docker pull advrisc/u20.04-awt536lbv1
3.2 Run Docker Example
- Step 1: Run Docker Container
Assume your working directory is
home/bsp/myLinuxand the Docker container name ist536_linux_risc.
Replacehome/bsp/myLinuxandt536_linux_riscwith the actual ones based on your environment.
$ export WORKSPACE="home/bsp/myLinux"
$ export CONTAINER_NAME="t536_linux_risc"
$ sudo docker run -it --name ${CONTAINER_NAME} -v ${WORKSPACE}:/home/adv/BSP:rw --privileged advrisc/u20.04-awt536lbv1:latest  /bin/bash
- Step 2: Change User in Container
adv@7cc0fa834366:~$ sudo chown adv:adv -R BSP
4. Getting Linux Source Code
4.1 Full SDK
$ cd ~/BSP
$ mkdir t536_linux_risc
$ cd t536_linux_risc
$ git config --global user.name "Your Name"
$ git config --global user.email you@example.com
$ repo init -u https://AIM-Linux@dev.azure.com/AIM-Linux/RISC-AW-T536-Linux/_git/manifest -b t536-linux-v0.8-risc -m default.xml
$ repo sync
$ repo forall -c git checkout -b local --track adv-t536-azure/t536-linux-v0.8-risc
4.2 BSP Tarball
You can get BSP tarball (e.g., afe-e620_buildroot202205-linux-5.15.147_v0.0.3_kernel-5.15.147_t536_all_all_2026-06-22.bsp.tgz) from our released BSP, then you have to copy it into container.
Follow the steps below:
1. Exit Container and Return to Local Machine
$ exit
2. Copy BSP Tarball to Workspace and Change Owner
$ export BSP_TARBALL="afe-e620_buildroot202205-linux-5.15.147_v0.0.3_kernel-5.15.147_t536_all_all_2026-06-22.bsp.tgz"
$ cp ${BSP_TARBALL} ${WORKSPACE}
$ sudo chown adv:adv ${WORKSPACE}/${BSP_TARBALL}
3. Return to Container
$ sudo docker start ${CONTAINER_NAME}
$ sudo docker attach ${CONTAINER_NAME}
4. Unpack BSP Tarball
$ tar zxvf ${BSP_TARBALL}
BSP tarballis for fast developingubootandkernel.- For the complete functionality of the OS, please use
Full SDK
5. Building
5.1 Build Choose Project
- Build AFE-E620 Project
$ export T536_BSP_TOP=`pwd`
$ cd $T536_BSP_TOP
$ source build/envsetup.sh
$ ./build.sh autoconfig -o buildroot -i t536 -b afe-e620 -n default -k linux-5.15-origin
5.2 Build U-boot
- Build AFE-E620 U-boot
$ cd $T536_BSP_TOP
$ ./build.sh bootloader
5.3 Build Kernel
- Build AFE-E620 Kernel
$ cd $T536_BSP_TOP
$ ./build.sh kernel
5.4 Build rootfs buildroot-202205
$ cd $T536_BSP_TOP
$ ./build.sh buildroot_rootfs
5.5 Build all and package Generate OS
$ cd $T536_BSP_TOP
$ ./build.sh
$ ./build.sh pack
5.6 Get All Images
All images are located in $T536_BSP_TOP/out/.
Output Image Files
The common image files are listed below:
$ cd $T536_BSP_TOP

build output all file in                 : out/
toolchain in                             : out/toolchain

kernel : out/t536/kernel/staging/boot.img
OS     : out/t536_linux_afe-e620_uart0.img
6. Update Images
6.1 Prepare the OS to be used and copy it to the Windows PC.
Copy the complete OS to be used to the PC side of Windows. For the use of subsequent tools.( t536_linux_afe-e620_uart0.img )
6.2 Prepare software tools for burning OS.
$ cd $T536_BSP_TOP
$ cd tools/tools_win/
$ ls usbdriver* PhoenixCard*
PhoenixCard_V4.3.3.zip  usbdriver_V1.0.0.4.zip
There are usbdriver_V1.0.0.4.zip and PhoenixCard_V4.3.3.zip files in this directory. Copy to Windows PC for use.
First unzip and use the usbdriver_V1.0.0.4.zip tool to install the USB driver for the PC version. (Using InstallUSBDrv.bat)
Then unzip and use the PhoenixCard_V4.3.3.zip tool to selectively burn the inserted SD card. (Using PhoenixCard.exe)
6.3 Using the PhoenixCard.exe tool to "burn" or "boot" the OS with the help of an SD card.
Prepare an SD card and insert it into the windows PC.
Use the pre prepared PhoenixCard.exe software.
Select the OS you want to use, and then choose to use it as an SD card burning system or as an SD card booting system.
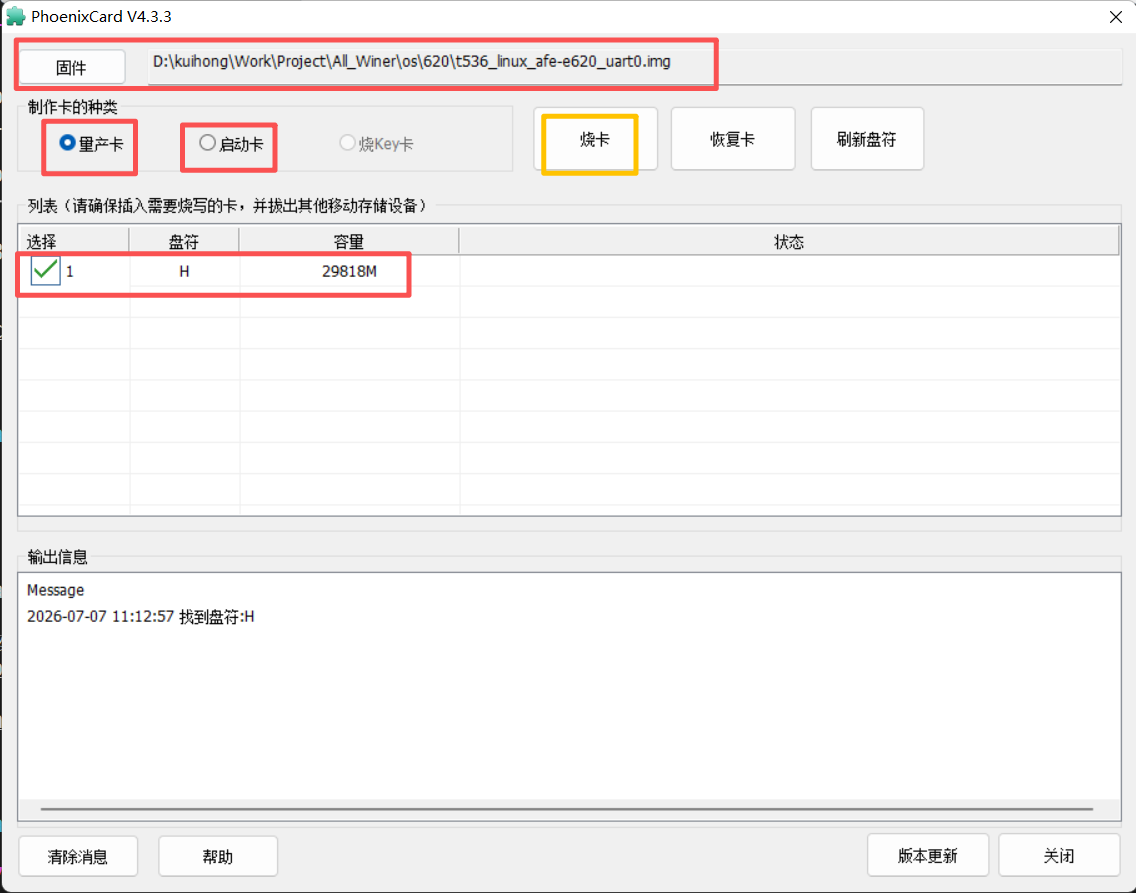
After the SD card is completed, insert it into the target board, power it on, and wait for automatic burning or system startup.
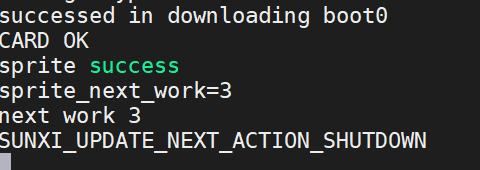
If the SD card is used as a burning OS, it will prompt "SUNXI_UPDATE_NEXT_ACTION_SHUTDOWN" in console , after successful burning is completed.
6.4 Replace the kernel separately.
If you only need to replace the kernel for debugging, you can copy boot.img to the board side, execute the following instructions, and restart the system.
$ dd if=./boot.img of=/dev/mmcblk0p3 bs=1M ; sync
7. Summary
7.1 Supported Hardware Platforms
- AFE-E620
7.2 System Requirements
- Docker environment with
advrisc/u20.04-awt536lbv1image - Ubuntu 20.04 base system
- BSP tarball from our released BSP
- Build tools and dependencies
- Sufficient disk space for source code and build artifacts
- Internet connection for package installation
- Target processors (AFE-E620)
7.3 Build Workflow Summary
- Environment Setup → Docker + Ubuntu 20.04
- Source Acquisition → BSP tarball or Full SDK
- Project Selection → Choose target processors platform
- Component Build → U-boot → Kernel → (buildroot)*
- Image Generation → OS → (image) → toolchain
- Deployment tools → PhoenixCard, usbdriver
Components marked with asterisk () are not supported in BSP tarball mode.
7.4 Development Modes
7.4.1 BSP Tarball Mode (Limited)
- Use Case: Quick U-boot and kernel development
- Advantages: Fast setup, smaller download size
- Limitations:
BSP Tarballis only used for debugging kennell and uboot code. For the complete functionality of the OS, please useFull SDK.
The BSP tarball is designed for fast development of uboot and kernel components. However, it has some limitations.
- ✅ Supported: U-boot building
- ✅ Supported: Kernel building
- ✅ Supported: buildroot building
- ❌ Dont Support:
rtosrepository
7.4.2 Full SDK Mode (Complete)
- Use Case: Complete system development and customization
- Advantages: Full build capability, all components supported
- Limitations: Larger download size