EPC-R3430 Yocto 2.5 User Guide
產品介紹(Product introduction )
產品特性(Features)
- NXP ARM® Cortex®-A9 i.MX6 Dual 1GHz
- On-board 1GB DDR3L and 4GB eMMC
- HDMI
- RS-232/422/485, 2 USB, 1 GbE
- Mini-PCIe w/ Nano SIM socket for 3G/LTE
- M.2 Key E, Type 2230 for Wi-Fi & BTimport Tabs from '@theme/Tabs'; import TabItem from '@theme/TabItem';
EPC-R3430 Yocto 2.1 User Guide
產品介紹(Product introduction )
產品特性(Features)
- NXP ARM® Cortex®-A9 i.MX6 Dual 1GHz
- On-board 1GB DDR3L and 4GB eMMC
- HDMI
- RS-232/422/485, 2 USB, 1 GbE
- Mini-PCIe w/ Nano SIM socket for 3G/LTE
- M.2 Key E, Type 2230 for Wi-Fi & BT
- Micro SD socket
- UIO40-Express expansion as 1 RS-485, 8 GPIO, 2 RS-232, 2nd LAN, CAN Bus
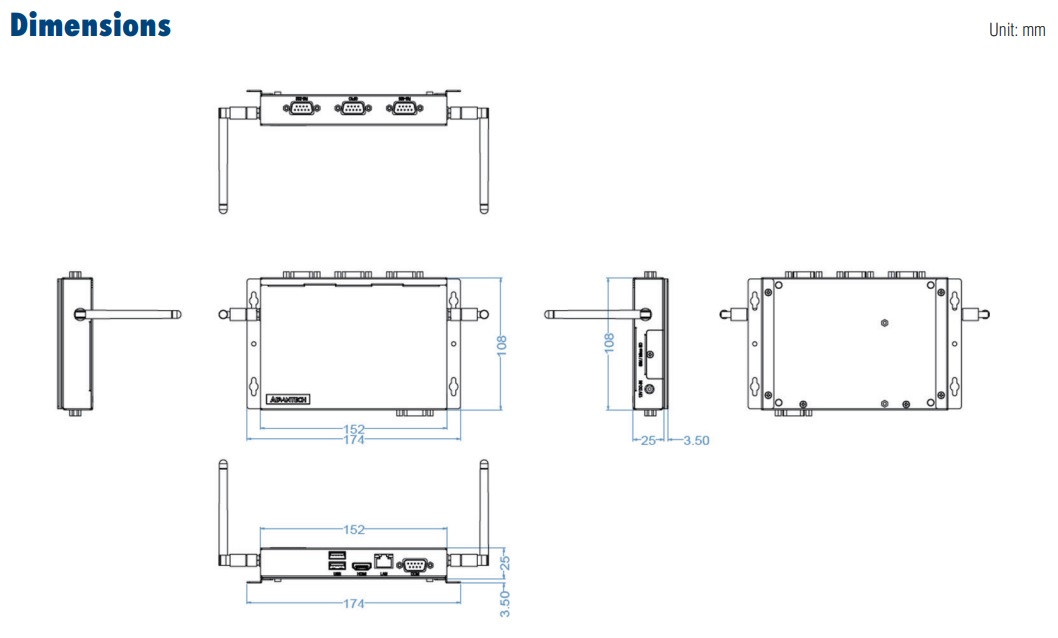
接口布局和尺寸(Layout and Sizes)
接口布局圖 Board Dimension Layout
機械尺寸 (**Mechanical Characteristics)
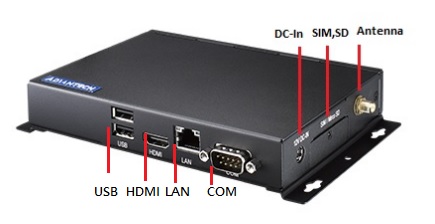
Connector List
| DC-In | 12V DC in by DC-Jack |
| SIM,SD | SIM, SD slot |
| Antenna | Antenna connector |
| USB | supports 2 x USB2.0 type A connectors |
| HDMI | HDMI CONN |
| LAN | Ethernet port |
| COM | Supports 1 x RS-232/RS-422/RS-485. |
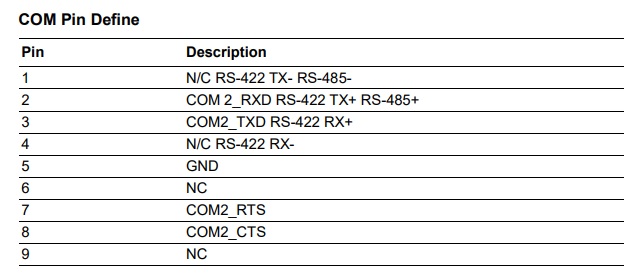
接口引脚定義 (Pin definitions)
COM Pin Define
快速入门 (Quick Start)
系统下载 (OS Download)
- Linux系统 (Linux OS)
Yocto 3.0
Yocto 2.5
Yocto 2.1
Debug Port連接 (Ddbug Port Connection)
-
Connect debug cable to EPC-R3430 debug port
-
Connect the other side of debug cable to USB-to-RS232 cable then connect to your PC
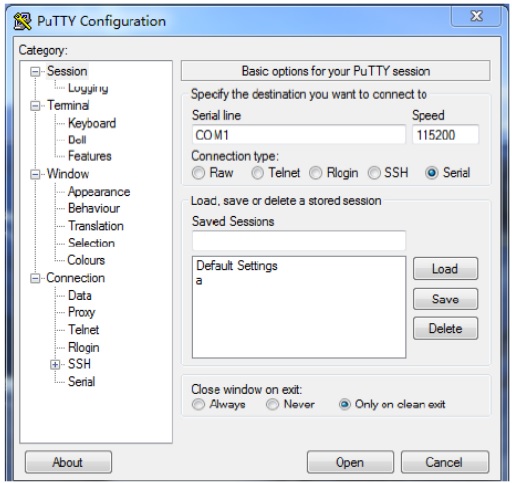
Debug Port設定 (Debug Port Settings)
EPC-R3430 can communicate with a host server by using serial cables. Common serial communication programs such as HyperTerminal, Tera Term or Putty can be used in this case. The example below describes the serial terminal setup using HyperTerminal on a Windows host: 1. Connect EPC-R3430 with your PC by using a serial cable
-
Open HyperTerminal on your Windows PC and select the settings as shown below
-
After the boot loader is programmed on Micro SD card, insert power adapter connector to DC jack on EPC-R3430 to power up the board. The boot loader prompt is displayed on the terminal screen. HyperTerminal Settings for Terminal Setup
Linux 燒錄方法 (Linux Flash eMMC Method)
-
確認SD 在Ubuntu 電腦中的代號(Check SD symbol in Ubuntu system)
-
先將鏡像燒錄到SD Card 中( Create a bootable SD card )
-
設定終端機(Set Debug Terminal)
Debug 串口調試 (Debug port Setting)
以 Tera Term 为例介绍如何使用串口调试功能
   Baud Rate波特率:115200
   Data 数据位:8
   Parity 奇偶校验:无
      Stop 停止位:1
   Flow Control流控:无
Tera Term Tool
Check the Sriel port in Device Manager (查看PC端的串口号):
if you can not identify the Serial device , please check your serial driver.
-
Insert the SD card into the device.
-
Check the DIP switch settings (1 ON, 2 OFF).
-
Connect the Debug Cable.
-
Turn on the power.
-
Access the system via the terminal.
-
Flash the image to eMMC.
Copy 3430A1AIM20LIV90146_DualQuad_flash_tool.tgz to a USB drive and insert it into the device's USB port.
In the system, verify the flashing data on the USB drive.
Decompress the file in the root directory.
Execute ./mksd-linux.sh in the mkInand directory.
- Remove the SD card and boot from eMMC.
Linux系统的基本使用(Linux System Basic Operating Method)
載入預設值由uboot 設定(Load Default Setting in Uboot )
-
During boot, press the Space bar within 5 seconds to enter U-Boot.
-
Command :
env default -a

saveenv

reset
顯示設定 (Display Setting )
default Display : HDMI
Display (LVDS:800x480) Setting
U-boot command:

setenv mmcargs setenv bootargs console=\${console},\${baudrate} \${smp} root=\${mmcroot} \${bootargs} video=mxcfb0:dev=ldb,800x480M@60,if=RGB24
Audio Test
Line out :

$ aplay -D plughw:0,0 Advantech.wav
MIC in :

$ arecord -t wav -c 1 -r 44100 -d 10 test.wav
設置RTC (RTC Setting)
$ date MMDDhhmm[[CC]YY][.ss] $ hwclock -w

$ ntpdate tw.pool.ntp.org
乙太網路使用方法(Ethernent Testing Method)
Command : ifconfig
Command: Ping 8.8.8.8
- Use Different Domain
LAN - Front IO -eth0
ifconfig eth0 xxx.xxx.xxx.xxx

ping 8.8.8.8

LAN - Rear IO -eth1

ifconfig eth1 xxx.xxx.xxx.xxx

ping 8.8.8.8
WiFi & BT 使用方法(WIFI & Bluetooth Testing Method)
M.2 module (EWM-W162M201E) - WIFI / BT Function
WIFI:
$ ifconfig mlan0 up
$ wpa_passphrase \${SSID} \${WPA_KEY} > /tmp/wpa.conf
$ wpa_supplicant -BDwext -imlan0 -c/tmp/wpa.conf
$ udhcpc -b -i mlan0

BlueTooth:
$ /usr/libexec/bluetooth/bluetoothd -C
$ hciconfig hci0 up
$ bluetoothctl
$ discoverable on
$ pairable on
$ scan on
[NEW] FC:18:3C:8D:75:F4 Device ID
$ scan off
$ pair FC:18:3C:8D:75:F4
$ connect FC:18:3C:8D:75:F4
3G使用方法(3G Testing Method)
Command:
3G (Telit HE910D)
pppd connect 'chat -v -s -t 10 "" "AT" "" "ATDT*99#" "CONNECT" ""' user username password password /dev/ttyACM3 460800 nodetach crtscts debug usepeerdns defaultroute &
USB 測試方式(USB Test metod )
USB
Insert a USB disk
usb 1-1.2: new high-speed USB device number 4 using ci\_hdrc
 usb-storage 1-1.2:1.0: USB Mass Storage device detected
 scsi2 : usb-storage 1-1.2:1.0
 scsi 2:0:0:0: Direct-Access     Generic- SD/MMC           1.00 PQ: 0 ANSI: 0 CCS
 sd 2:0:0:0: [sda] 3862528 512-byte logical blocks: (1.97 GB/1.84 GiB)
 sd 2:0:0:0: [sda] Write Protect is off
 sd 2:0:0:0: [sda] No Caching mode page found
 sd 2:0:0:0: [sda] Assuming drive cache: write through
 sd 2:0:0:0: [sda] No Caching mode page found
 sd 2:0:0:0: [sda] Assuming drive cache: write through
 sda: sda1
 sd 2:0:0:0: [sda] No Caching mode page found
 sd 2:0:0:0: [sda] Assuming drive cache: write through
 sd 2:0:0:0: [sda] Attached SCSI removable disk
串口使用方法(Serial Port Operating Method)
RS-232 Test
Uboot command :
setenv console ttymxc2 (Change to other RS-232 port) , then do the Front IO - RS 232 test
saveenv
reset
stty -F /dev/ttymxc1 115200
echo Serial Port Test > /dev/ttymxc1

if wnat to change debug port back, need to set the uboot command again .

setenv console ttymxc1

saveenv

reset
RS-422 setting
echo 134 > /sys/class/gpio/export
echo 135 > /sys/class/gpio/export
echo out > /sys/class/gpio/gpio1/direction
echo out > /sys/class/gpio/gpio2/direction
echo 1 > /sys/class/gpio/gpio1/value
echo 1 > /sys/class/gpio/gpio2/value
RS-422 test
stty -F /dev/ttymxc1 115200
echo Serial Port Test > /dev/ttymxc1
RS-485 setting
echo 134 > /sys/class/gpio/export
echo 135 > /sys/cla ```ss/gpio/export
echo out > /sys/class/gpio/gpio1/direction
echo out > /sys/class/gpio/gpio2/direction
echo 0 > /sys/class/gpio/gpio1/value
echo 1 > /sys/class/gpio/gpio2/value
RS-485 test
stty -F /dev/ttymxc1 115200
echo Serial Port Test > /dev/ttymxc1
RS-485 Port Test (For UIO-4030 COM Port)
Note:
RS-232: /dev/ttymxc2
GPIO : need to connect loopback. RS-485: pin1 data- & pin2 data+ (ttyUSB0)
Test command
$ stty -F /dev/ttymxc2 -echo -onlcr 115200 crtscts
$ cat /dev/ttymxc2 &
$ echo "Serial Port Test" > /dev/ttymxc2
RS-485 Test with Adam-4520
$ stty -F /dev/ttyUSB0 115200
$ echo "Serial Test" > /dev/ttyUSB0
RS-232 Port Test (For UIO-4032 COM Port)
Note: RS-232: /dev/ttymxc2
$ stty -F /dev/ttymxc2 -echo -onlcr 115200 crtscts
$ cat /dev/ttymxc2 &
$ echo "Serial Port Test" > /dev/ttymxc2
RS-232 Port Test (For UIO-4034 COM Port)
$ stty -F /dev/ttymxc2 -echo -onlcr 115200 crtscts
$ cat /dev/ttymxc2 &
$ echo "Serial Port Test" > /dev/ttymxc2
GPIO Port Def
GPIO [EXTENSION I/O B]

|  |  |
| --- | --- |
| pin#5: gpio 121 | pin#6: gpio 122 |
| pin#7: gpio 123 | pin#8: gpio 124 |
| pin#9: gpio 125 | pin#10: gpio 126 |
| pin#11: gpio 127 | pin#12: gpio 133 |
if want to test need to connect with GPIO device.
CAN Bus Port Test (For UIO-4034 CAN Port)
$ ip link set can0 up type can bitrate 125000
$ ifconfig can0 up
$ ip link set can1 up type can bitrate 125000
$ ifconfig can1 up

$ candump can0 &
$ cansend can1 1F334455#1122334455667788
Watch Dog Test
$ echo 1 > /dev/watchdog


遠程訪問及文件傳輸(Remote Access and File Transimmion)

查看主板IP位址 ( Chech IP Address ):

Command: ifconfig
SSH Remote Log into Device:
SSH Remote Log into Device SSH远程登录,以putty选择putty.exe(或者使用Xshell、SecureCRT等类似软件) 需要设置远程设备的IP、通讯端口(默认22)、通讯方式,登录后验证用户名密码
System Recovery
This section provides detailed procedures for restoring the eMMC image. If you destroy the onboard flash image by accident, you can recover a system by following these steps:
1. Copy "3430A1LIVxxxx.img.gz" package to your desktop.
2. Open "Terminal" on Ubuntu 12.04 LTS.
3. $sudo su (Change to "root" authority)
4. Input your password.
5. #cd Desktop/
6. #gunzip 3430A1LIVxxxx.img.gz (Unzip files)
7. Insert one SD card to your developing computer
8. sudo fdisk - l
9. Note: Check the SD card location, like /dev/sdf
10. #dd if=3430A1LIVxxxx.img of=/dev/sdf bs=1M conv=fsync
11. Please wait until dump disk is done
12. Connect console cable to debug port (CONSOLE) and open serial console pro�gram on Ubuntu 12.04 LTS, set baudrate to 115200. For detailed console set�tings, please refer to section 3.6.

On RSB-3430 platform, type #root (Login)
On RSB-3430 platform, type #cd /mk_inand
On RSB-3430 platform, type #./mkinand?linux.sh /dev/mmcblk0
On RSB-3430 platform, type "y " (Start to copy files, wait until it shows [Done])
Power off and remove this SD card.
通用方法(General Method)
查看CPU温度(Check CPU Temperature)
root@imx8qxprom5620a1:/# cat /sys/devices/virtual/thermal/thermal_zone0/temp 44600

# 或者直接以度爲單位顯示 echo $[$(cat /sys/class/thermal/thermal_zone0/temp)/1000]° >>> 45°
查看CPU频率(Check CPU Frequency)
cat /sys/devices/system/cpu/cpu0/cpufreq/cpuinfo_cur_freq
>> 900000
cat /sys/devices/system/cpu/cpu0/cpufreq/cpuinfo_max_freq
>> 1200000
查看内存容量(Check Memory Capacity)
root@imx8qxprom5620a1:/# busybox free -m
             total       used       free     shared    buffers     cached
Mem:       1794920     516080    1278840      17252      9852        80292
-/+ buffers/cache:     425936    1368984
Swap:            0          0          0
查看存储容量(Check Storage Capacity)
root@imx8qxprom5620a1:/# busybox df -h
Filesystem                Size      Used Available Use% Mounted on
/dev/root                13.4G      1.7G     11.1G  13% /
devtmpfs                395.8M      4.0K    395.8M   0% /dev
tmpfs                   876.4M         0    876.4M   0% /dev/shm
tmpfs                   876.4M     16.5M    859.9M   2% /run
tmpfs                   876.4M         0    876.4M   0% /sys/fs/cgroup
tmpfs                   876.4M      4.0K    876.4M   0% /tmp
tmpfs                   876.4M    280.0K    876.2M   0% /var/volatile
/dev/mmcblk0p2           13.6G      1.7G     11.3G  13% /run/media/mmcblk0p2
/dev/mmcblk0p1           63.9M     23.4M     40.5M  37% /run/media/mmcblk0p1
/dev/mmcblk1p1           63.9M     23.4M     40.5M  37% /run/media/mmcblk1p1
tmpfs                   175.3M     88.0K    175.2M   0% /run/user/0
root@imx8qxprom5620a1:/#
網路Ping測試(Ping Network Testing)
ping 8.8.8.8
PING 8.8.8.8 (8.8.8.8) 56(84) bytes of data.
64 bytes from 8.8.8.8: icmp_seq=1 ttl=54 time=2.10 ms
64 bytes from 8.8.8.8: icmp_seq=2 ttl=54 time=2.10 ms
- Micro SD socket
- UIO40-Express expansion as 1 RS-485, 8 GPIO, 2 RS-232, 2nd LAN, CAN Bus
產品官網連結(Product official website link)
硬件接口說明(Hardware interface introduction)
接口布局和尺寸(Layout and Sizes)
接口布局圖 Board Dimension Layout
機械尺寸 (**Mechanical Characteristics)
Connector List
| DC-In | 12V DC in by DC-Jack |
| SIM,SD | SIM, SD slot |
| Antenna | Antenna connector |
| USB | supports 2 x USB2.0 type A connectors |
| HDMI | HDMI CONN |
| LAN | Ethernet port |
| COM | Supports 1 x RS-232/RS-422/RS-485. |
接口引脚定義 (Pin definitions)
COM Pin Define
快速入门 (Quick Start)
系统下载 (OS Download)
- Linux系统 (Linux OS)
Yocto 3.0
Yocto 2.5
Yocto 2.1
Debug Port連接 (Ddbug Port Connection)
-
Connect debug cable to EPC-R3430 debug port
-
Connect the other side of debug cable to USB-to-RS232 cable then connect to your PC
Debug Port設定 (Debug Port Settings)
EPC-R3430 can communicate with a host server by using serial cables. Common serial communication programs such as HyperTerminal, Tera Term or Putty can be used in this case. The example below describes the serial terminal setup using HyperTerminal on a Windows host: 1. Connect EPC-R3430 with your PC by using a serial cable
-
Open HyperTerminal on your Windows PC and select the settings as shown below
-
After the boot loader is programmed on Micro SD card, insert power adapter connector to DC jack on EPC-R3430 to power up the board. The boot loader prompt is displayed on the terminal screen. HyperTerminal Settings for Terminal Setup
Linux 燒錄方法 (Linux Flash eMMC Method)
-
確認SD 在Ubuntu 電腦中的代號(Check SD symbol in Ubuntu system)
-
先將鏡像燒錄到SD Card 中( Create a bootable SD card )
-
設定終端機(Set Debug Terminal)
Debug 串口調試 (Debug port Setting)
以 Tera Term 为例介绍如何使用串口调试功能
   Baud Rate波特率:115200
   Data 数据位:8
   Parity 奇偶校验:无
      Stop 停止位:1
   Flow Control流控:无
Tera Term Tool
Check the Sriel port in Device Manager (查看PC端的串口号):
if you can not identify the Serial device , please check your serial driver.
-
Insert the SD card into the device.
-
Check the DIP switch settings (1 ON, 2 OFF).
-
Connect the Debug Cable.
-
Turn on the power.
-
Access the system via the terminal.
-
Flash the image to eMMC.
Copy 3430A1AIM20LIV90146_DualQuad_flash_tool.tgz to a USB drive and insert it into the device's USB port.
In the system, verify the flashing data on the USB drive.
Decompress the file in the root directory.
Execute ./mksd-linux.sh in the mkInand directory.
- Remove the SD card and boot from eMMC.
Linux系统的基本使用(Linux System Basic Operating Method)
載入預設值由uboot 設定(Load Default Setting in Uboot )
-
During boot, press the Space bar within 5 seconds to enter U-Boot.
-
Command :
env default -a

saveenv

reset
顯示設定 (Display Setting )
default Display : HDMI
Display (LVDS:800x480) Setting
U-boot command:

setenv mmcargs setenv bootargs console=\${console},\${baudrate} \${smp} root=\${mmcroot} \${bootargs} video=mxcfb0:dev=ldb,800x480M@60,if=RGB24
Audio Test
Line out :

$ aplay -D plughw:0,0 Advantech.wav
MIC in :

$ arecord -t wav -c 1 -r 44100 -d 10 test.wav
設置RTC (RTC Setting)
$ date MMDDhhmm[[CC]YY][.ss] $ hwclock -w

$ ntpdate tw.pool.ntp.org
乙太網路使用方法(Ethernent Testing Method)
Command : ifconfig
Command: Ping 8.8.8.8
- Use Different Domain
LAN - Front IO -eth0
ifconfig eth0 xxx.xxx.xxx.xxx

ping 8.8.8.8

LAN - Rear IO -eth1

ifconfig eth1 xxx.xxx.xxx.xxx

ping 8.8.8.8
WiFi & BT 使用方法(WIFI & Bluetooth Testing Method)
M.2 module (EWM-W162M201E) - WIFI / BT Function
WIFI:
$ ifconfig mlan0 up
$ wpa_passphrase \${SSID} \${WPA_KEY} > /tmp/wpa.conf
$ wpa_supplicant -BDwext -imlan0 -c/tmp/wpa.conf
$ udhcpc -b -i mlan0

BlueTooth:
$ /usr/libexec/bluetooth/bluetoothd -C
$ hciconfig hci0 up
$ bluetoothctl
$ discoverable on
$ pairable on
$ scan on
[NEW] FC:18:3C:8D:75:F4 Device ID
$ scan off
$ pair FC:18:3C:8D:75:F4
$ connect FC:18:3C:8D:75:F4
3G使用方法(3G Testing Method)
Command:
3G (Telit HE910D)
pppd connect 'chat -v -s -t 10 "" "AT" "" "ATDT*99#" "CONNECT" ""' user username password password /dev/ttyACM3 460800 nodetach crtscts debug usepeerdns defaultroute &
USB 測試方式(USB Test metod )
USB
Insert a USB disk
usb 1-1.2: new high-speed USB device number 4 using ci\_hdrc
 usb-storage 1-1.2:1.0: USB Mass Storage device detected
 scsi2 : usb-storage 1-1.2:1.0
 scsi 2:0:0:0: Direct-Access     Generic- SD/MMC           1.00 PQ: 0 ANSI: 0 CCS
 sd 2:0:0:0: [sda] 3862528 512-byte logical blocks: (1.97 GB/1.84 GiB)
 sd 2:0:0:0: [sda] Write Protect is off
 sd 2:0:0:0: [sda] No Caching mode page found
 sd 2:0:0:0: [sda] Assuming drive cache: write through
 sd 2:0:0:0: [sda] No Caching mode page found
 sd 2:0:0:0: [sda] Assuming drive cache: write through
 sda: sda1
 sd 2:0:0:0: [sda] No Caching mode page found
 sd 2:0:0:0: [sda] Assuming drive cache: write through
 sd 2:0:0:0: [sda] Attached SCSI removable disk
串口使用方法(Serial Port Operating Method)
RS-232 Test
Uboot command :
setenv console ttymxc2 (Change to other RS-232 port) , then do the Front IO - RS 232 test
saveenv
reset
stty -F /dev/ttymxc1 115200
echo Serial Port Test > /dev/ttymxc1

if wnat to change debug port back, need to set the uboot command again .

setenv console ttymxc1

saveenv

reset
RS-422 setting
echo 134 > /sys/class/gpio/export
echo 135 > /sys/class/gpio/export
echo out > /sys/class/gpio/gpio1/direction
echo out > /sys/class/gpio/gpio2/direction
echo 1 > /sys/class/gpio/gpio1/value
echo 1 > /sys/class/gpio/gpio2/value
RS-422 test
stty -F /dev/ttymxc1 115200
echo Serial Port Test > /dev/ttymxc1
RS-485 setting
echo 134 > /sys/class/gpio/export
echo 135 > /sys/cla ```ss/gpio/export
echo out > /sys/class/gpio/gpio1/direction
echo out > /sys/class/gpio/gpio2/direction
echo 0 > /sys/class/gpio/gpio1/value
echo 1 > /sys/class/gpio/gpio2/value
RS-485 test
stty -F /dev/ttymxc1 115200
echo Serial Port Test > /dev/ttymxc1
RS-485 Port Test (For UIO-4030 COM Port)
Note:
RS-232: /dev/ttymxc2
GPIO : need to connect loopback. RS-485: pin1 data- & pin2 data+ (ttyUSB0)
Test command
$ stty -F /dev/ttymxc2 -echo -onlcr 115200 crtscts
$ cat /dev/ttymxc2 &
$ echo "Serial Port Test" > /dev/ttymxc2
RS-485 Test with Adam-4520
$ stty -F /dev/ttyUSB0 115200
$ echo "Serial Test" > /dev/ttyUSB0
RS-232 Port Test (For UIO-4032 COM Port)
Note: RS-232: /dev/ttymxc2
$ stty -F /dev/ttymxc2 -echo -onlcr 115200 crtscts
$ cat /dev/ttymxc2 &
$ echo "Serial Port Test" > /dev/ttymxc2
RS-232 Port Test (For UIO-4034 COM Port)
$ stty -F /dev/ttymxc2 -echo -onlcr 115200 crtscts
$ cat /dev/ttymxc2 &
$ echo "Serial Port Test" > /dev/ttymxc2
GPIO Port Def
GPIO [EXTENSION I/O B]

|  |  |
| --- | --- |
| pin#5: gpio 121 | pin#6: gpio 122 |
| pin#7: gpio 123 | pin#8: gpio 124 |
| pin#9: gpio 125 | pin#10: gpio 126 |
| pin#11: gpio 127 | pin#12: gpio 133 |
if want to test need to connect with GPIO device.
CAN Bus Port Test (For UIO-4034 CAN Port)
$ ip link set can0 up type can bitrate 125000
$ ifconfig can0 up
$ ip link set can1 up type can bitrate 125000
$ ifconfig can1 up

$ candump can0 &
$ cansend can1 1F334455#1122334455667788
Watch Dog Test
$ echo 1 > /dev/watchdog


遠程訪問及文件傳輸(Remote Access and File Transimmion)

查看主板IP位址 ( Chech IP Address ):

Command: ifconfig
SSH Remote Log into Device:
SSH Remote Log into Device SSH远程登录,以putty选择putty.exe(或者使用Xshell、SecureCRT等类似软件) 需要设置远程设备的IP、通讯端口(默认22)、通讯方式,登录后验证用户名密码
System Recovery
This section provides detailed procedures for restoring the eMMC image. If you destroy the onboard flash image by accident, you can recover a system by following these steps:
1. Copy "3430A1LIVxxxx.img.gz" package to your desktop.
2. Open "Terminal" on Ubuntu 12.04 LTS.
3. $sudo su (Change to "root" authority)
4. Input your password.
5. #cd Desktop/
6. #gunzip 3430A1LIVxxxx.img.gz (Unzip files)
7. Insert one SD card to your developing computer
8. sudo fdisk - l
9. Note: Check the SD card location, like /dev/sdf
10. #dd if=3430A1LIVxxxx.img of=/dev/sdf bs=1M conv=fsync
11. Please wait until dump disk is done
12. Connect console cable to debug port (CONSOLE) and open serial console pro�gram on Ubuntu 12.04 LTS, set baudrate to 115200. For detailed console set�tings, please refer to section 3.6.

On RSB-3430 platform, type #root (Login)
On RSB-3430 platform, type #cd /mk_inand
On RSB-3430 platform, type #./mkinand?linux.sh /dev/mmcblk0
On RSB-3430 platform, type "y " (Start to copy files, wait until it shows [Done])
Power off and remove this SD card.
通用方法(General Method)
查看CPU温度(Check CPU Temperature)
root@imx8qxprom5620a1:/# cat /sys/devices/virtual/thermal/thermal_zone0/temp 44600

# 或者直接以度爲單位顯示 echo $[$(cat /sys/class/thermal/thermal_zone0/temp)/1000]° >>> 45°
查看CPU频率(Check CPU Frequency)
cat /sys/devices/system/cpu/cpu0/cpufreq/cpuinfo_cur_freq
>> 900000
cat /sys/devices/system/cpu/cpu0/cpufreq/cpuinfo_max_freq
>> 1200000
查看内存容量(Check Memory Capacity)
root@imx8qxprom5620a1:/# busybox free -m
             total       used       free     shared    buffers     cached
Mem:       1794920     516080    1278840      17252      9852        80292
-/+ buffers/cache:     425936    1368984
Swap:            0          0          0
查看存储容量(Check Storage Capacity)
root@imx8qxprom5620a1:/# busybox df -h
Filesystem                Size      Used Available Use% Mounted on
/dev/root                13.4G      1.7G     11.1G  13% /
devtmpfs                395.8M      4.0K    395.8M   0% /dev
tmpfs                   876.4M         0    876.4M   0% /dev/shm
tmpfs                   876.4M     16.5M    859.9M   2% /run
tmpfs                   876.4M         0    876.4M   0% /sys/fs/cgroup
tmpfs                   876.4M      4.0K    876.4M   0% /tmp
tmpfs                   876.4M    280.0K    876.2M   0% /var/volatile
/dev/mmcblk0p2           13.6G      1.7G     11.3G  13% /run/media/mmcblk0p2
/dev/mmcblk0p1           63.9M     23.4M     40.5M  37% /run/media/mmcblk0p1
/dev/mmcblk1p1           63.9M     23.4M     40.5M  37% /run/media/mmcblk1p1
tmpfs                   175.3M     88.0K    175.2M   0% /run/user/0
root@imx8qxprom5620a1:/#
網路Ping測試(Ping Network Testing)
ping 8.8.8.8
PING 8.8.8.8 (8.8.8.8) 56(84) bytes of data.
64 bytes from 8.8.8.8: icmp_seq=1 ttl=54 time=2.10 ms
64 bytes from 8.8.8.8: icmp_seq=2 ttl=54 time=2.10 ms