產品介紹
產品特性(Features)
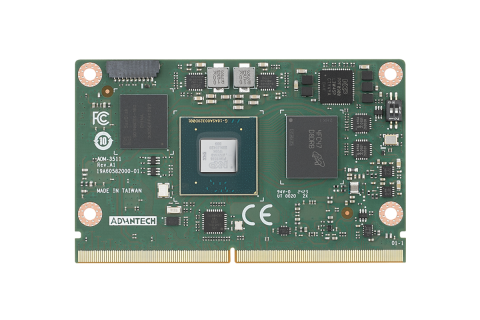
NXP i.MX95 Cortex®-A55 AOM-5521 AI-on-Module Nano
- NXP Arm® Cortex®-A55 i.MX95 Six Cores up to 2.0 GHz
- 1 x Arm Cortex-M7 core & 1 x Cortex-M33 core
- Onboard LPDDR5 8 GB, 6400MT/s memory
- 1 x 4 lane MIPI-DSI (Optional), 1 x Dual channel LVDS, 1 x HDMI
- 1 x USB3.2 Gen1By1, 4 x USB2.0, 1 x USB 2.0 OTG, 4 x UART,
- 5 x I2C, 14 x GPIO, 1 x PCIe3.0, 1x10GbE +2x Gb Ethernet (w/TSN), 2 x CAN-FD
- Neural network accelerator built-in
產品官網連結(Product information Link)
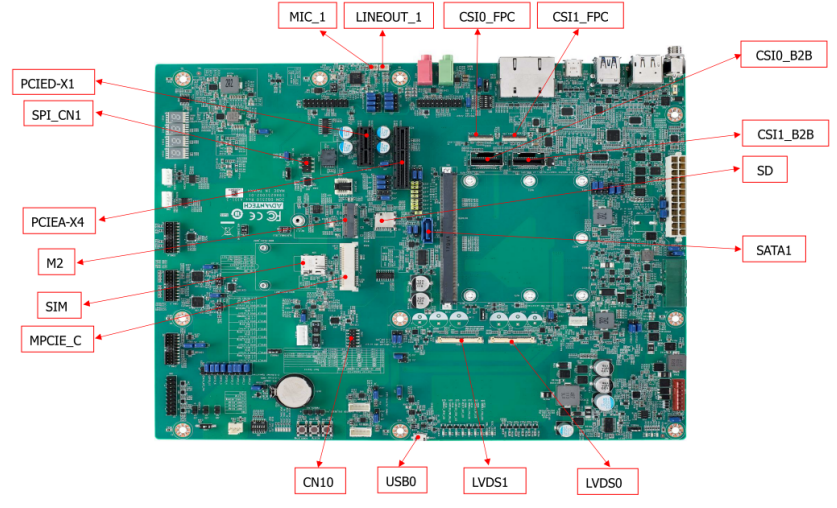
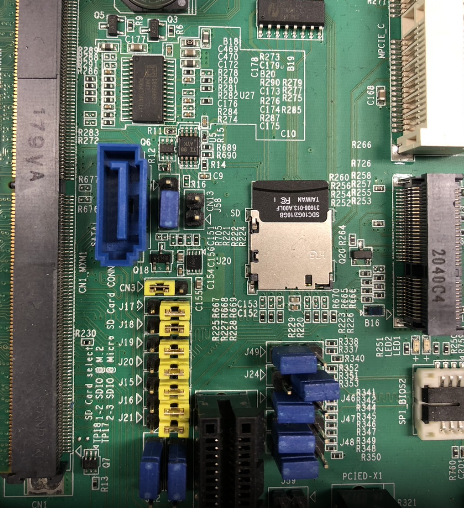
接口布局和尺寸(Layout and Sizes)
AOM-5521 接口布局圖 Board Dimension Layout
[ ]
]
[ ]
]
SOM-DB2510 接口布局圖 Board Dimension Layout
[ ]
]
[ ]
]
主板内置插针式引脚排序方式 (Pin Header defination)
Internal I/O
[ ]
[
]
[ ]
]
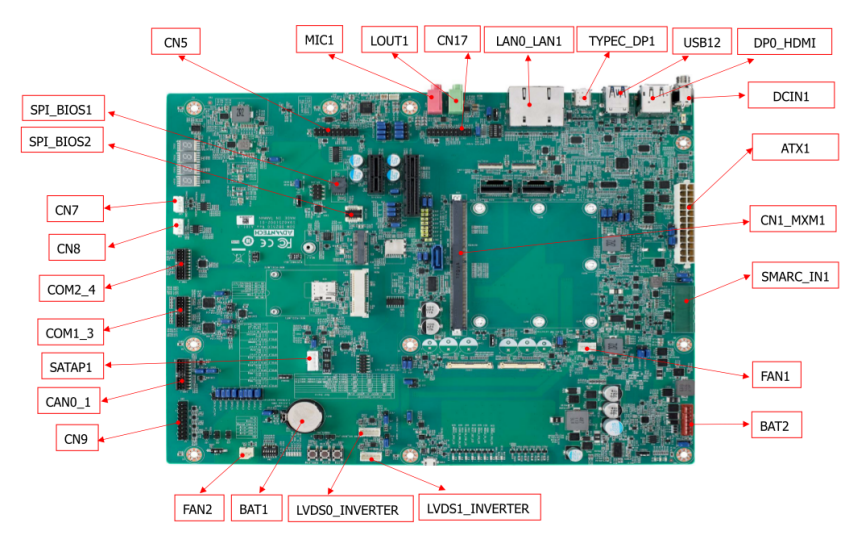
| Label | Function | Label | Function |
| ATX1 | ATX Connector | FAN1 | Smart Fan Connector |
| SMARC_IN1 | Wide Range Input Power Connector (3V~5.25V) | FAN2 | System Fan Connector |
| DCIN1 | DCIN connector | CAN0_1 | CAN Bus Connector |
| DP0_HDMI | DP & HDMI Connector | USB0 | USB OTG Connector |
| USB12 | USB 2.0 port1~2 & USB 3.0 port0 Connector | COM1_3 | COM Port Port1,3 Connector |
| TYPEC_DP1 | Type-C Connector | COM2_4 | COM Port Port2,4 Connector |
| LAN0_LAN1 | LAN0 & LAN1 Connector | CN8 | I2C connector for I2C_PM |
| LOUT1 | Line Out Connector | CN7 | I2C Connector for I2C_GP |
| MIC1 | MIC1 Connector | CN10 | eSPI Pin Header |
| CN1_MXM1 | SMARC Connector | SATAP1 | SATA Power Connector |
| PCIEA-X4 | PCIe x4 Connector | CSI0_B2B | MIPI B2B Connector for 2M Camera |
| SATA1 | SATA Port0 Connector | CSI1_B2B | MIPI B2B Connector for 8M & 13M Camera |
| PCIED-X1 | PCIe x1 Connector | SPI_BIOS1 | Carrier Board BIOS Socket (SOIC) |
| M2 | M.2 Key-E Connector | BAT1 | Coin battery holder |
| MPCIE_C | Mini PCIe Connector | BAT2 | Smart battery Connector |
| SIM | SIM card Connector | LINEOUT_1 | I2S Headphone Connector |
| LVDS1 | LVDS1 Connector | MIC_1 | I2S MIC In Connector |
| LVDS0 | LVDS0 Connector | CSI1_FPC | MIPI FPC Connector for 8M & 13M Camera |
| LVDS1_INVERTER | LVDS1 Invertor Connector | CSI0_FPC | MIPI FPC Connector for 2M Camera |
| LVDS0_INVERTER | LVDS0 Invertor Connector | CN5 | I2S2 Connector |
| SPI_BIOS2 | Carrier Board BIOS Socket (QFN) | CN17 | I2S0 Connector |
| SD | SD Card Connector |
Rear I/O
[]
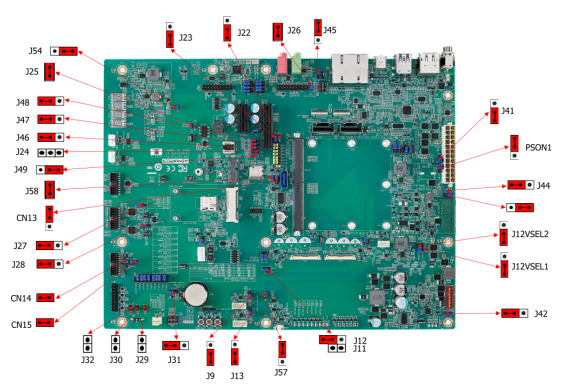
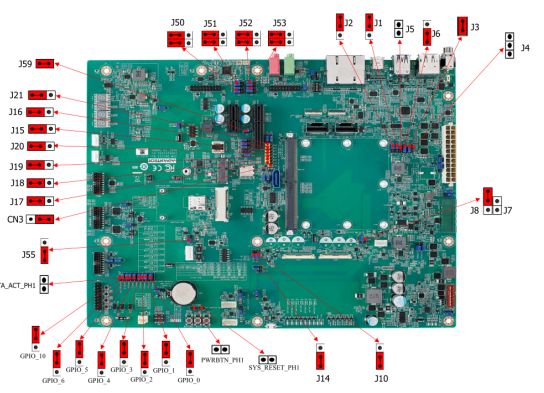
Jumper 位置( Jumper Locations)
[ ]
[
]
[ ]
]
| Lable | Function | Lable | Function |
| BTN3 | Sleep Button | J14 | EDP1/LVDS1 Hot-Plug Detect Selection Header |
| BTN1 | Power Button | J56 | Standby Voltage Control Header |
| BTN2 | Reset Button | J44 | Module +3.3V/+5V Power Selection Header |
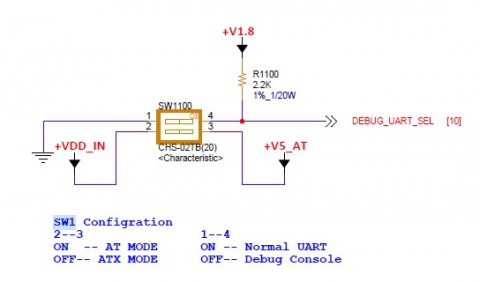
| SW4 | BOOT SELECT Switch | PSON1 | AT/ATX Selection Header |
| LID1 | LID Switch | SPI_CN1 | SPI Header |
| J30 | Enable Battery Low# Header | CN14 | For CAN Bus port0 Terminal Resistor |
| M2E_DISABLE_N1 | M.2 Wireless Disable | CN15 | For CAN Bus port1 Terminal Resistor |
| J29 | SMB Alert Enable Header | J3/J4 | DP0 EQ0 Selection |
| CN9 | Header For GPIO Test | J5/J6 | DP0 EQ1 Selection |
| J7/J8 | LVDS0 Power Selection Header | J58 | PCIE_B_CKREQ# Selection |
| J11/J12 | LVDS1 Power Selection Header | J59 | PCIE_A_CKREQ# Selection |
| J9 | LVDS0 Inverter Power Selection Heade | GPIO_0 | GPIO0/CAM0_PWR# Selection |
| J10 | EDP0/LVDS0 Hot-Plug Detect Selection Header | GPIO_1 | GPIO1/CAM1_PWR# Selection |
| J26 | HDA/I2S Selection Header | GPIO_2 | GPIO2/CAM0_RST# Selection |
| J1 | DP1/HDMI1 Select | GPIO_3 | GPIO3/CAM1_RST# Selection |
| J13 | LVDS1 Inverter Power Selection Header | GPIO_4 | GPIO4/HDA_RST# Selection |
| J31 | Clear CMOS Header | GPIO_5 | GPIO5/PWM_OUT Selection |
| J25 | SPI Power Header | GPIO_6 | GPIO6/TACHIN Selection |
| SW1 | COM1 mode Select | SATA_ACT_PH1 | SATA act# Header |
| SW2 | COM3 mode Select | PWRBTN_PH1 | Power button Header |
| J41 | Core Power Voltage Control Header | SYS_RESET_PH1 | Reset button Header |
| J2 | DDI1 AUX/DDC Selection |
LED Function List
| Location | Function |
| MODULE_VIN_LED1 | WDT_TIME_OUT# Indicate |
| MODULE_5V_LED | Module 5V Indicate |
| MODULE_VIN_LED | Module +V_MOD_IN Indicate |
| RESET_OUT_LED | RESET_OUT Indicate |
| RESET_OUT_LED | CARRIER_STBY Indicate |
| CARRIER_PWR_ON_LED | CARRIER_PWR_ON Indicate |
| MODULE_3P3V_LED | Module 3.3V Indicate |
| 3P3V_LED | Carrier Board +V3.3 Indicate |
| 5V_LED | Carrier Board +V5 Indicate |
| 5V_DUAL_LED | Carrier Board +V5SB Indicate |
| 3P3V_DUAL_LED | Carrier Board +V3.3SB Indicate |
| 5VA_LED | Carrier Board +V5D_MOD Indicate |
| SATA_LED | SATA Indicate |
| SOM_LED | SOM BOM Indicate |
| RISC_LED | RISC BOM Indicate |
Switch Settings
- [SW4]
- [LID1]
- [SW5]
- [SW1]
- [SW3]
**机械尺寸 (**Mechanical Characteristics)
AOM-5521
快速入门 (Quick Start)
Linux 燒錄方法 (Linux Flash eMMC Method)
使用Flash tool 燒錄鏡像到eMMC (Flash image into eMMC by Flash Tools)
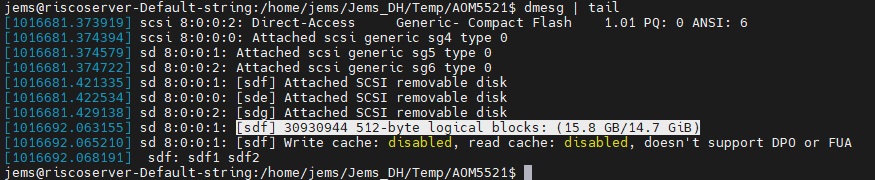
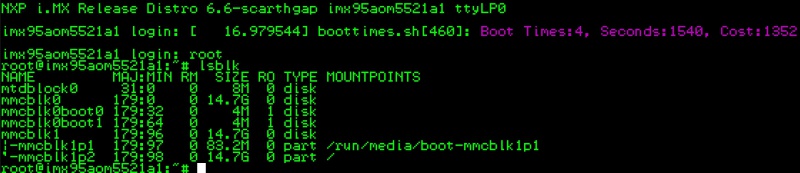
Step0: 檢查SD卡在Linux 環境的代號 (check SD card symbol in Linux system)
[ ]
Step1: 創造一張可開機的SD 卡 (Create a bootable SD card)
]
Step1: 創造一張可開機的SD 卡 (Create a bootable SD card)
Command :
$ sudo dd if=5521A1AIM38LIVG0009_iMX95_8G_2025-03-06.img of=/dev/sdf bs=1M conv=fsync status=progress
[ ]
]
Step2: 將可開機的SD 卡插入底板SD卡卡槽(Plug the SD card into Carrier board 's SD card slot)
[ ]
]
Step4: 確認開機選擇指撥開關
SD 卡開機模式: (2, 3:on, others off)
eMMC 開機模式: (1: on, others off)
[ ]
]
Step3:打開電源 和 終端機 (Turn on the Power & Terminal)
[ ]
]
Step4: 下載flash tools image檔案,並複製到U盤中(Download and copy the flash tool image file, then copy to USB Disk), USB Disk use the exFAT file system for an example.
Step5: 將U盤連接到AOM-5521系統, 解壓縮image檔(Connect USB Disk to the AOM-5521 system, then unzip the flash tool image file)
解壓縮(Unzip/tar the file), 先設定系統時間(setup system time first), tar解壓縮加入--no-same-owner參數(tar + --no-sam-owner)
# date -s "2025-05-21 16:21:00"
# tar zxf 5521A1AIM38LIVG0009_iMX95_8G_flash_tool.tgz --no-same-owner
[ ]
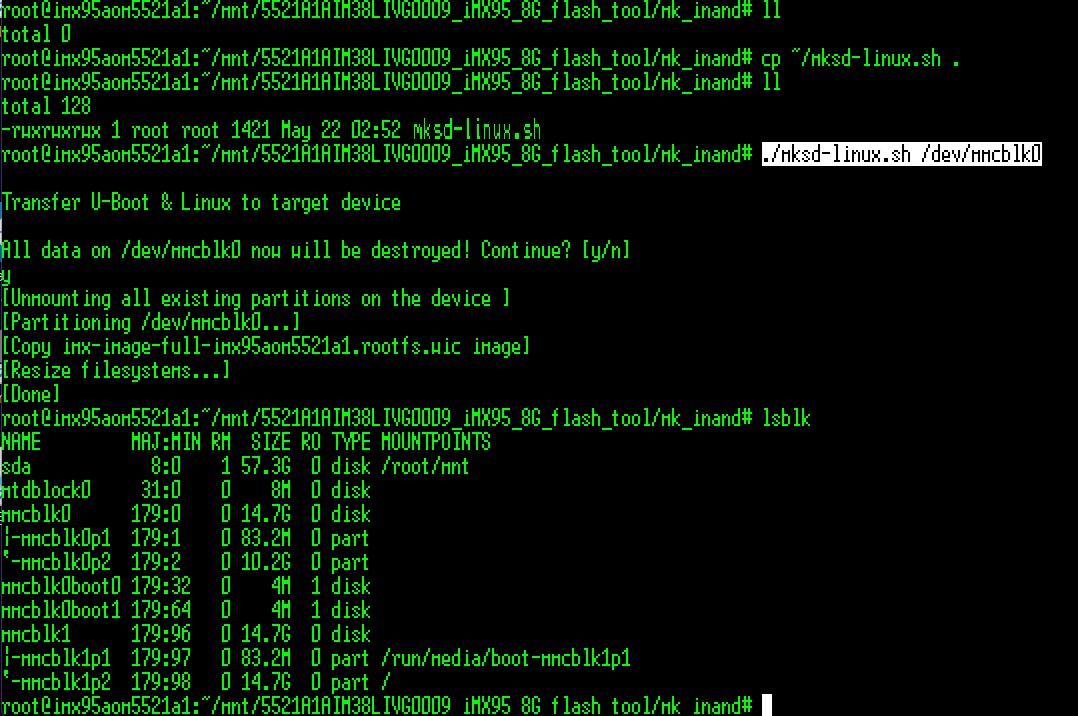
5. 將U盤連接到AOM-5521系統, 進入flsah tool下的mk_inand資歷夾, 執行指令./mksd-linux.sh /dev/mmcblk0燒錄image到eMMC(Connect USB Disk to AOM-5521 system, browser to mk_inand folder and execute flash shell script "./mksd-linux.sh /dev/mmcblk0"
]
5. 將U盤連接到AOM-5521系統, 進入flsah tool下的mk_inand資歷夾, 執行指令./mksd-linux.sh /dev/mmcblk0燒錄image到eMMC(Connect USB Disk to AOM-5521 system, browser to mk_inand folder and execute flash shell script "./mksd-linux.sh /dev/mmcblk0"
如果mk_inand資料夾下沒有mksd-linux.sh檔案, 請到以下連結下載並複製到mk_inand下(Please download the mksd-linux.sh file from the link below if there is no script file in mk_inand deiectory)
Download mksd-linux.sh in <https://github.com/ADVANTECH-Corp/RISC_tools_scripts/blob/mickledore/imx8/mksd-linux.sh>
| AOM-5521 | |
| SD card | /dev/mmcblk1 |
| eMMC | /dev/mmcblk0 |
# ./mksd-linux.sh /dev/mmcblk0
- 切換開機switch 1:on 2,3,4,5,6:off來設定成從eMMC開機(Change boot switch to "1:on 2,3,4,5,6:off" to boot from eMMC. Reboot system).
Debug 串口調試 (Debug port Setting)
Debug port output:
| AOM-5521 CPU | Linux device node | AOM-5521 golden finger | DB5901 | DB2510 |
| UART5 | /dev/ttyLP4 | SER2 | CN15B down | COM3 |
| UART1: A core | /dev/ttyLP0 | SER3 | COM3 | COM4 |
| UART6 | /dev/ttyLP5 | SER0 | CN15A up | COM1 |
| UART2: M core | SER1 | COM1 | COM2 |
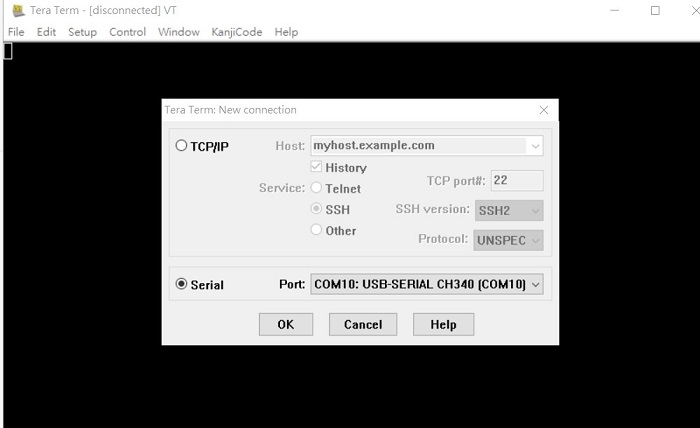
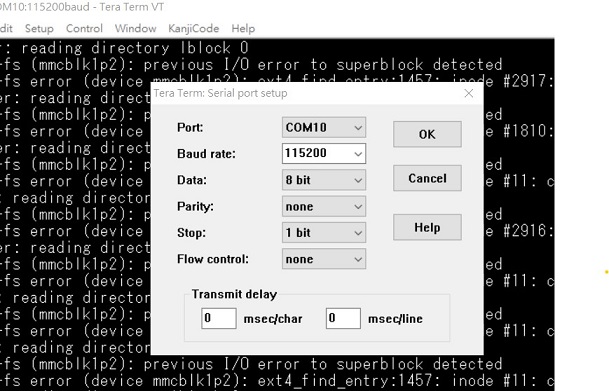
以 Tera Term 为例介绍如何使用串口调试功能
   Baud Rate波特率:115200
   Data 数据位:8
   Parity 奇偶校验:无
   Stop 停止位:1
   Flow Control流控:无
Tera Term Tool
[ ]
]
[ ]
]
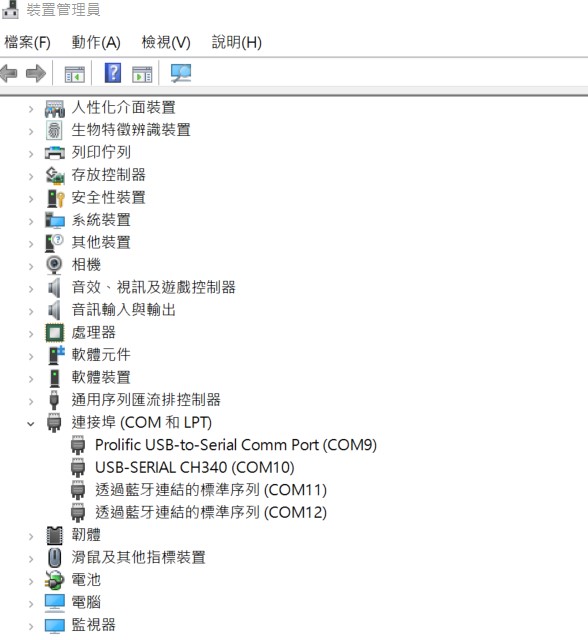
Check the Serial port in Device Manager (查看PC端的串口号):
if you can not identify the Serial device, please check your serial driver.
[ ]
]
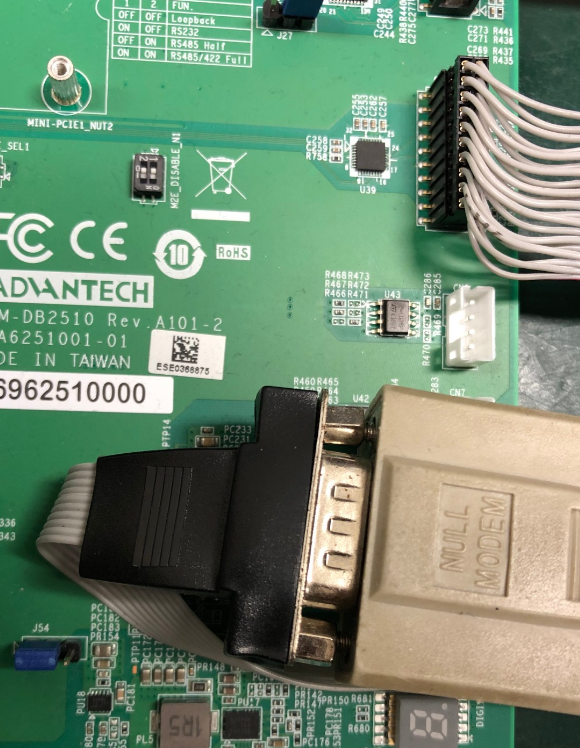
Debug port connection (串口連接)
[ ]
Log into Terminal Tool (进入串口调试终端):
]
Log into Terminal Tool (进入串口调试终端):
[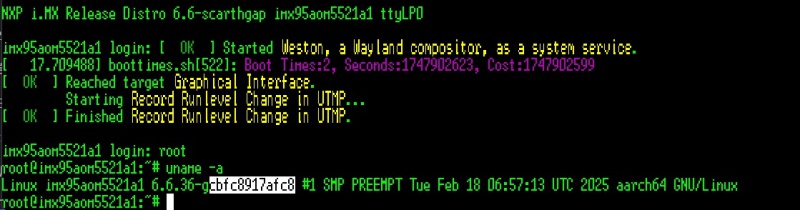 ]
]
Linux系统的基本使用(Linux System Basic Operating Method)
UUU 使用方法(USB Connection (OTG port))
Download uuu tool: Releases · nxp-imx/mfgtools
Inofrmation for uuu: Home · nxp-imx/mfgtools Wiki
Version for tested:
uuu (Universal Update Utility) for nxp imx chips -- libuuu_1.5.182-0-gda3cd53
[ ]
]
The “imx-boot-imx95aom5521a1-8G.bin-flash_all” file is included in 5521A1AIM38LIVG0XXX_iMX95_8G_imx-boot.tgz. XXX is the version.
The "imx-image-full-imx95aom5521a1.rootfs.wic" file included in 5521A1AIM38LIVG0XXX_iMX95_8G_flash_tool/tgz.
U-Boot image: imx-boot-imx95aom5521a1-8G.bin-flash_all
Complete Image: imx-image-full-imx95aom5521a1.rootfs.wic
[]
Connect USB cable to USB OTG port.
Change the boot switch to "4:on 1,2,3,5,6:off" to boot from force recovery mode.
Type the command below to flash eMMC:
$ sudo ./uuu_aom5521 -b emmc_all 5521A1AIM38LIVG0009_iMX95_8G_imx-boot/imx-boot-imx95aom5521a1-8G.bin-flash_all 5521A1AIM38LIVG0009_iMX95_8G_flash_tool/image/imx-image-full-imx95aom5521a1.rootfs.wic
[ ]
]
Display Setting (ROM-5722)
Ex:
list dtb files in u-boot:
=> fatls mmc 0
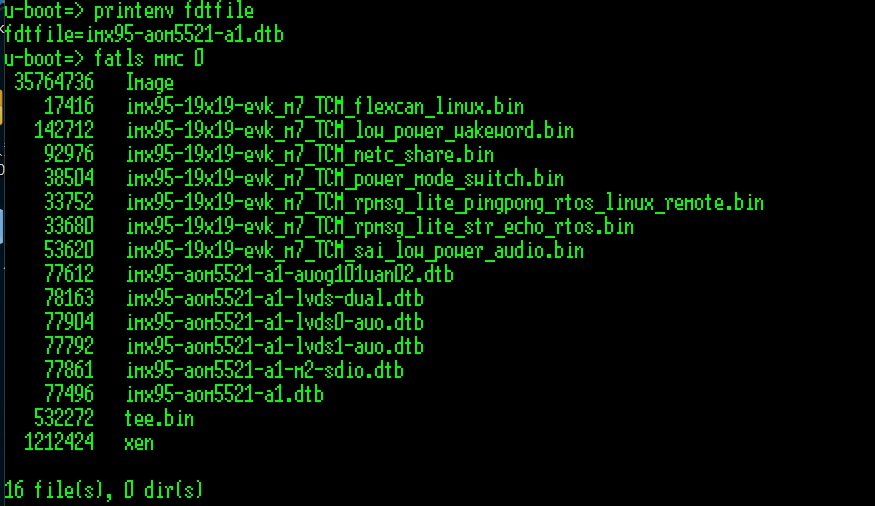
=> setenv fdtfile imx95-aom5521-a1-lvds0-auo.dtb
U-boot Command :
- Display
- HDMI (default)
- imx95-aom5521-a1.dtb
- LVDS
- g070vw01(LVDS0)
- imx95-aom5521-a1-lvds0-auo.dtb
- g070vw01(LVDS1)
- imx95-aom5521-a1-lvds1-auo.dtb
- g215hvn01(DUAL LVDS)
- imx95-aom5521-a1-lvds-dual.dtb
- g070vw01(LVDS0)
- DSI
- auog101uan02(DSI)
- imx95-aom5521-a1-auog101uan02.dtb
- auog101uan02(DSI)
- HDMI (default)
- Camera
- OV5640 (default)
- imx95-aom5521-a1.dtb
- OV5640 (default)
Audio使用方法(Audio Test Method)
Audio codec (sgtl5000): Connect ROM-EG51 to AUDIO pin header
DB-2520 has two I2S pin heaters CN5 and CN17.
Test on DB2510: CN17
J26: no jumper
SW3: 1:off, 2-on
J50~J53: pin13
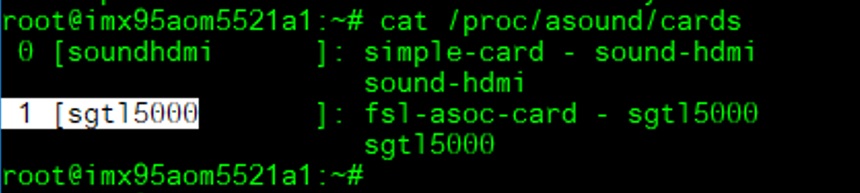
Check audio codec:
cat /proc/asound/cards
[ ]
]
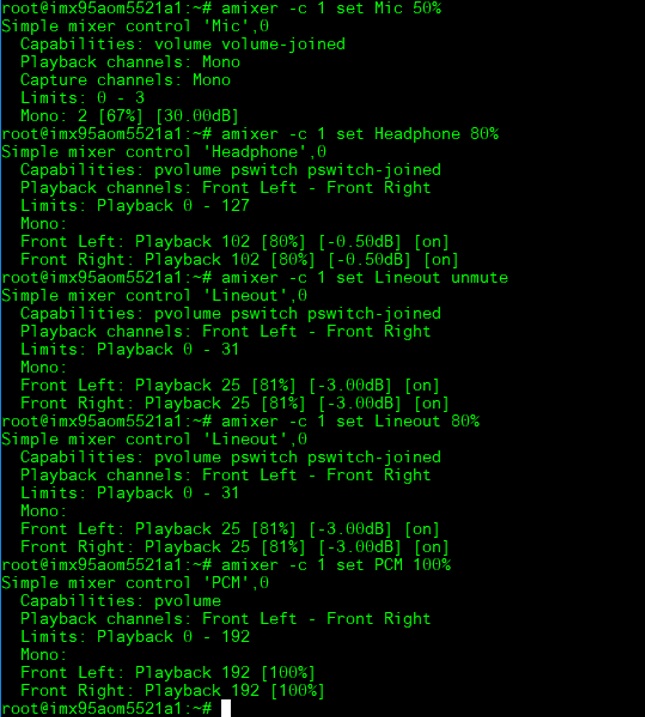
Set MIC and headphones: The sgtl5000 is card 1:
amixer -c 1 set Mic 50%
amixer -c 1 set Headphone 80%
amixer -c 1 set Lineout unmute
amixer -c 1 set Lineout 80%
amixer -c 1 set PCM 100%
[ ]
]
Record and playback:
arecord –D plughw:1,0 -t wav -c 2 -r 44100 -d 10 /tmp/mic.wav
[ ]
]
aplay -D plughw:1,0 /tmp/mic.wav
[ ]
]
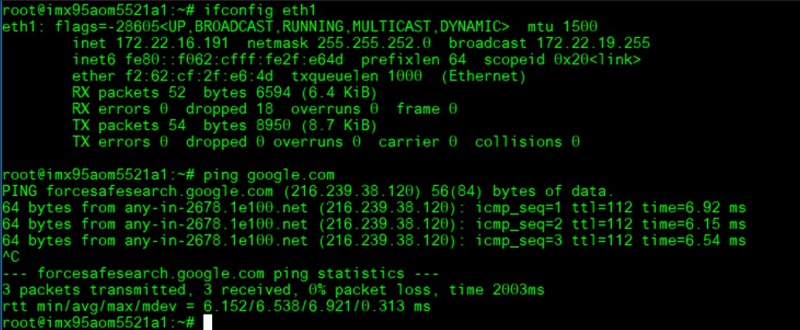
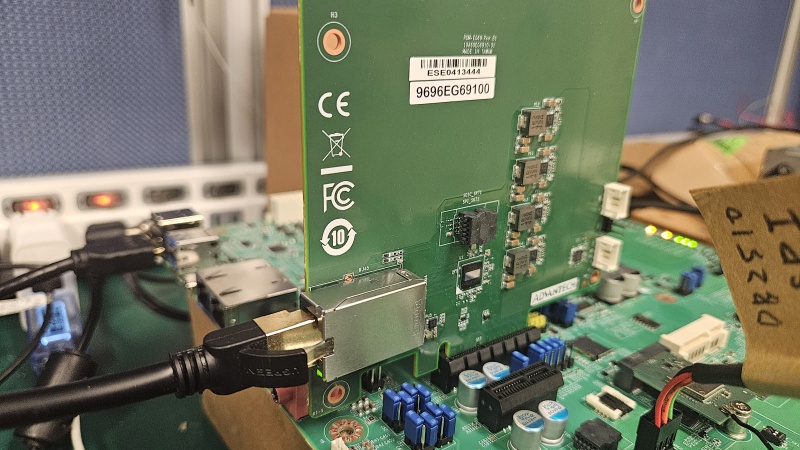
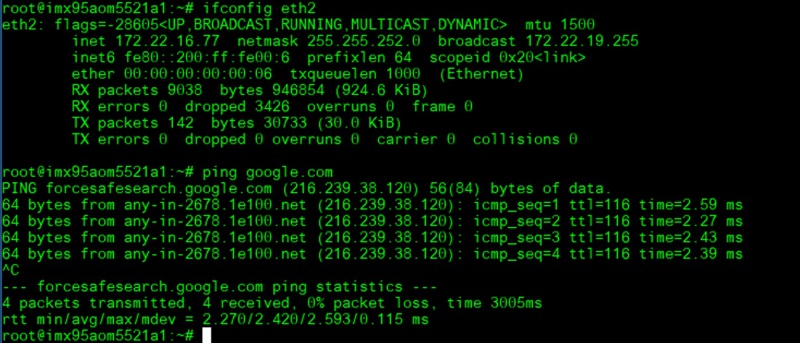
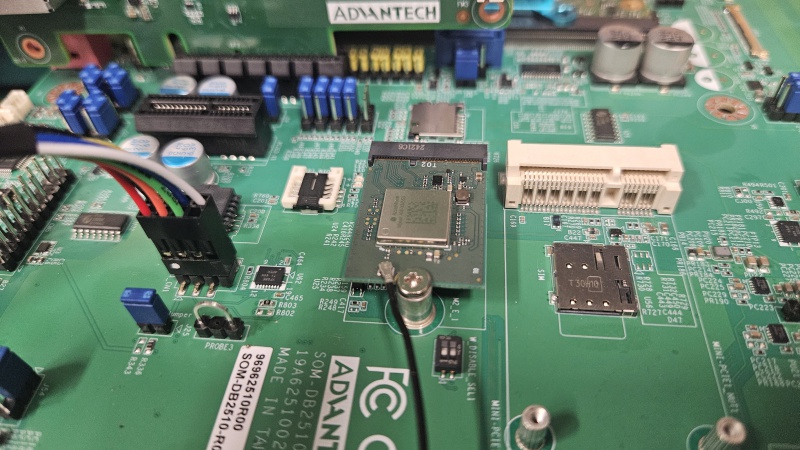
乙太網路使用方法(Ethernent Testing Method)
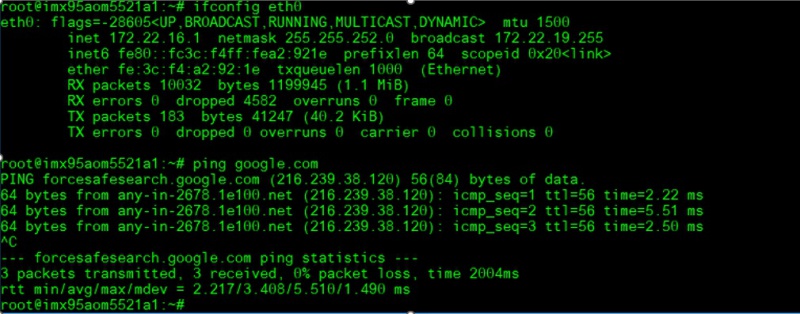
Command: ifconfig
Command: Ping - I eth1 8.8.8.8 or Ping - I eth0 8.8.8.8
**[ ]
]
**[ ]
]
10 G:
**[ ]
]
**[ ]
]
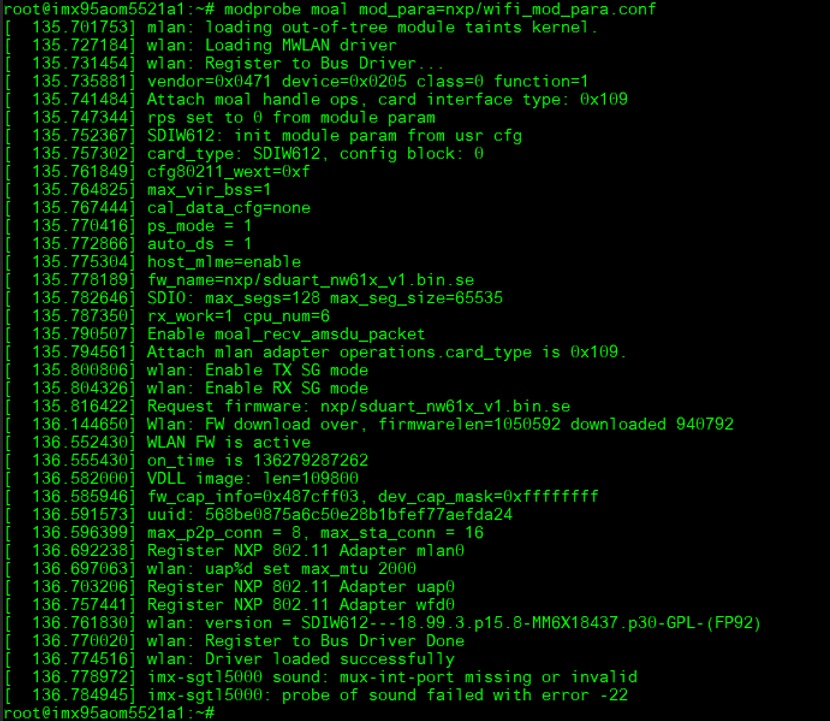
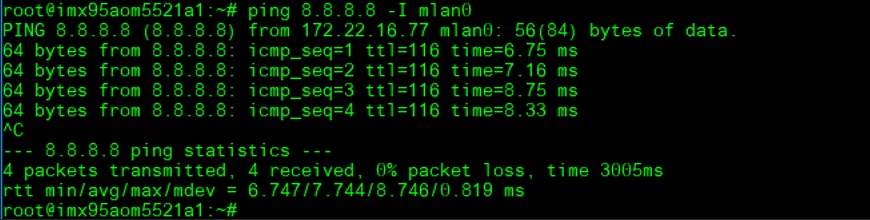
WiFi使用方法(WIFI Testing Method)
Test with AIW-167(M.2): Switch SOM-DB2510 J15~J21 to 1 and 2.
**[ ]
Load dtb file in u-boot:
]
Load dtb file in u-boot:
=> setenv fdtfile imx95-aom5521-a1-m2-sdio.dtb; boot
Install Driver:
modprobe moal mod_para=nxp/wifi_mod_para.conf
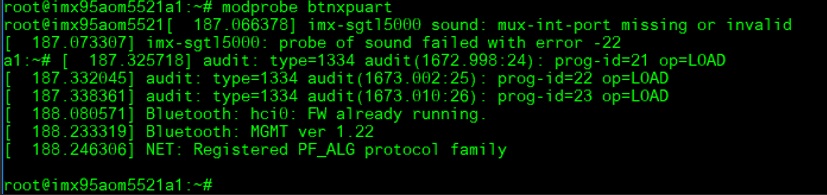
modprobe btnxpuart
[ ]
]
[ ]
]
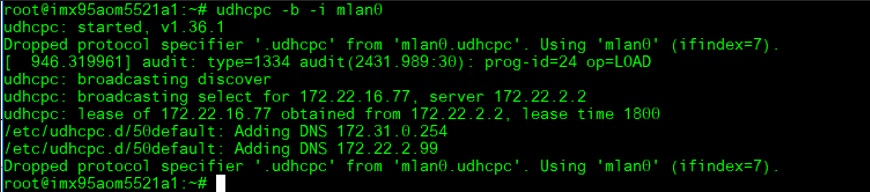
WiFi Test:
AP PW: xxxxxxxx
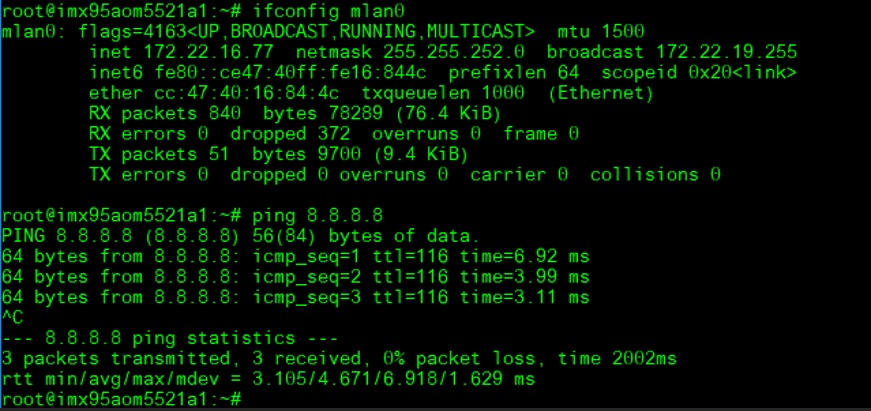
ifconfig mlan0 up
wpa_passphrase ASUS_RISC_SOM_ESBC_2.4 xxxxxxxx > /tmp/wpa.conf && wpa_supplicant -d -B -i mlan0 -c /tmp/wpa.conf
udhcpc -b -i mlan0
ping 8.8.8.8
 ]
]
[ ]
]
[ ]
]
[ ]
]
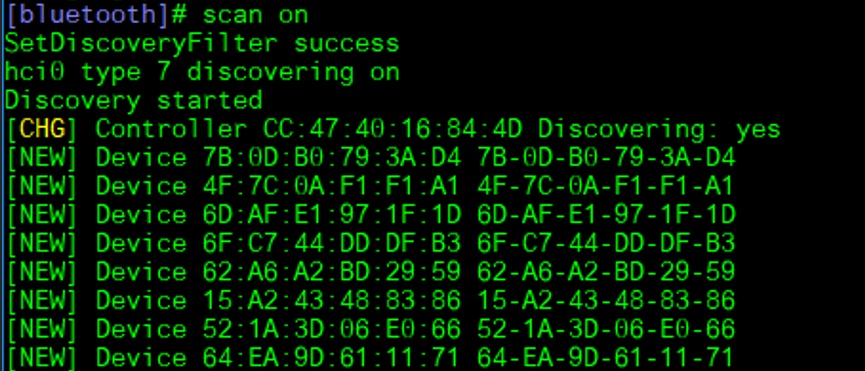
藍芽使用方法(Bluetooth Operating Method)
Test AIW-167 BT: Follow the above WiFi test to install the driver and run the BT test.
BT Test:
hciconfig hci0 up
bluetoothctl
discoverable on
pairable on
scan on
 ]
]
[
Device 84:C5:A6:D3:AF:E4 NB090726
scan off
pair 84:C5:A6:D3:AF:E4
[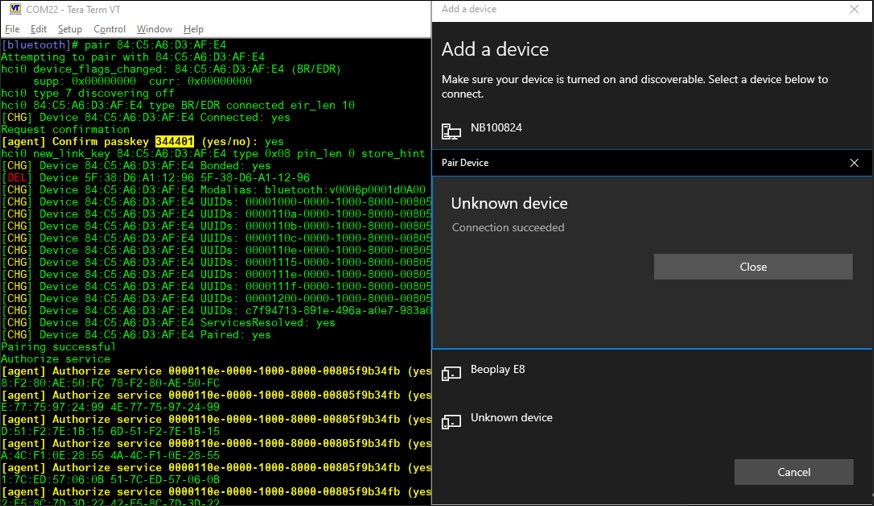 ]
]
connect 84:C5:A6:D3:AF:E4
[ ]
]
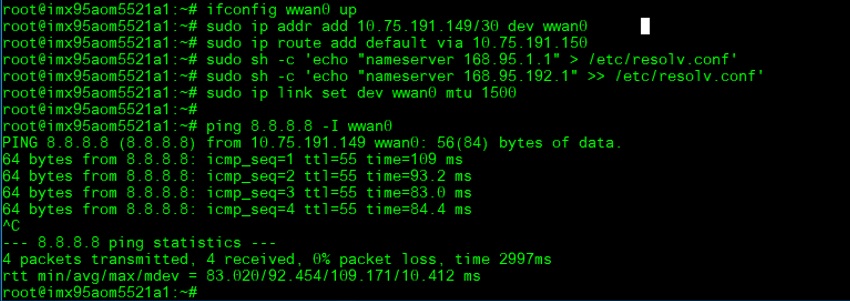
4G使用方法(4G Testing Method)
Test with AIW-344(Full-size mPCIe USB interface): Connect to PCIe x4 slot and mini USB to TypeA
Test by MBIM mode:
Enable AIW-344 module MBIM mode:
echo -e "AT+GTUSBMODE=29\r" > /dev/ttyUSB1
systemctl stop connman
systemctl disable connman
(System Reboot)
[ ]
]
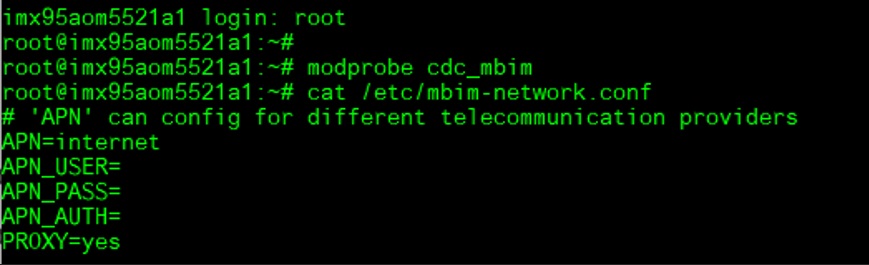
Install driver and confige mbim network:
modprobe cdc_mbim
vi /etc/mbim-network.conf
'APN' can config for different telecommunication providers
APN=internet
APN_USER=
APN_PASS=
APN_AUTH=
PROXY=yes
[ ]
]
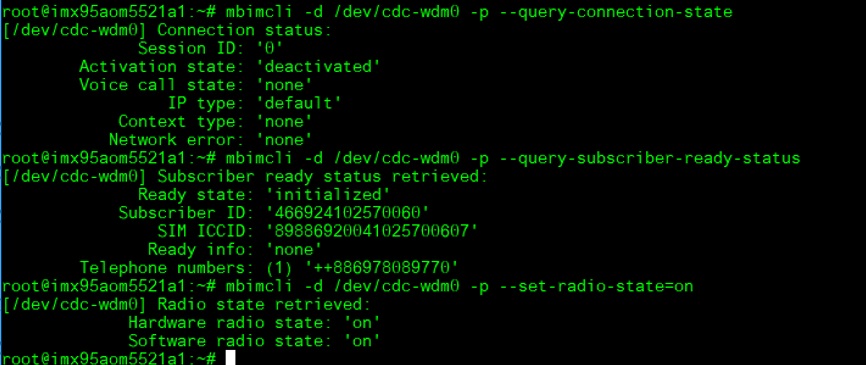
mbimcli -d /dev/cdc-wdm0 -p --query-connection-state
mbimcli -d /dev/cdc-wdm0 -p --query-subscriber-ready-status
mbimcli -d /dev/cdc-wdm0 -p --set-radio-state=on
[ ]
]
If you need to auth by PIN (If necessary): This step is not necessary
mbimcli -d /dev/cdc-wdm0 -p --enter-pin=0000
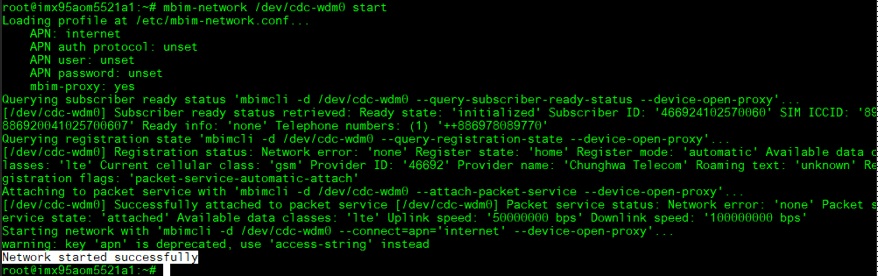
mbim-network /dev/cdc-wdm0 start
[ ]
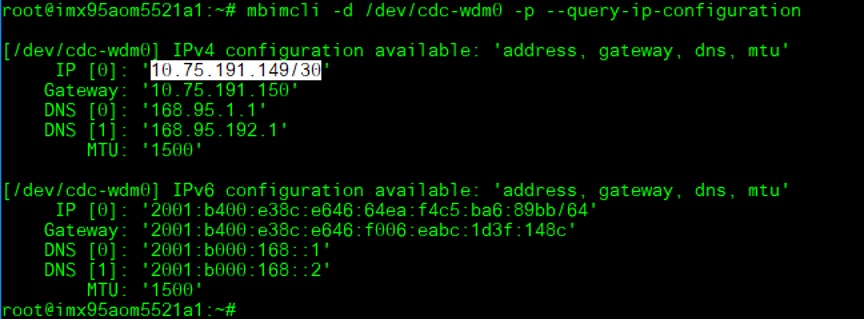
Query the IP addr information:
]
Query the IP addr information:
mbimcli -d /dev/cdc-wdm0 -p --query-ip-configuration
[ ]
]
Reference the above query result for IP configuration to set up:
ifconfig wwan0 up
sudo ip addr add 10.75.191.149/30 dev wwan0
sudo ip route add default via 10.75.191.150
sudo sh -c 'echo "nameserver 168.95.1.1" > /etc/resolv.conf'
sudo sh -c 'echo "nameserver 168.95.192.1" >> /etc/resolv.conf'
$ sudo ip link set dev wwan0 mtu 1500
Test Ping:
ping 8.8.8.8 -I wwan0
[ ]
]
GPIO使用方法(GPIO Operating Method)
GPIO pin:
| SMARC Pin# | SMARC Pin Name | CPU Ball Name | Kernel GPIO | Default Direction |
| p108 | GPIO0 | GPIO_IO12__GPIO2_IO_BIT12 | 524 | |
| p109 | GPIO1 | SD3_CLK__GPIO3_IO_BIT20 | GPIO1_CAM1_PWR# | |
| p110 | GPIO2 | SD3_CMD__GPIO3_IO_BIT21 | 565 | |
| p111 | GPIO3 | SD3_DATA0__GPIO3_IO_BIT22 | GPIO3_CAM1_RST# | |
| p112 | GPIO4 | SD3_DATA1__GPIO3_IO_BIT23 | 567 | |
| p113 | GPIO5 | GPIO_IO16__GPIO2_IO_BIT16 | 528 | |
| p114 | GPIO6 | SD3_DATA2__GPIO3_IO_BIT24 | 568 | |
| p115 | GPIO7 | SD3_DATA3__GPIO3_IO_BIT25 | 569 | |
| p116 | GPIO8 | PCA6416_P0_5 | 653 | |
| p117 | GPIO9 | PCA6416_P0_4 | 652 | |
| p118 | GPIO10 | PCA6416_P0_3 | 651 | |
| p119 | GPIO11 | PCA6416_P0_2 | 650 | |
| s142 | GPIO12 | PCA6416_P0_1 | 649 | |
| s123 | GPIO13 | PCA6416_P0_0 | 648 |
Loop-back Test (Take GPIO0 and GPIO2 as examples)

Step 1: Connect GPIO0 and GPIO2, change GPIO_0 and GPIO_2 to pin 12
Step 2: Export GPIO interface

root@imx95aom5521a1: ~# echo 524 > /sys/class/gpio/export
root@imx95aom5521a1: ~# echo 565 > /sys/class/gpio/export

Step 3: Set direction

root@imx95aom5521a1: ~# echo out > /sys/class/gpio/gpio1/direction
root@imx95aom5521a1: ~# echo in > /sys/class/gpio/gpio2/direction

Step 4: Read value and set output value then check

root@imx95aom5521a1: ~# cat /sys/class/gpio/gpio2/value
0
root@imx95aom5521a1: ~# echo 1 > /sys/class/gpio/gpio1/value
root@imx95aom5521a1: ~# cat /sys/class/gpio/gpio2/value
1
Watch Dog測試方法(Watch Dog Test Method)
System will reboot after 3 sec:
/unit_tests/Watchdog/wdt_driver_test.out 1 2 0
[ ]
]
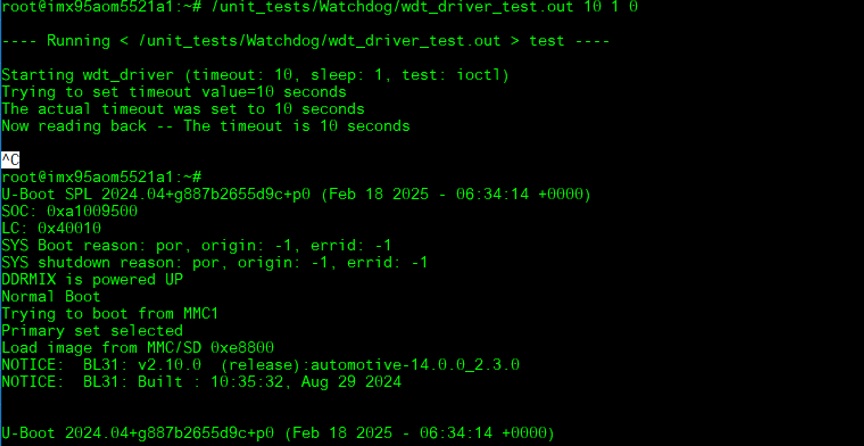
Timeout 10s:
System will not reboot. Watchdog can be refreshed when feed dog before it timeout.
/unit_tests/Watchdog/wdt_driver_test.out 10 1 0
- Ctrl + C ==> System will reboot after 10 sec. Watchdog does not refresh after it timeout.
[ ]
]
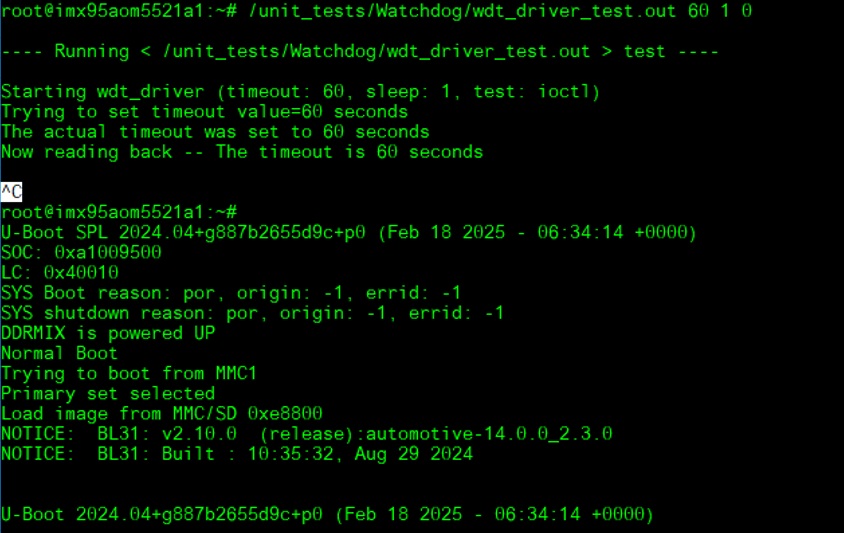
Timeout 60s:
System will not reboot. Watchdog can be refreshed when feed dog before it timeout.
/unit_tests/Watchdog/wdt_driver_test.out 60 1 0
- Ctrl + C ==> System will reboot after 10 sec. Watchdog does not refresh after it timeout.
[ ]
]
串口使用方法(Serial Port Operating Method)
| AOM-5521 CPU | Linux device node | AOM-5521 golden finger | DB5901 | DB2510 |
| UART5 | /dev/ttyLP4 | SER2 | CN15B down | COM3 |
| UART1: A core | /dev/ttyLP0 | SER3 | COM3 | COM4 |
| UART6 | /dev/ttyLP5 | SER0 | CN15A up | COM1 |
| UART2: M core | SER1 | COM1 | COM2 |
RS-232 Test
CN15上(SER0/UART6): /dev/ttyLP5
CN15下(SER2/UART5): /dev/ttyLP4
DB2510 COM4 (A core debug/SER3/UART1): /dev/ttyLP0
DB2510 COM1 (M core debug/SER1/UART2):
SW7 Setting (SW7設置)
[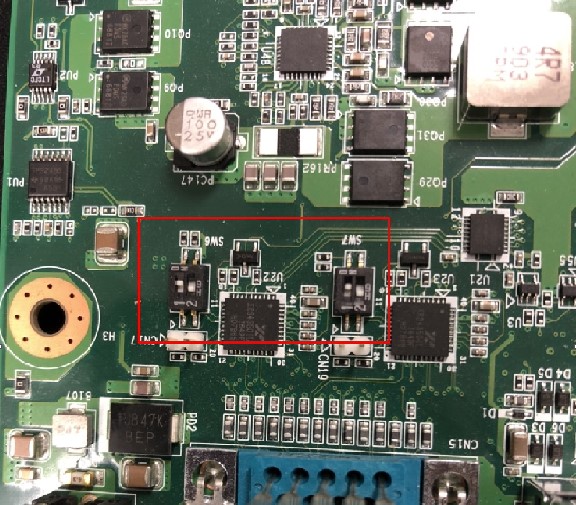 ]
]
MODE1 MODE0
0 0 LOOPBACK
0 1 RS232
1 0 RS485
1 1 RS422
Loopback test (eg. ttymxc0)
Connect loopback test tool
- stty ‐F /dev/ttyLP4 115200
stty ‐F /dev/ttyLP4 ‐echo
cat /dev/ttyLP4 &
echo test > /dev/ttyLP4
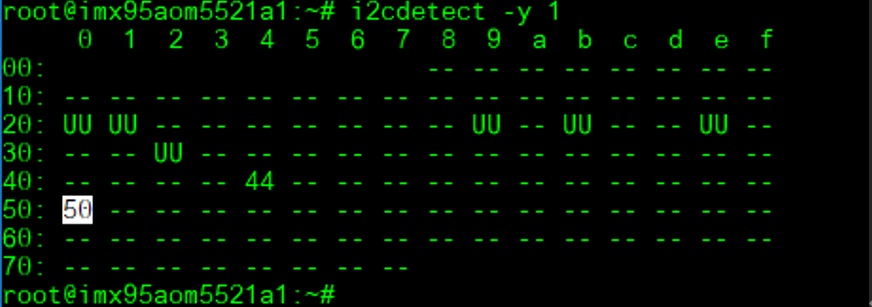
I2C測試方法(I2C Test Method)
I2C test: Check I2C device
(0x50 EEPROM on module)
i2cdetect -y 1
[ ]
]
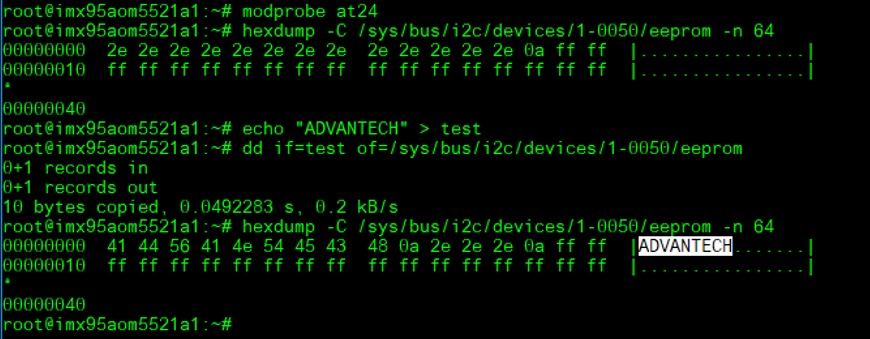
Write/Read/Verify eeprom Hi/Low byte
**# modprobe at24
echo "ADVANTECH" > test
dd if=test of=/sys/bus/i2c/devices/1-0050/eeprom
hexdump -C /sys/bus/i2c/devices/1-0050/eeprom -n 64**
[ ]
]
RTC測試方法(RTC Test Method)
Disable RTC sync service:
systemctl stop systemd-timesyncd
systemctl disable systemd-timesyncd
[ ]
]
Set system time to current, then write to RTC:
date 021710452022 && hwclock -w && date
[ ]
]
Set one incorrect time, then read time from RTC to verify:
date 010100002000 && hwclock -r && date
[ ]
]
Set the system time from the RTC:
hwclock -s && date
[ ]
]
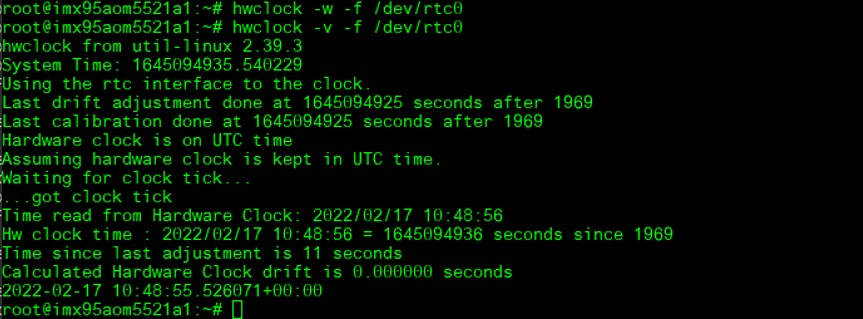
Store into RTC and check RTC current status:
hwclock -w -f /dev/rtc0
hwclock -v -f /dev/rtc0
[ ]
]
Enable RTC sync service:
systemctl enable systemd-timesyncd
systemctl start systemd-timesyncd
[ ]
]
TPM使用方法(TPM Test Method)
Generate Random code
tpm2_getrandom --hex 20
[ ]
]
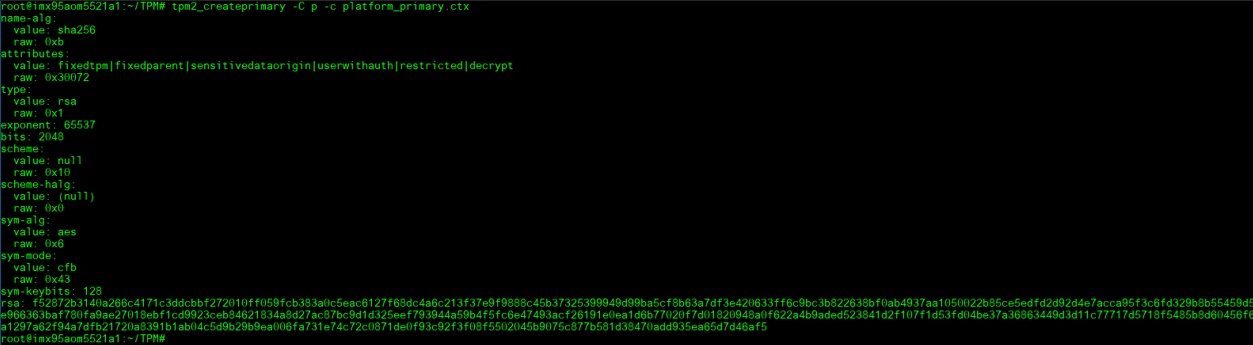
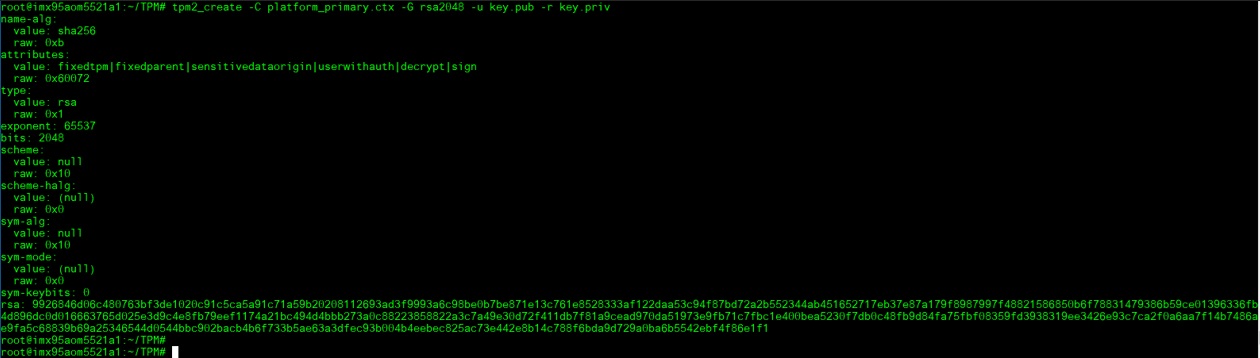
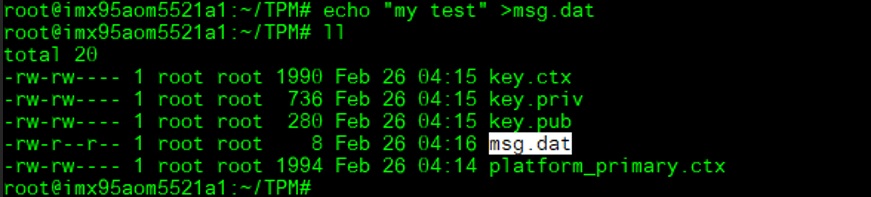
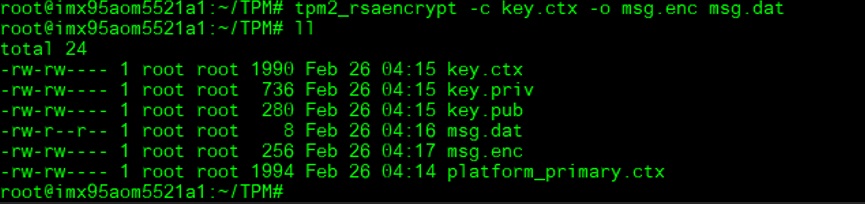
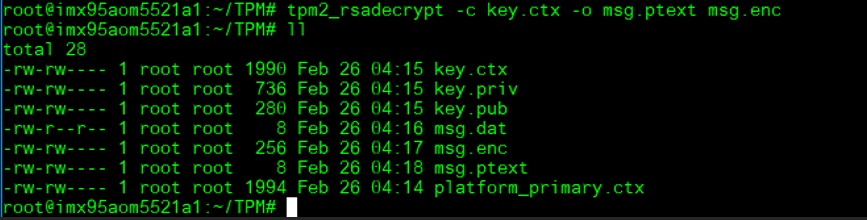
Crypt msg.dat file
tpm2_createprimary -C p -c platform_primary.ctx
tpm2_create -C platform_primary.ctx -G rsa2048 -u key.pub -r key.priv
tpm2_load -C platform_primary.ctx -u key.pub -r key.priv -c key.ctx
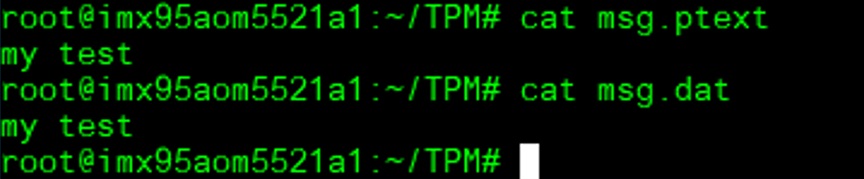
echo "my test" >msg.dat
tpm2_rsaencrypt -c key.ctx -o msg.enc msg.dat
tpm2_rsadecrypt -c key.ctx -o msg.ptext msg.enc
[ ]
]
[ ]
]
[![]() ]
]
[ ]
]
[
[ ]
]
cat msg.ptext
cat msg.dat
[ ]
]
Store data to TPM
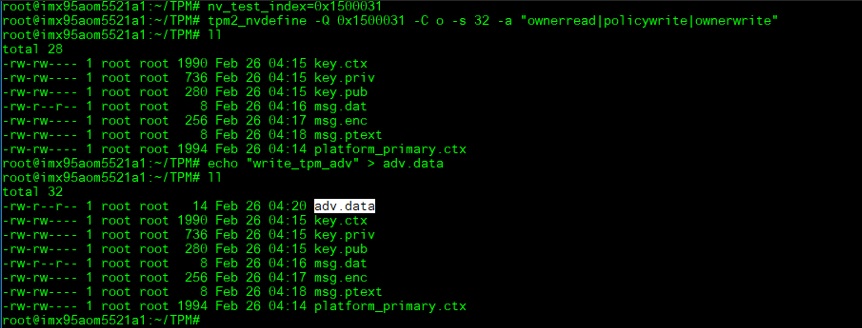
nv_test_index=0x1500031
tpm2_nvdefine -Q 0x1500031 -C o -s 32 -a "ownerread|policywrite|ownerwrite"
echo "write_tpm_adv" > adv.data
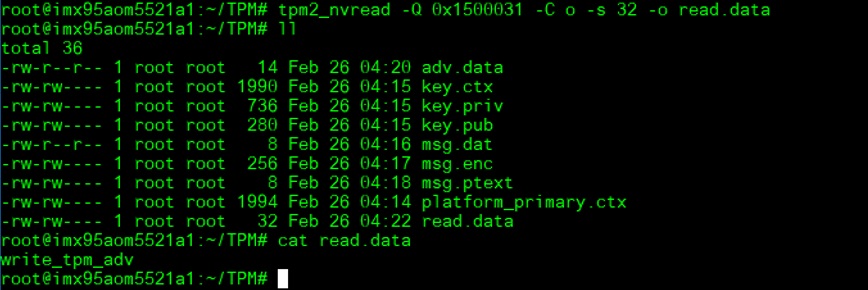
tpm2_nvwrite -Q 0x1500031 -C o -i adv.data
tpm2_nvread -Q 0x1500031 -C o -s 32 -o read.data
cat read.data
[ ]
[
]
[ ]
]
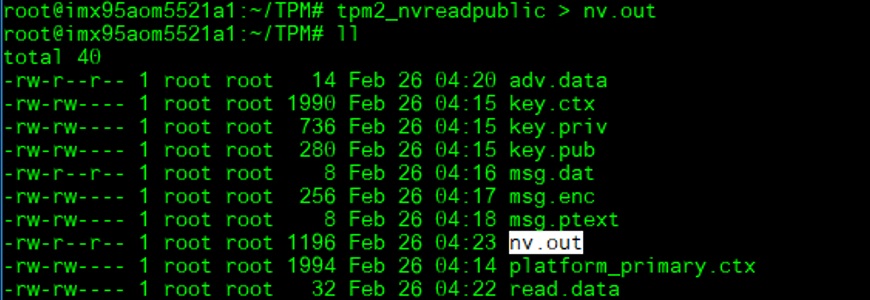
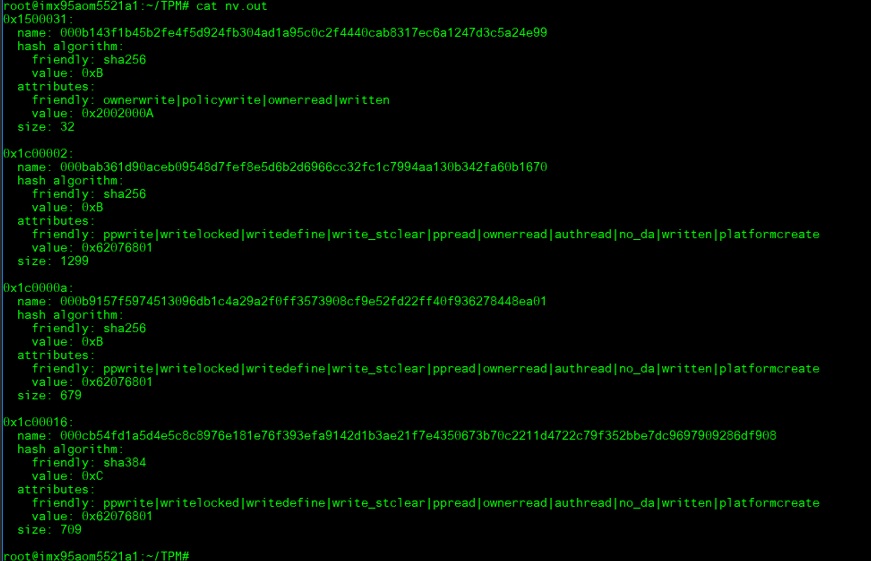
Check TPM store area
tpm2_nvreadpublic > nv.out
cat nv.out
[ ]
]
[ ]
]
SPI BUS功能測試(SPI BUS Function Test)
Storage information:
eMMC: /dev/mmcblk0
SD: /dev/mmcblk1
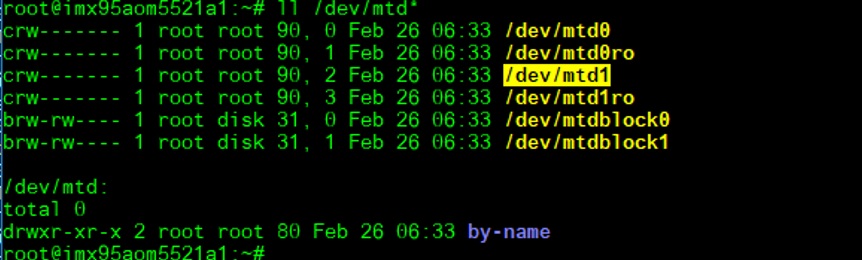
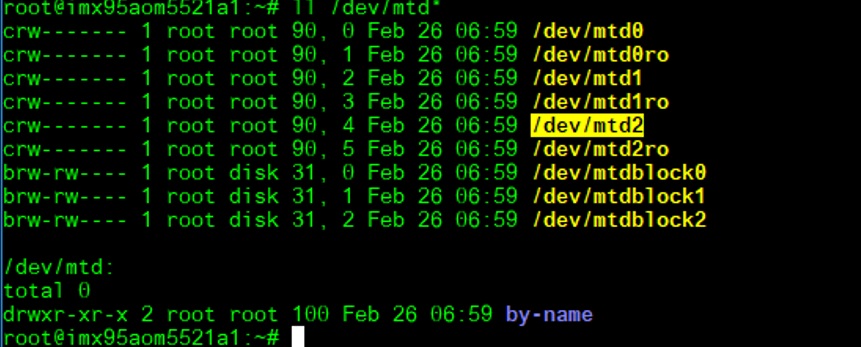
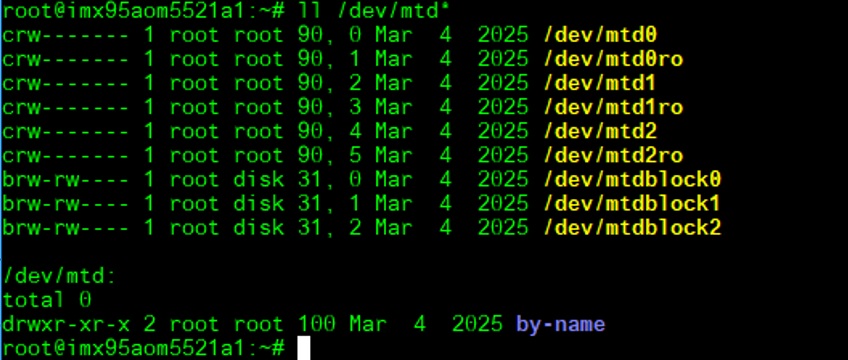
QSPI1: /dev/mtd0
SPI0_0: /dev/mtd1
SPI0_1: /dev/mtd2
SPI1_0: /dev/mtd3
SPI1_1: /dev/mtd4
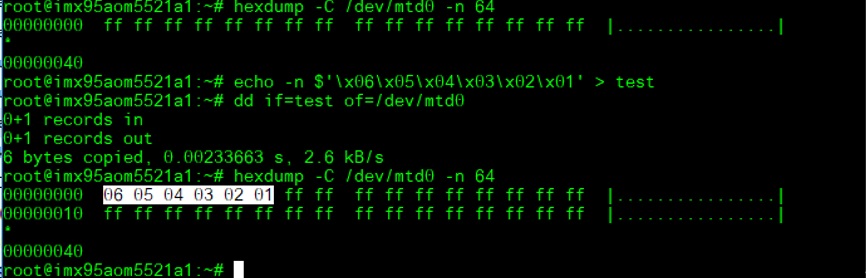
QSPIA (On the SMARC module)
echo -n $'\x06\x05\x04\x03\x02\x01' > test
dd if=test of=/dev/mtd0
hexdump -C /dev/mtd0 -n 64
[ ]
]
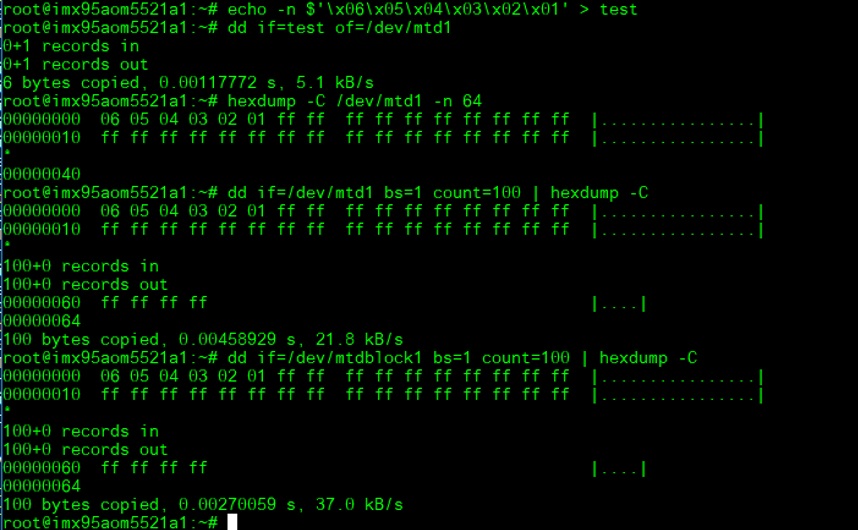
SPI0 test: flash (Winboan 25q64) function:
Place SPI flash to SPI_BIOS1:
J46, J47, J48: pin12
J24: pin 12
(/dev/mtd1)
[ ]
Dump SPI content:
]
Dump SPI content:
echo -n $'\x06\x05\x04\x03\x02\x01' > test
dd if=test of=/dev/mtd1
hexdump -C /dev/mtd1 -n 64
[ ]
]
SPI1(ESPI)(CN10) test: flash (Winboan 25q64) function:
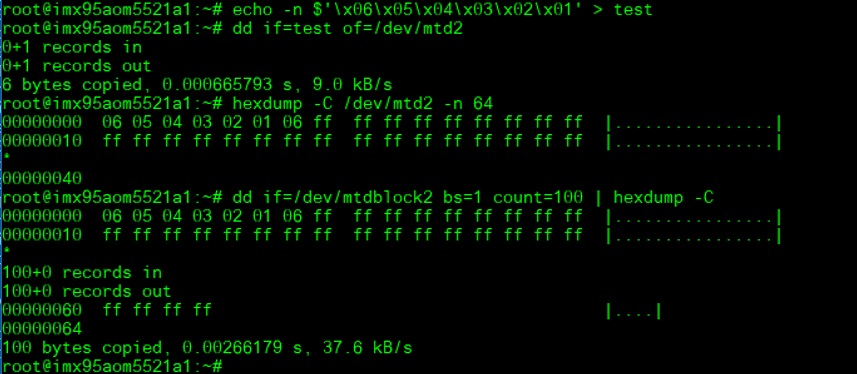
(/dev/mtd2)
[ ]
Dump SPI content:
]
Dump SPI content:
echo -n $'\x06\x05\x04\x03\x02\x01' > test
dd if=test of=/dev/mtd2
hexdump -C /dev/mtd2 -n 64
or
dd if=/dev/mtdblock2 bs=1 count=100 | hexdump -C
[ ]
]
SPI_CN1: Test with ROM-EG70
(Need to rework U62 +V_SPI to +V3.3 for ROM-EG70)
(There are two SPI NOR flash on ROM-EG70)
[ ]
]
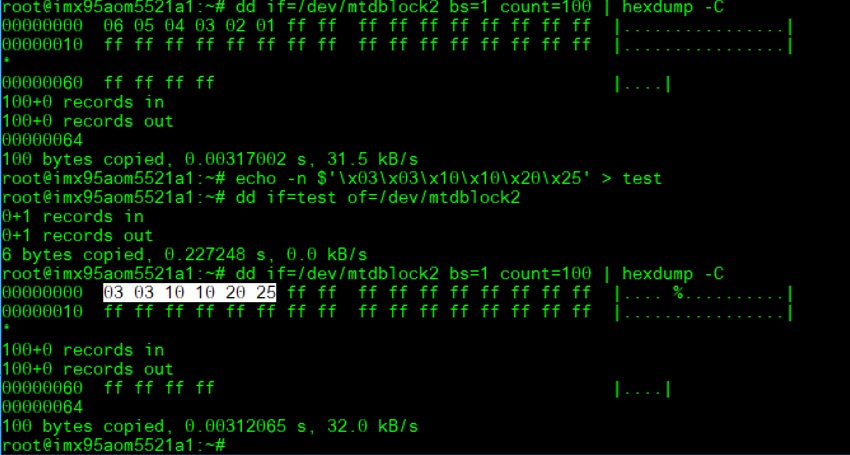
Dump SPI content:
echo -n $'\x03\x03\x10\x10\x20\x25' > test
dd if=test of=/dev/mtdblock1
hexdump -C /dev/mtd1 -n 64
or
dd if=/dev/mtdblock1 bs=1 count=100 | hexdump –C
mtdblock1:
[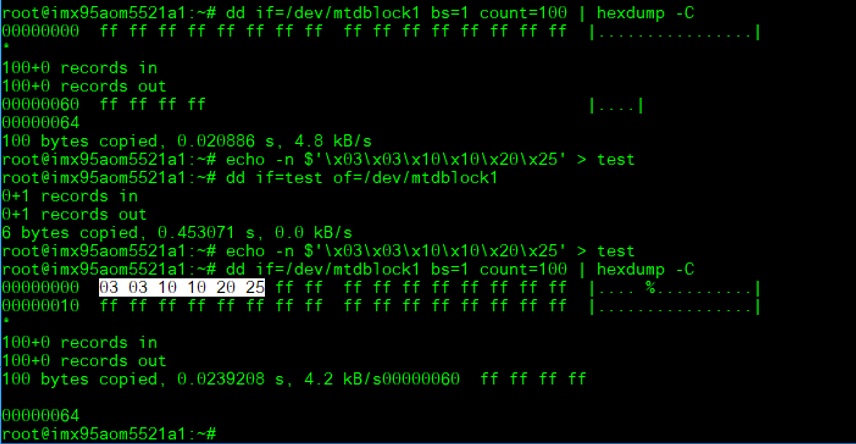 ]
mtdblock2:
]
mtdblock2:
**[ ]
]
CANBUS功能測試(CABBUS Test Method)
Connect: CAN0_R_D- to CAN1_R_D- and CAN0_R_D+ to CAN1_R_D+
CAN0_R_D-: pin3
CAN0_R_D+: pin4
CAN1_R_D-: ping13
CAN1_R_D+: ping14
Set can0 and can1 up:
Check CAN driver
zcat /proc/config.gz | grep FLEXCAN
[ ]
]
ip link set can0 up type can bitrate 12500
ifconfig can0 up
ip link set can1 up type can bitrate 12500
ifconfig can1 up
(candump can0/1)(cansend can0/1)
candump can0 & candump can1 &
cansend can0 1F334455#1122334455667788
cansend can1 1F334455#1122334455667788
[ ]
]
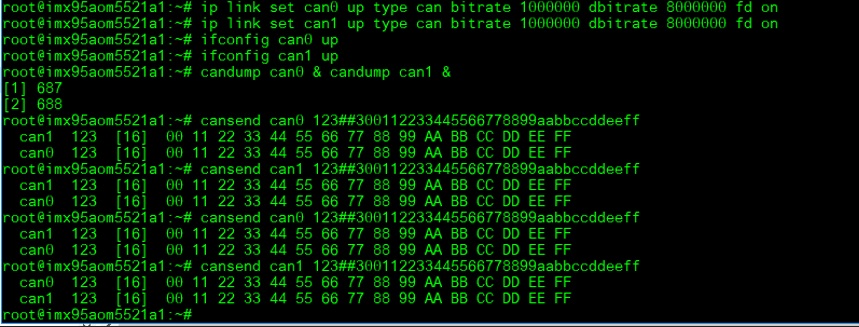
CAN FD:
ip link set can0 up type can bitrate 1000000 dbitrate 8000000 fd on
ip link set can1 up type can bitrate 1000000 dbitrate 8000000 fd on
ifconfig can0 up
ifconfig can1 up
candump can0 & candump can1 &
cansend can0 123##300112233445566778899aabbccddeeff
cansend can1 123##300112233445566778899aabbccddeeff
[ ]
]
MIPI CS功能測試(MIPI CSI Test Method)
AOM-5521 to DB-2510
CSI1: CSI1_FPC(4 lane)
CSI2: CSI0_FPC(2 lane): Not support
Preview(CSI1_FPC):
Connect OV5640 camera to EG-55 CAM2
Connect EG-55 to DB-2510 CSI1_FPC(video0)
OV5640 setup:
media-ctl -l "'ov5640 2-003c':0 ->'csidev-4ad30000.csi':0 [1]"
media-ctl -V "'ov5640 2-003c':0 [fmt: UYVY8_1X16/1920x1080 field:none]"
media-ctl -V "'csidev-4ad30000.csi':0 [fmt: UYVY8_1X16/1920x1080 field:none]"
media-ctl -V "'crossbar':2 [fmt: UYVY8_1X16/1920x1080 field:none]"
media-ctl -V "'mxc_isi.0':0 [fmt: UYVY8_1X16/1920x1080 field:none]"
media-ctl -V "'mxc_isi.2':0 [fmt: UYVY8_1X16/1920x1080 field:none]"
media-ctl -V "'mxc_isi.3':0 [fmt: UYVY8_1X16/1920x1080 field:none]"
media-ctl -V "'mxc_isi.4':0 [fmt: UYVY8_1X16/1920x1080 field:none]"
media-ctl -V "'mxc_isi.5':0 [fmt: UYVY8_1X16/1920x1080 field:none]"
media-ctl -V "'mxc_isi.6':0 [fmt: UYVY8_1X16/1920x1080 field:none]"
media-ctl -V "'mxc_isi.7':0 [fmt: UYVY8_1X16/1920x1080 field:none]"
OV5640 Preview:
gst-launch-1.0 v4l2src device=/dev/video0 ! 'video/x-raw,width=1920,height=1080' ! autovideosink
(Check the HDMI can preview the image)
遠程訪問及文件傳輸(Remote Access and File Transimmion)
**查看主板IP位址 ( Chech IP Address ):**
Command: ifconfig
Windows下SSH访问及文件传输
SSH Remote Log into Device
- SSH远程登录,以putty选择putty.exe(或者使用Xshell、SecureCRT等类似软件)
- 需要设置远程设备的IP、通讯端口(默认22)、通讯方式,登录后验证用户名密码

通用方法(General Method)
查看CPU温度(Check CPU Temperature)
    # cat /sys/devices/virtual/thermal/thermal_zone*/temp

    # 或者直接以度爲單位顯示 echo $[$(cat /sys/class/thermal/thermal_zone0/temp)/1000]° >>> 45°
查看CPU频率(Check CPU Frequency)
           # cat /sys/devices/system/cpu/cpu*/cpufreq/cpuinfo_cur_freq
           >> 500000
           # cat /sys/devices/system/cpu/cpu*/cpufreq/cpuinfo_max_freq
           >> 1800000
查看内存容量(Check Memory Capacity)
root@imx95aom5521a1:~# free -h
               total        used        free      shared  buff/cache   available
Mem:           7.5Gi       431Mi       7.1Gi        13Mi       151Mi       7.1Gi
Swap:             0B          0B          0B
root@imx95aom5521a1:~#
查看存储容量(Check Storage Capacity)
root@imx95aom5521a1:~# df -hT
Filesystem     Type      Size  Used Avail Use% Mounted on
/dev/root      ext4       15G  5.4G  8.0G  41% /
devtmpfs       devtmpfs  3.3G  4.0K  3.3G   1% /dev
tmpfs          tmpfs     3.8G     0  3.8G   0% /dev/shm
tmpfs          tmpfs     1.6G   11M  1.5G   1% /run
tmpfs          tmpfs     3.8G   12K  3.8G   1% /tmp
tmpfs          tmpfs     3.8G  260K  3.8G   1% /var/volatile
/dev/mmcblk0p1 vfat       84M   37M   47M  45% /run/media/boot-mmcblk0p1
/dev/mmcblk1p1 vfat       84M   37M   47M  45% /run/media/boot-mmcblk1p1
tmpfs          tmpfs     769M  8.0K  769M   1% /run/user/0
/dev/mmcblk1p2 ext4       15G  5.4G  8.1G  41% /run/media/root-mmcblk1p2
root@imx95aom5521a1:~#
網路Ping測試(Ping Network Testing)
     ping 8.8.8.8
     PING 8.8.8.8 (8.8.8.8) 56(84) bytes of data.
     64 bytes from 8.8.8.8: icmp_seq=1 ttl=54 time=2.10 ms
     64 bytes from 8.8.8.8: icmp_seq=2 ttl=54 time=2.10 ms
設置RTC (RTC Setting)
root@imx8mprom5722a1:~# systemctl stop ntpdate.service
root@imx8mprom5722a1:~# date 090816072021 && hwclock -w && date
Wed Sep  8 16:07:00 UTC 2021
Tue Nov 23 07:38:50 UTC 2021
root@imx8mprom5722a1:~# date
Tue Nov 23 07:38:56 UTC 2021
root@imx8mprom5722a1:~#
Add Patch in linux-imx_6.1.bb file
SRC_URI:append:imx8qmrom5722a1 += " file://panel_gpi4.patch"
Linux BSP編譯方法(Linux BSP Compile Method)
Yocto 5.0
============================================================================================================================================
Build known issue
如果有驗證上的錯誤 請使用以下的方法
### repo sync failed with Server certificate verification failed. CAfile: /etc/ssl/certs/ca-certificates.crt CRLfile: none ERROR: gstreamer1.0-1.14.4.imx-r0 do_unpack: Fetcher failure: Fetch command export PSEUDO_DISABLED=1; export PATH="/hom e/adv/adv-release-bsp/build_x11/tmp/work/aarch64-poky-linux/gstreamer1.0/1.14.4.imx-r0/recipe-sysroot-native/usr/bin/py thon3-native:/home/adv/adv-release-bsp/sources/poky/scripts:/home/adv/adv-release-bsp/build_x11/tmp/work/aarch64-poky-l inux/gstreamer1.0/1.14.4.imx-r0/recipe-sysroot-native/usr/bin/aarch64-poky-linux:/home/adv/adv-release-bsp/build_x11/tm p/work/aarch64-poky-linux/gstreamer1.0/1.14.4.imx-r0/recipe-sysroot/usr/bin/crossscripts:/home/adv/adv-release-bsp/buil d_x11/tmp/work/aarch64-poky-linux/gstreamer1.0/1.14.4.imx-r0/recipe-sysroot-native/usr/sbin:/home/adv/adv-release-bsp/b uild_x11/tmp/work/aarch64-poky-linux/gstreamer1.0/1.14.4.imx-r0/recipe-sysroot-native/usr/bin:/home/adv/adv-release-bsp /build_x11/tmp/work/aarch64-poky-linux/gstreamer1.0/1.14.4.imx-r0/recipe-sysroot-native/sbin:/home/adv/adv-release-bsp/ build_x11/tmp/work/aarch64-poky-linux/gstreamer1.0/1.14.4.imx-r0/recipe-sysroot-native/bin:/home/adv/adv-release-bsp/so urces/poky/bitbake/bin:/home/adv/adv-release-bsp/build_x11/tmp/hosttools"; export HOME="/home/adv"; git -c core.fsyncob jectfiles=0 submodule update --init --recursive failed with exit code 1, output:
Submodule 'common' (
<https://anongit.freedesktop.org/git/gstreamer/common.git)> registered for path 'common'
Cloning into '/home/adv/adv-release-bsp/build_x11/tmp/work/aarch64-poky-linux/gstreamer1.0/1.14.4.imx-r0/git/common'...
fatal: unable to access '
<https://anongit.freedesktop.org/git/gstreamer/common.git/':> server certificate verification fa iled. CAfile: /etc/ssl/certs/ca-certificates.crt CRLfile: none
fatal: clone of '
<https://anongit.freedesktop.org/git/gstreamer/common.git'> into submodule path '/home/adv/adv-release-b sp/build_x11/tmp/work/aarch64-poky-linux/gstreamer1.0/1.14.4.imx-r0/git/common' failed
Failed to clone 'common'. Retry scheduled
Cloning into '/home/adv/adv-release-bsp/build_x11/tmp/work/aarch64-poky-linux/gstreamer1.0/1.14.4.imx-r0/git/common'...
fatal: unable to access '
<https://anongit.freedesktop.org/git/gstreamer/common.git/':> server certificate verification fa iled. CAfile: /etc/ssl/certs/ca-certificates.crt CRLfile: none
fatal: clone of '
<https://anongit.freedesktop.org/git/gstreamer/common.git'> into submodule path '/home/adv/adv-release-b sp/build_x11/tmp/work/aarch64-poky-linux/gstreamer1.0/1.14.4.imx-r0/git/common' failed
Failed to clone 'common' a second time, aborting
ERROR: gstreamer1.0-1.14.4.imx-r0 do_unpack: Function failed: base_do_unpack
ERROR: Logfile of failure stored in: /home/adv/adv-release-bsp/build_x11/tmp/work/aarch64-poky-linux/gstreamer1.0/1.14. 4.imx-r0/temp/log.do_unpack.42631
ERROR: Task (/home/adv/adv-release-bsp/sources/meta-fsl-bsp-release/imx/meta-bsp/recipes-multimedia/gstreamer/gstreamer 1.0_1.14.imx.bb:do_unpack) failed with exit code '1'
ERROR: gstreamer1.0-plugins-base-1.14.4.imx-r0 do_unpack: Fetcher failure: Fetch command export PSEUDO_DISABLED=1; expo rt PATH="/home/adv/adv-release-bsp/build_x11/tmp/work/aarch64-mx8mm-poky-linux/gstreamer1.0-plugins-base/1.14.4.imx-r0/ recipe-sysroot-native/usr/bin/python3-native:/home/adv/adv-release-bsp/sources/poky/scripts:/home/adv/adv-release-bsp/b uild_x11/tmp/work/aarch64-mx8mm-poky-linux/gstreamer1.0-plugins-base/1.14.4.imx-r0/recipe-sysroot-native/usr/bin/aarch6 4-poky-linux:/home/adv/adv-release-bsp/build_x11/tmp/work/aarch64-mx8mm-poky-linux/gstreamer1.0-plugins-base/1.14.4.imx -r0/recipe-sysroot/usr/bin/crossscripts:/home/adv/adv-release-bsp/build_x11/tmp/work/aarch64-mx8mm-poky-linux/gstreamer 1.0-plugins-base/1.14.4.imx-r0/recipe-sysroot-native/usr/sbin:/home/adv/adv-release-bsp/build_x11/tmp/work/aarch64-mx8m m-poky-linux/gstreamer1.0-plugins-base/1.14.4.imx-r0/recipe-sysroot-native/usr/bin:/home/adv/adv-release-bsp/build_x11/ tmp/work/aarch64-mx8mm-poky-linux/gstreamer1.0-plugins-base/1.14.4.imx-r0/recipe-sysroot-native/sbin:/home/adv/adv-rele ase-bsp/build_x11/tmp/work/aarch64-mx8mm-poky-linux/gstreamer1.0-plugins-base/1.14.4.imx-r0/recipe-sysroot-native/bin:/ home/adv/adv-release-bsp/sources/poky/bitbake/bin:/home/adv/adv-release-bsp/build_x11/tmp/hosttools"; export HOME="/hom e/adv"; git -c core.fsyncobjectfiles=0 submodule update --init --recursive failed with exit code 1, output:
Submodule 'common' (
<https://anongit.freedesktop.org/git/gstreamer/common.git)> registered for path 'common'
Cloning into '/home/adv/adv-release-bsp/build_x11/tmp/work/aarch64-mx8mm-poky-linux/gstreamer1.0-plugins-base/1.14.4.im x-r0/git/common'...
fatal: unable to access '
<https://anongit.freedesktop.org/git/gstreamer/common.git/':> server certificate verification fa iled. CAfile: /etc/ssl/certs/ca-certificates.crt CRLfile: none
fatal: clone of '
<https://anongit.freedesktop.org/git/gstreamer/common.git'> into submodule path '/home/adv/adv-release-b sp/build_x11/tmp/work/aarch64-mx8mm-poky-linux/gstreamer1.0-plugins-base/1.14.4.imx-r0/git/common' failed
Failed to clone 'common'. Retry scheduled
Cloning into '/home/adv/adv-release-bsp/build_x11/tmp/work/aarch64-mx8mm-poky-linux/gstreamer1.0-plugins-base/1.14.4.im x-r0/git/common'...
fatal: unable to access '
<https://anongit.freedesktop.org/git/gstreamer/common.git/':> server certificate verification fa iled. CAfile: /etc/ssl/certs/ca-certificates.crt CRLfile: none
fatal: clone of '
<https://anongit.freedesktop.org/git/gstreamer/common.git'> into submodule path '/home/adv/adv-release-b sp/build_x11/tmp/work/aarch64-mx8mm-poky-linux/gstreamer1.0-plugins-base/1.14.4.imx-r0/git/common' failed
Failed to clone 'common' a second time, aborting
ERROR: gstreamer1.0-plugins-base-1.14.4.imx-r0 do_unpack: Function failed: base_do_unpack
ERROR: Logfile of failure stored in: /home/adv/adv-release-bsp/build_x11/tmp/work/aarch64-mx8mm-poky-linux/gstreamer1.0 -plugins-base/1.14.4.imx-r0/temp/log.do_unpack.51633
ERROR: Task (/home/adv/adv-release-bsp/sources/meta-fsl-bsp-release/imx/meta-bsp/recipes-multimedia/gstreamer/gstreamer 1.0-plugins-base_1.14.imx.bb:do_unpack) failed with exit code '1'
============================================================
nnshark error
<https://community.nxp.com/t5/i-MX-Processors/Yocto-3-3-5-10-72-BSP-Build-Fail/m-p/1487902>