Introduction
This document describes how to work with the RISC and Qualcomm LE GA1.3 (QLI 1.3) Board Support Package (BSP) release.
Yocto Version
Yocto 4.0.22
Kernel Version
Kernel 6.6.52
Meta Build ID
QCM6490.LE.1.0-00321-STD.PROD-1
Host machine requirements
OS
Ubuntu 20.04 or Ubuntu 22.04
CPU
Intel Core-i7 Processor (>= 8 cores)
RAM
16+ GB RAM
Disk
350 GB free disk space (more is recommended and SSD is suggested for better performance)
Docker Install and BSP Download
Install Docker Engine on your platform
Please refer to Docker Installation Guide for details
Pull docker images
$ sudo docker pull advrisc/u20.04-qcslbv2:latest
Run docker example
$ mkdir -p /home/bsp/myLinux
$ sudo docker run --privileged -it --name qclinux -v /home/bsp/myLinux:/home/adv/BSP:rw advrisc/u20.04-qcslbv2 /bin/bash
adv@7cc0fa834366:~$ sudo chown adv:adv -R BSP
Download BSP
$ repo init -u https://dev.azure.com/AIM-Linux/risc_qcs_linux_le_1.3_public/_git/manifest -b main -m ${OFFICIAL_MANIFEST}
$ repo sync -c -j${YOUR_CPU_CORE_NUM}
- AOM-2721: A example of OFFICIAL_MANIFEST is aom2721a1_yocto4.0.22-le1.3_v1.1.0_kernel-6.6.52_qcs6490+qcs5430.xml
- AOM-5721: A example of OFFICIAL_MANIFEST is aom5721a1_yocto4.0.22-le1.3_v0.0.1_kernel-6.6.52_qcs6490+qcs5430.xml
- MIO-5355: A example of OFFICIAL_MANIFEST is mio5355a1_yocto4.0.22-le1.3_v0.1.0_kernel-6.6.52_qcs6490.xml
- DS-011: A example of OFFICIAL_MANIFEST is ds011a1_yocto4.0.22-le1.3_v0.1.0_kernel-6.6.52_qcs6490.xml
If you want to get latest bsp
$ repo init -u https://dev.azure.com/AIM-Linux/risc_qcs_linux_le_1.3_public/_git/manifest -b main -m ${LATEST_MANIFEST}
$ repo sync -c -j${YOUR_CPU_CORE_NUM}
- AOM-2721: LATEST_MANIFEST is aom2721a1_yocto4.0.22-le1.3_v0.0.0_kernel-6.6.52_qcs6490+qcs5430.xml
- AOM-5721: LATEST_MANIFEST is aom5721a1_yocto4.0.22-le1.3_v0.0.0_kernel-6.6.52_qcs6490+qcs5430.xml
- MIO-5355: LATEST_MANIFEST is mio5355a1_yocto4.0.22-le1.3_v0.0.0_kernel-6.6.52_qcs6490.xml
- DS-011: LATEST_MANIFEST is ds011a1_yocto4.0.22-le1.3_v0.0.0_kernel-6.6.52_qcs6490.xml
Get and Unzip the Downloads Files
Yocto downloads file:[ downloads_qcs6490_le1.3_public.tar.gz ]
The size of downloads_qcs6490_le1.3_public.tar.gz is 41937076025 byte (40,954,176 KB)
The md5sum of downloads_qcs6490_le1.3_public.tar.gz is ffdea91e5c562703e576c3c0087f771c
Build Instructions
Build yocto images in the docker container
$ cd /home/adv/BSP
$ MACHINE=${YOCTO_MACHINE_NAME} DISTRO=qcom-robotics-ros2-humble QCOM_SELECTED_BSP=custom source setup-robotics-environment
$ ../qirp-build qcom-robotics-full-image
- AOM-2721: YOCTO_MACHINE_NAME is qcs6490aom2721a1
- AOM-5721: YOCTO_MACHINE_NAME is qcs6490aom5721a1
- MIO-5355: YOCTO_MACHINE_NAME is qcs6490mio5355a1
- DS-011: YOCTO_MACHINE_NAME is qcs6490ds011a1
Output ufs images: build-qcom-robotics-ros2-humble/tmp-glibc/deploy/images/qcm6490/qcom-robotics-full-image Output emmc images: build-qcom-robotics-ros2-humble/tmp-glibc/deploy/images/qcm6490/qcom-robotics-full-image-emmc
Recovery & Rescue
Using windows PCAT or Qualcomm Download (QDL) tool to flash software images to the device.
Get the official images and unzip
Unzip command example:
$ sudo tar -zxvf aom5721a1_yocto4.0.22-le1.3_v0.0.1_kernel-6.6.52_qcs6490+qcs5430_6490-16g-8g+5430-8g-4g_emmc_2026-01-15.tgz
Enter EDL download mode
AOM-2721
- Connect the Micro USB (EDL) to your host computer.
- Forced Recovery: The SW2 switch to 1-on.
- Flash EMMC: the SW1 switch to 1-off, 2-on
- Flash UFS: the SW1 switch to 1-on, 2-on
- Connect the adapter and power on the device
AOM-5721
- Connect the Micro USB (EDL) to your host computer.
- Forced Recovery: the AOM-5721 SW1 set to 2-on or AOM-DB6700 SW2 set to 4-on
- Flash EMMC: the AOM-5721 SW1 set to 1-on
- Flash UFS: the AOM-5721 SW1 set to 1-off
- Connect the adapter and power on the device
MIO-5355
- Connect the Micro USB (EDL) to your host computer.
- Forced Recovery: The SW1 switch to 1-on.
- Flash EMMC: the SW1 set to 3-off
- Flash UFS: the SW1 set to 3-on
- Connect the adapter and power on the device
DS-011
- Connect the Micro USB (EDL) to your host computer.
- Forced Recovery: The SW7 switch to left.
- Flash EMMC: the SW1 set to 1-off 2-on
- Flash UFS: the SW1 set to 1-on 2-on
- Connect the adapter and power on the device
Use the windows PCAT to flash images
1. Download the Qualcomm Software Center
2. Open the Qualcomm Software Center
3. Search "PCAT" in the search bar

4. Click Qualcomm® Product Configuration Assistant Tool
5. Select Qualcomm® Product Configuration Assistant Tool version
Version: 2.33.2.119
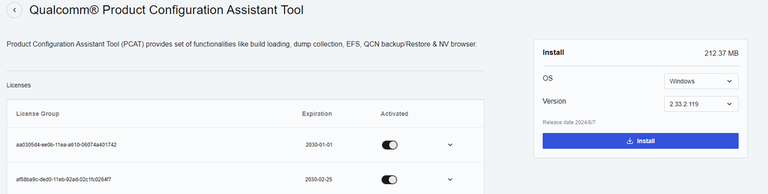
6. Install Qualcomm® Product Configuration Assistant Tool 2.33.2.119
7. Search "QUTS" in the search bar
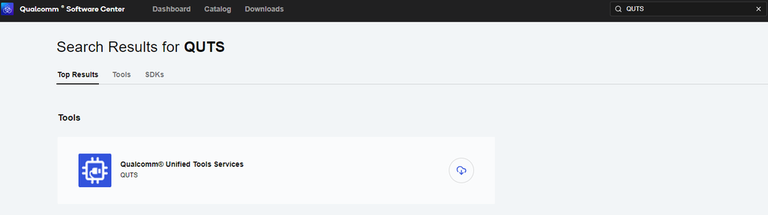
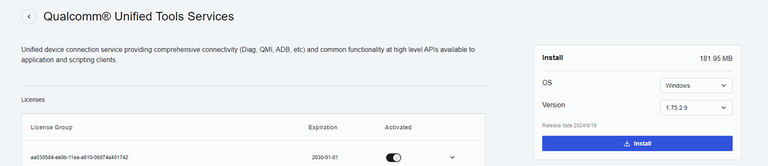
8. Click the Qualcomm® Unified Tools Services
9. Select Qualcomm® Unified Tools Services version
Version : 1.75.2.9
10. Install Qualcomm® Unified Tools Services 1.75.2.9
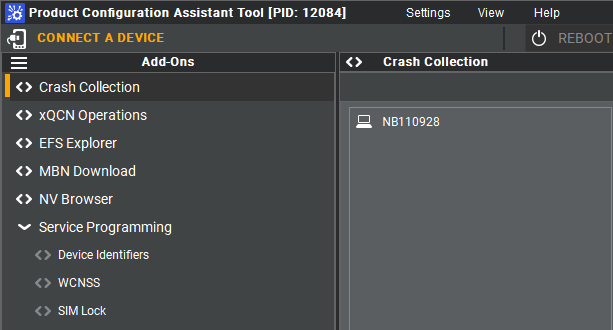
11. You will find the new application after installing the PCAT and QUTS in your Windows system .
12. Unzip the UFS File and eMMC File
For example :
aom5721a1_yocto4.0.22-le1.3_v0.0.1_kernel-6.6.52_qcs6490+qcs5430_6490-16g-8g+5430-8g-4g_ufs_2026-01-15.tgz
aom5721a1_yocto4.0.22-le1.3_v0.0.1_kernel-6.6.52_qcs6490+qcs5430_6490-16g-8g+5430-8g-4g_emmc_2026-01-15.tgz
13. Connect your device via Micro USB.
USF Provision
1. Select provision button ![]()
![]()
2. Add the prog_firehose_ddr.elf and provision_ufs31.xml in UFS folder.

3. Then press "OK" , it will start to do USF Provision.

4. When the Provision finished , you can see the result in message window.

Flash UFS
1. Change the switch
AOM-2721:
-
Flash UFS: the SW1 switch to 1-on, 2-on
-
Forced Recovery : The SW2 switch to 1-on ,2 - on .
AOM-5721:
-
Flash UFS: the AOM-5721 SW1 set to 1-off
-
Forced Recovery : the AOM-5721 SW1 set to 2-on or AOM-DB6700 SW2 set to 4-on
MIO-5355:
-
Flash UFS: the SW1 set to 3-on
-
Forced Recovery : The SW1 switch to 1-on
DS-011:
-
Flash UFS: the SW1 set to 1-on 2-on
-
Forced Recovery : The SW7 switch to left
2. Turn on the power
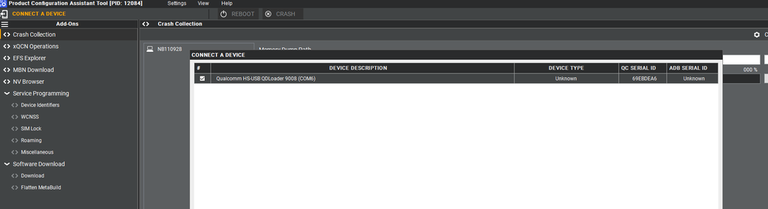
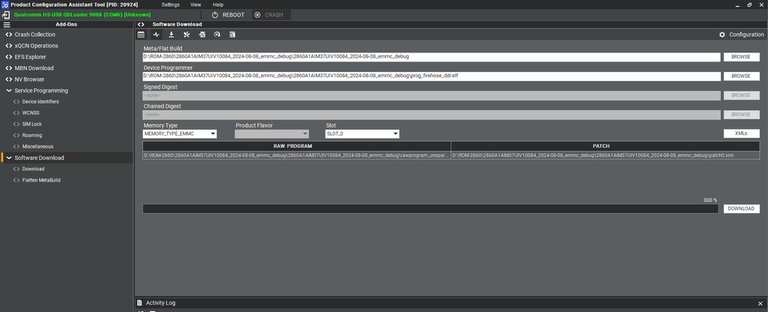
3. Open " PCATApp" Tool
4. Click " Connect A Device"
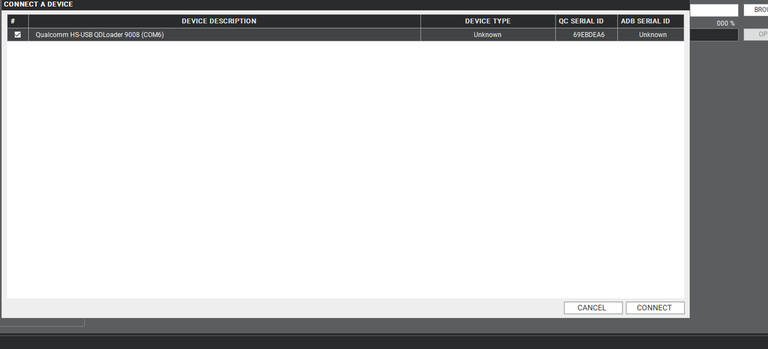
5. Select "Qualcomm HS-USB QDLoader 9008 (COM6)
6. Click " Connect " device
7. When you connected successfully , it will show "green word" - Qualcomm HS-USB QDLoader 9008 (COM 6)

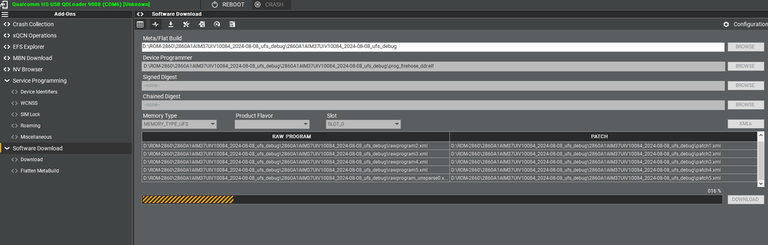
8. Select UFS Folder in PCAT Tool , the Tool will help load Files automatically and Select "MEMORY_TYPE_UFS"
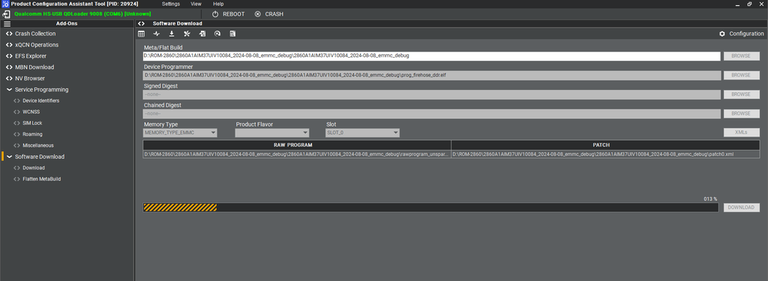
9. Click " Download"
10. UFS Download Status
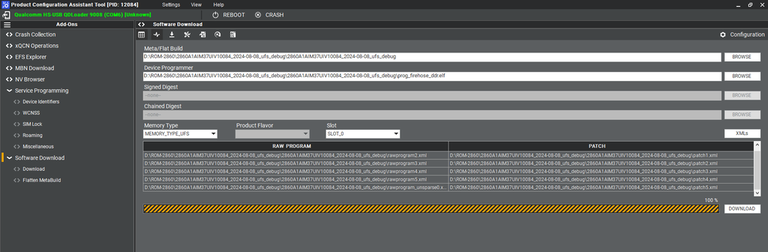
11. UFS Donwload compeleted
12. When the UFS installation finished . Close the PCAT tool ,
13. pleaes remove the mirco usb cable, turn off the power
14. UFS boot up :
AOM-2721:
-
The SW1 switch to 1-on, 2-on
-
The SW2 switch to 1-off, 2-on
AOM-5721:
-
The AOM-5721 SW1 set to 1-off
-
The AOM-5721 SW1 set to 2-off and AOM-DB6700 SW2 set to 4-off
MIO-5355:
- The SW1 switch to 1-off, 3-on
DS-011:
-
The SW1 switch to 1-on, 2-on
-
The SW7 switch to right
15. Connect debug cable and open the terminal , turn on the power .
16. When the systme boot up , you need to type " qcs6490aom2721a1 login: root " , " Password: oelinux123"
17. After type the long in and password , and you also can chek the image information about date , kernel version etc..
Flash eMMC
1. Turn off the Power
2. Change the switch
AOM-2721:
-
Flash eMMC: The SW1 switch to 1-off, 2-on
-
Forced Recovery : The SW2 switch to 1-on, 2-on
AOM-5721:
-
Flash eMMC: the AOM-5721 SW1 set to 1-on
-
Forced Recovery : the AOM-5721 SW1 set to 2-on or AOM-DB6700 SW2 set to 4-on
MIO-5355:
-
Flash eMMC: the SW1 set to 3-off
-
Forced Recovery : the SW1 switch to 1-on
DS-011:
-
Flash eMMC: the SW1 set to 1-off 2-on
-
Forced Recovery : the SW7 switch to left
3. Turn on the power
4. Make sure the device connection status.
5. If the device disconnect with PCAT Tool , please connect it again.
6. Select eMMC Folder.
 7. Make sure the setting ,then press " Download " button.

8. eMMC downlaoad status
9. eMMC Donwload compeleted

10. When the eMMC installation finished . Close the PCAT tool ,
11. pleaes remove the mirco usb cable, turn off the power
12. eMMC boot up :
AOM-2721:
-
The SW1 switch to 1-off, 2-on
-
The SW2 switch to 1-off, 2-on
AOM-5721:
-
The AOM-5721 SW1 set to 1-on
-
The AOM-5721 SW1 set to 2-off and AOM-DB6700 SW2 set to 4-off
MIO-5355:
- The SW1 switch to 1-off, 3-off
DS-011:
-
The SW1 switch to 1-off, 2-on
-
The SW7 switch to right
13. Connect debug cable and open the terminal , turn on the power .
14. When the systme boot up , you need to type " qcs6490aom2721a1 login: root " , " Password: oelinux123"
15. After type the long in and password , and you also can chek the image information about date , kernel version etc..
Customization
Setting up SDK
You can download the sdk from [ sdk.qcs6490.le.1.3.tar.gz ]
The size of sdk.qcs6490.le.1.1.r00041.0.tar.gz is 5303727696 byte (5,179,422 KB)
The md5sum of sdk.qcs6490.le.1.1.r00041.0.tar.gz is f200fabd69c4751c61c280b6583449e7
Or perform the following command in terminal console
$ cd build-qcom-robotics-ros2-humble/tmp-glibc/deploy/sdk
$ sudo ./qcom-robotics-ros2-humble-x86_64-qcom-robotics-full-image-armv8-2a-qcs6490aom2721a1-toolchain-2.1.2.sh
Enter new installed directory or just press Enter to use default directory. While Proceed[Y/n]? shows up, please enter the correct one.
Waiting for the SDK installed (while the following messages show up completely)
Setting up cross compiling environment
SDK has been set up (ref.Setting_up_SDK) Perform the following command in terminal console
$ source ${TOOLCHAIN}/environment-setup-armv8-2a-qcom-linux