BSP Launcher — User Guide
BSP Launcher is Advantech’s GUI-driven automation tool for downloading validated images, building BSPs, and flashing targets without memorising Yocto workflows. It streamlines customer evaluation, production validation, and field recovery for NXP, Qualcomm, NVIDIA Jetson, and MediaTek platforms.
Download BSP Launcher (latest)
The Azure Blob link above always hosts the most recent BSP Launcher build—bookmark it to pick up future updates as soon as they drop.
Click the button above or run the following command to download the latest build:
wget 'http://bsp-launcher-cbgke3ddg4c5d6gr.southeastasia-01.azurewebsites.net/api/download-launcher' -k -O 'BSP_Launcher_latest.zip'
Latest Release Notes
View Full Release Notes
Click the button above to download the complete BSP Launcher release history.
Install BSP Launcher
unzip BSP_Launcher_latest.zip
sudo ./install.sh
source ~/.profile
Launch BSP Launcher
Method 1: Click the following icon
![]()
Method 2: Execute the following command.
bsp-launcher
1. At-a-Glance
- All-in-one console: download official prebuilt images or trigger full BSP builds from the same dashboard.
- Profile-aware builds: each project remembers the manifest, machine, and image recipe, so engineers can reproduce releases with one click.
- Integrated flashing: once an image is ready, the launcher guides you through recovery-mode wiring and flashes the media automatically.
- Traceable artifacts: build logs, SBOM data, and packaged images are stored with the project for audits and regression testing.
2. Why Teams Use BSP Launcher
| Traditional challenge | BSP Launcher approach |
|---|---|
| Host dependencies and mismatched Python/toolchain versions | Provides curated Docker environments and switches profiles automatically |
Error-prone CLI flows (repo, bitbake, manual SDK install) | Encapsulates repo sync, build scripts, and SDK export with validated presets |
| Multiple products sharing one workstation | Project drawer isolates configs, logs, and generated images |
| Manual flashing steps and inconsistent recovery instructions | Guided flash tasks with inline checklists and processors diagrams |
| Limited log visibility | Real-time terminal pane with searchable output and downloadable archives |
3. Guided Workflow
Step 1 – Download a Prebuilt Image
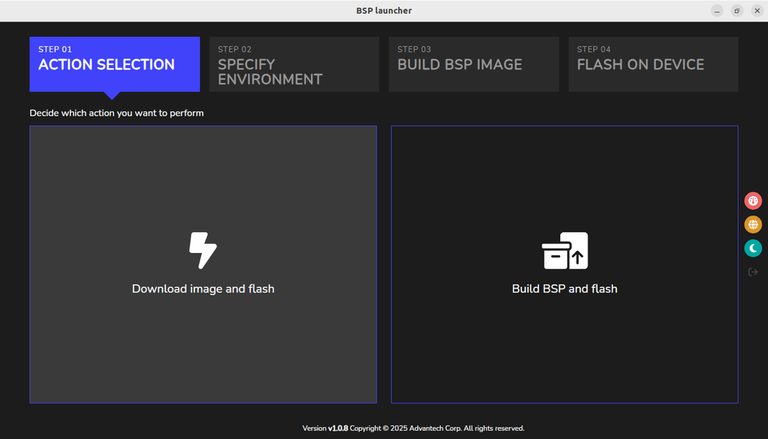
- Choose Download image and flash when you only need a validated release for lab bring-up.
- In Specify Environment, confirm platform, chipset, board name, and release filters.
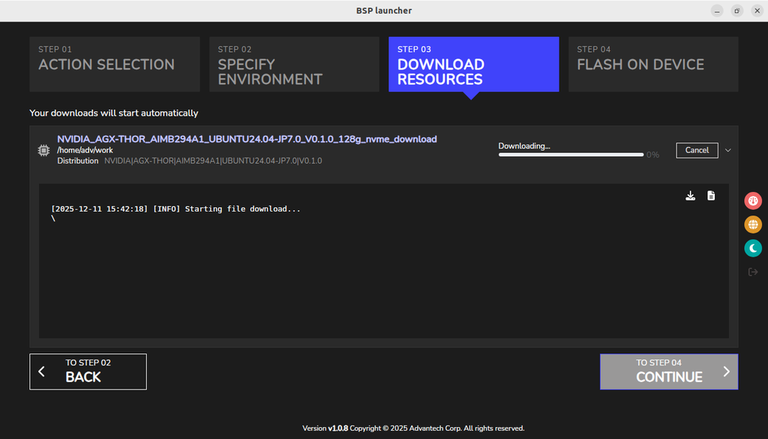
- Click Continue to start the download; progress, checksum validation, and extraction appear in the log pane.
- Completed images land inside the project’s folder and stay ready for flashing.
Step 2 – Download BSP Sources and Build
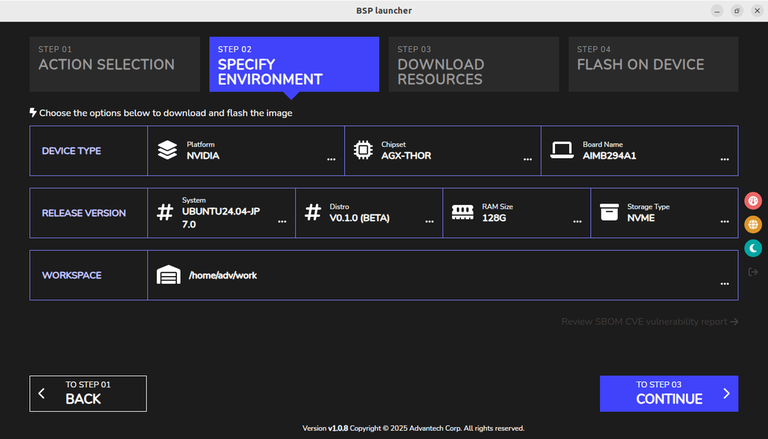
- Select Build BSP and flash to pull the correct manifest, sync layers, and run the Advantech release script.
- Define the platform profile (e.g.,
NVIDIA / AGX-THOR / AIMB294A1) plus distro, RAM, and workspace path. - Use the Download Resources view to monitor repo sync progress, throughput, and checksum checks.
- When prompted, confirm Docker availability and the host capability assessment before continuing the build.
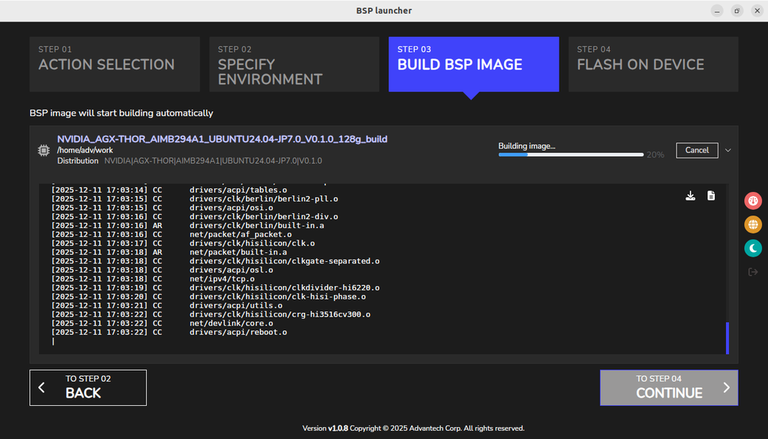
- The Build BSP Image tab streams logs (bitbake tasks, package installs, kernel compilation) and exposes download/export buttons for audit sharing.
- After
Build Completed!, the final artifact path prints in the log, and the packaged image is registered for flashing.
Step 3 – Flash a Prebuilt Image or Image built from BSP
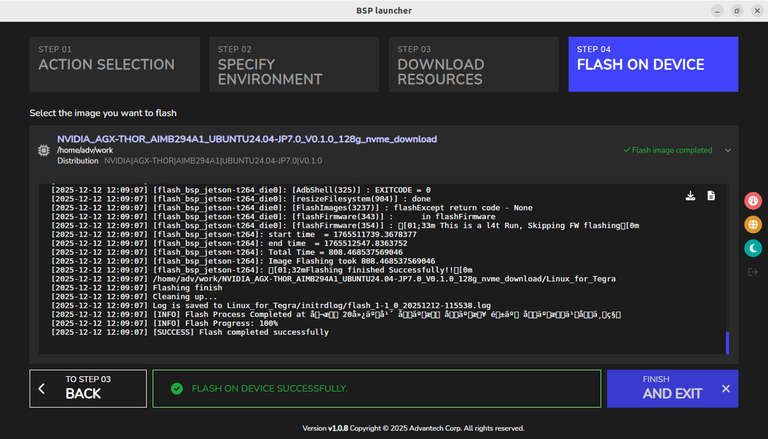
- Open the Flash on Device tab and choose either the downloaded image (
*_download) or the newly built package (*_build). - Connect the target processors via USB and enter recovery mode; the launcher confirms detection before enabling Flash.
- Pick the storage target (NVMe or USB) when prompted so the correct vendor script runs.
- Flash logs mirror the
flash_bsp_*scripts and surface progress percentages, retries, and timestamps. - A green Flash on device successfully banner signals completion; logs remain under the project directory for audits.
4. Comparing CLI vs. BSP Launcher
| Aspect | Terminal workflow | BSP Launcher workflow |
|---|---|---|
| Environment prep | Install packages, set env vars, source setup scripts | Launches curated container/Docker profile automatically |
| Manifest updates | Manual repo init / repo sync | Managed through project metadata, one click to resync |
| Build monitoring | tail -f tmp/log | Structured log pane with color-coded errors and download button |
| Flashing | Remember board-specific scripts and switches | Wizard with diagrams, recovery instructions, and logging |
| Knowledge transfer | Tribal knowledge, wikis | Projects act as executable documentation |
5. Enterprise Benefits
- Faster onboarding: new engineers can ship images in minutes instead of days of Yocto training.
- Consistent release cadence: one tool handles download, build, flash, and documentation, reducing handoffs.
- Audit-ready artifacts: logs, SBOMs, and packaged images stay with each project for future investigations.
- Field support acceleration: FAEs can reproduce customer issues by replaying the same project profile.
6. Conclusion
BSP Launcher converts a traditionally manual BSP workflow into a predictable, traceable, and user-friendly experience. Whether you are testing a prebuilt image, rebuilding the BSP from source, or flashing dozens of systems on a manufacturing line, the launcher enforces the same process every time—reducing mistakes and accelerating delivery.