Power Suite — User Guide
Power Suite provides a graphical interface for configuring ARM Linux devices, monitoring system status, and running hardware validation tests. It brings device settings, testing, results, and log export together in a single application.
Latest Download
Select your platform to find the corresponding Power Suite package. Each platform has its own release schedule. Choose a package that matches your product and operating system.
- NVIDIA
- NXP
- Qualcomm
- Rockchip
Download the latest Power Suite package for NVIDIA platforms.
Download Power Suite for NVIDIA (Ubuntu)
Download the latest Power Suite package for NXP platforms running Yocto Linux.
Download Power Suite for NXP (Yocto)
Download the latest Power Suite package for Qualcomm platforms running Ubuntu.
Download Power Suite for Qualcomm (Ubuntu)
Download the latest Power Suite package for Rockchip platforms.
Download link pending.
Latest Release Notes
Select your platform to review its release notes. Check the notes for the version you plan to install.
- NVIDIA
- NXP
- Qualcomm
- Rockchip
Review the release history and changes for Power Suite on NVIDIA platforms.
View NVIDIA Release Notes
Review the release history and changes for Power Suite on NXP platforms running Yocto Linux.
View NXP (Yocto) Release Notes
Review the release history and changes for Power Suite on Qualcomm platforms running Ubuntu.
View Qualcomm (Ubuntu) Release Notes
Review the release history and changes for Power Suite on Rockchip platforms.
Release notes link pending.
Install Power Suite
Launch Power Suite
Method 1: Use the Desktop Shortcut
If an Advantech Power Suite shortcut is available on the desktop, click it to launch the application. Follow the prompts if administrator authorization is required.
Method 2: Run from the Command Line
/usr/local/power_suite/run_powersuitelauncher.sh
1. At-a-Glance
- Device configuration: Use Lockdown to configure automatic login, the boot logo, and keyboard shortcuts.
- System settings: Use OS Enhancement to adjust the system, display, power, and communication options available on your product.
- Device validation: Use SystemTools to monitor system status and run stress, storage read/write, and power cycle tests.
- Test records: Review results and export logs on supported products.
| Plugin | Main Features | Typical Uses |
|---|---|---|
| Lockdown | Automatic login, boot logo, and keyboard shortcut control | Configure the device's startup and user environment |
| OS Enhancement | System, display, power, and communication settings | Adjust the device to meet performance and interface requirements |
| SystemTools | System monitoring, stress tests, read/write tests, and log management | Validate devices, check stability, and investigate issues |
2. Why Teams Use Power Suite
| Traditional Challenge | Power Suite Approach |
|---|---|
| Login, display, and power settings are managed separately | Access the settings available on your product through dedicated plugins |
| System load and temperature must be checked separately during testing | View system monitoring data and test status on the Home page |
| Multiple project tests need to be repeated | Use Sequence to run a predefined test plan |
| Test results and logs are difficult to review together | View test status, results, and available logs in one interface |
3. Platform Support
Legend:
- ✓ Supported: Power Suite provides the feature. A compatible installation package and any required tools must be available.
- ✕ Not supported: The feature is not available in the current version.
- △ Requires platform integration: The product must provide the necessary platform integration before the feature can be used.
Feature availability can vary between products on the same platform. Check the product version and the options available in the application.
Lockdown
| Feature | NVIDIA | NXP | Qualcomm | Rockchip |
|---|---|---|---|---|
| Automatic login | ✓ | △ | △ | △ |
| Boot logo | ✕ | △ | △ | △ |
| Keyboard filter | ✓ | ✕ | ✕ | ✕ |
OS Enhancement
| Feature | NVIDIA | NXP | Qualcomm | Rockchip |
|---|---|---|---|---|
| Restart after a system failure | ✓ | ✕ | ✓ | ✓ |
| Boot delay / display management | ✕ | ✕ | △ | △ |
| UART mode | ✕ | ✕ | ✕ | △ |
| Sleep, HDMI, and CPU power saving settings | ✕ | △ | ✕ | ✕ |
| Power / CPU core settings | ✓ | ✕ | ✕ | ✕ |
| Notification / automatic update settings | ✓ | ✕ | ✕ | ✕ |
| Package information lookup | ✓ | ✕ | ✕ | ✕ |
SystemTools
| Feature | NVIDIA | NXP | Qualcomm | Rockchip |
|---|---|---|---|---|
| CPU / memory monitoring and stress tests | ✓ | ✓ | ✓ | ✕ |
| GPU / temperature monitoring | ✓ | ✓ | ✓ | ✕ |
| Power cycle test | ✓ | △ | △ | ✕ |
| Custom tests with Sequence | △ | △ | △ | ✕ |
| Storage / USB read/write tests and log export | ✓ | ✓ | ✕ | ✕ |
4. Features and Operations
After launching Power Suite, check the device information to confirm the product, operating system, and platform. Select the plugin and feature you need. If an option is missing or grayed out, check whether your product version provides it.
Screenshots illustrate one device configuration. Available controls and labels may vary by product and software version.
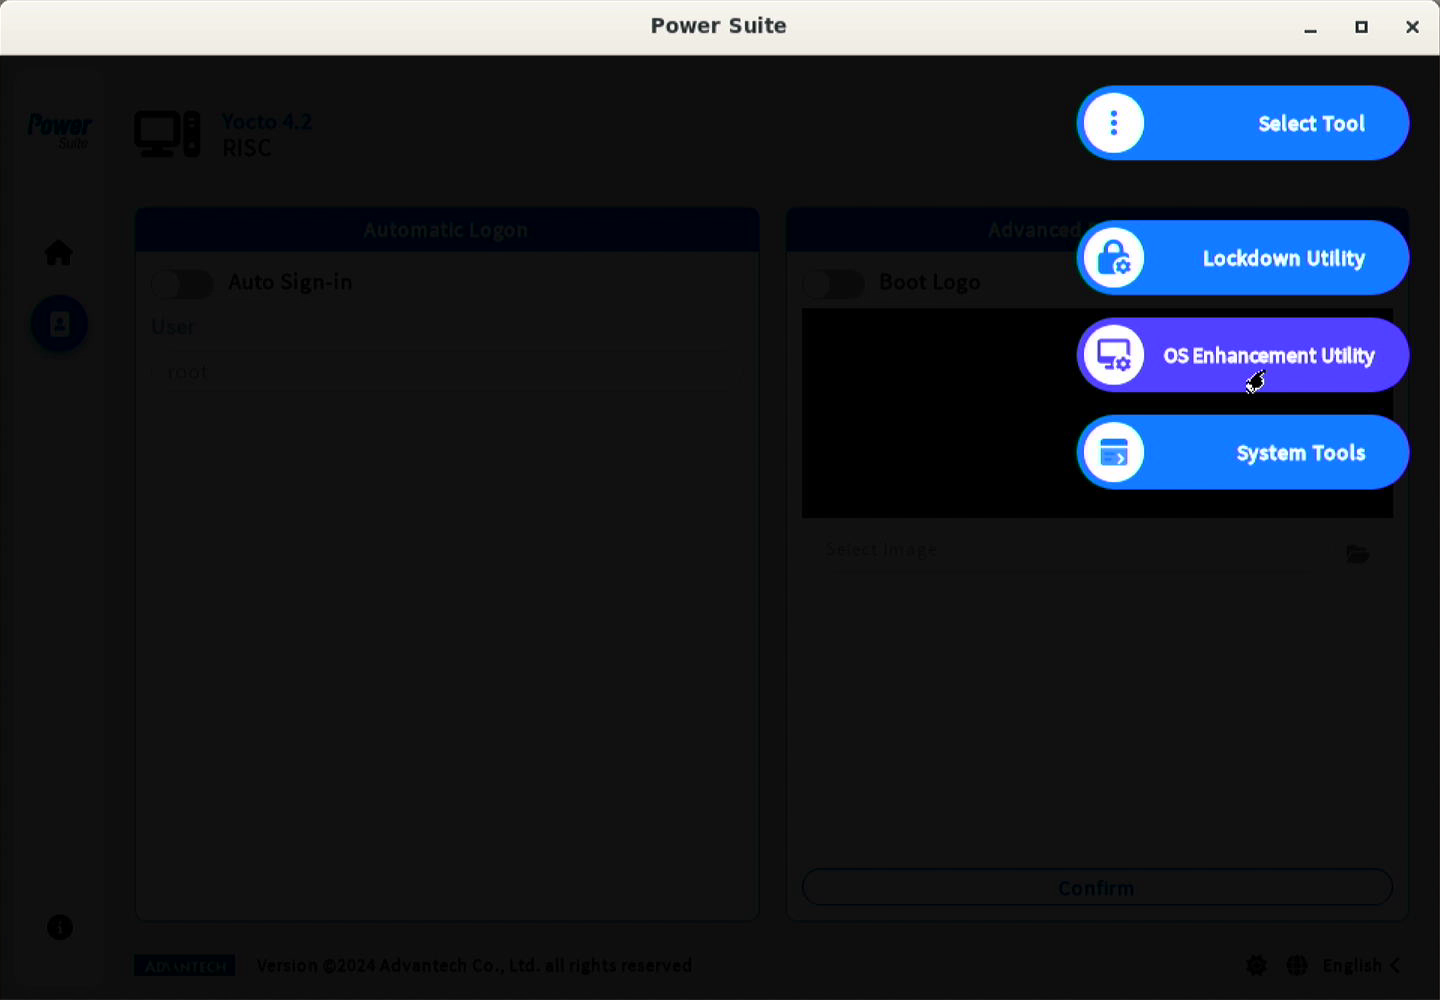
Figure 1. Select Lockdown Utility, OS Enhancement Utility, or System Tools from the plugin menu.
Before making changes or running tests:
- Record the current settings before changing login, display, or power options.
- Save your work before applying settings that require a restart.
- Check cooling and power connections before running extended stress tests.
- Use dedicated test media that can be overwritten for storage read/write tests.
4.1 Lockdown: Login and Startup Settings
Lockdown manages login behavior, the startup display, and keyboard shortcuts for devices that require a controlled user environment. Open Startup or Keyboard to access the relevant settings.
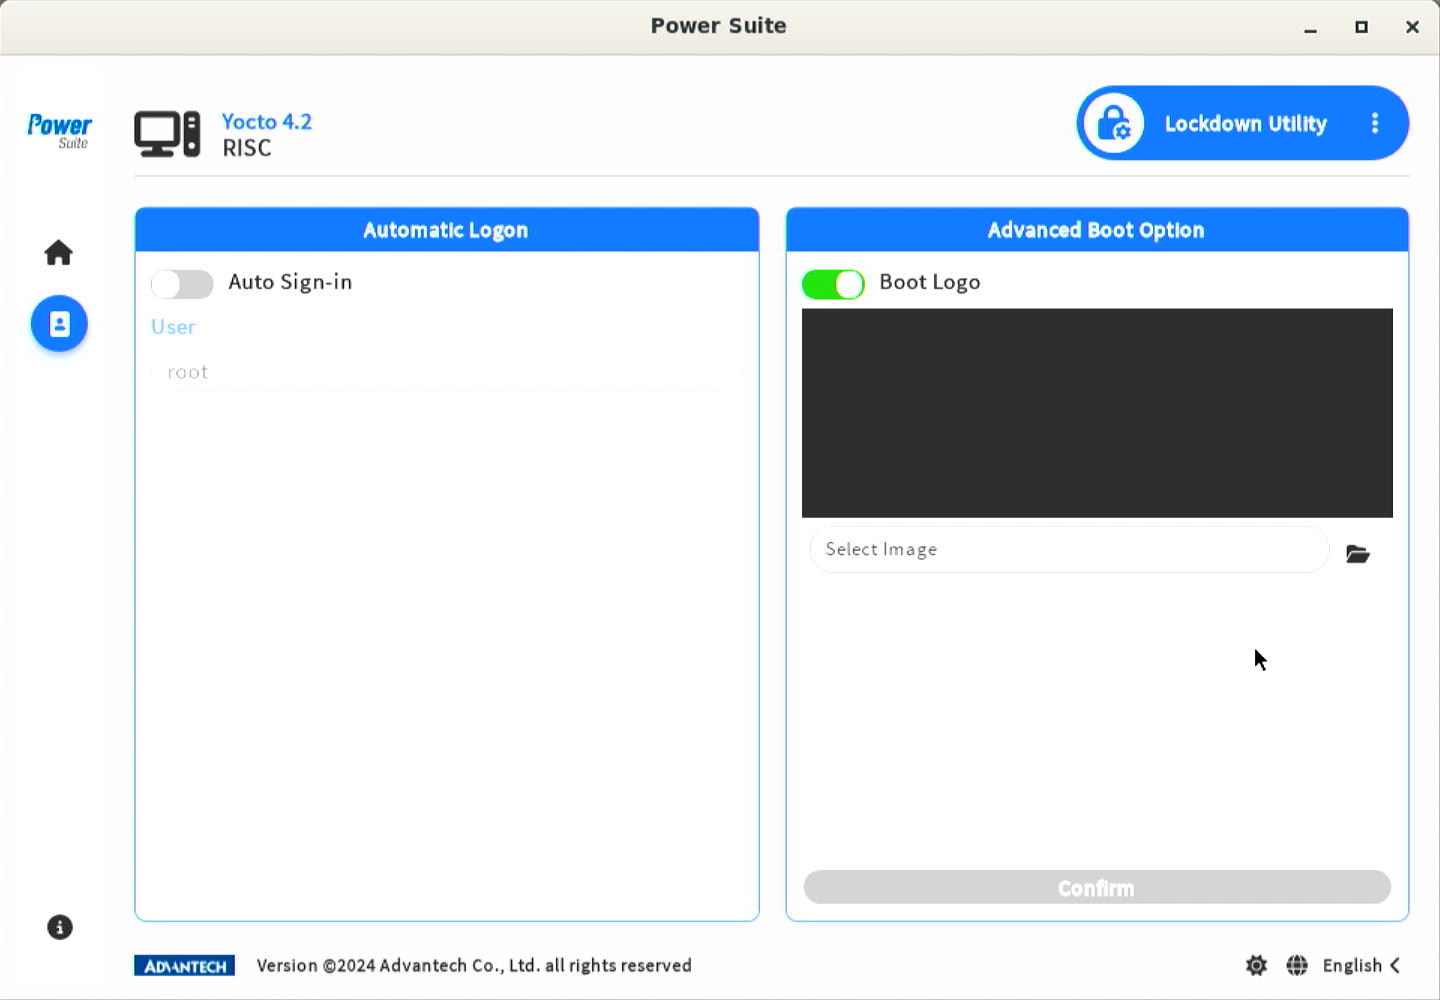
Figure 2. The Startup page shows Automatic Logon and Boot Logo controls on this device. Boot Logo availability depends on product integration.
4.1.1 Automatic Login
Automatic login allows the device to sign in to a specified local user account after startup.
- Open Lockdown → Startup.
- Select a local user in the automatic login section and confirm that the account has appropriate permissions.
- Change the automatic login toggle and follow any prompts to apply the setting.
- At the next login or restart, verify that the device signs in to the selected account.
To restore manual login, turn automatic login off.
4.1.2 Boot Logo
A custom boot logo can display your brand or product identity during startup. This feature requires product integration. Some i.MX95 products may not provide this option. If the Logo section is missing, contact your product support team to confirm availability.
Follow these steps only if your product provides the feature and the Logo section appears on the Startup page:
- Turn the Logo toggle on.
- Select a BMP image and click Confirm.
- Restart the device and check the logo displayed during startup.
4.1.3 Keyboard Filter
The keyboard filter allows or blocks selected shortcuts. Where available, you can also set a breakout key for maintenance access.
- Open Lockdown → Keyboard and open the predefined key settings.
- Select the shortcuts to block or allow, then apply the changes as prompted.
- If you need a breakout key, select the key to use for maintenance and click Confirm.
- Test the settings with a keyboard and ensure that necessary maintenance access remains available.
4.2 OS Enhancement: System Settings
OS Enhancement provides system, display, communication, and power settings. Depending on the platform, these options are available on the General or Energy page.
4.2.1 General System Settings
Open OS Enhancement → General and select an available setting. Wait for the operation to finish, then check its status.
| Feature | Purpose | How to Configure and Verify |
|---|---|---|
| Restart after a system failure | Control restart behavior following certain system failures | Change the toggle and check the displayed setting |
| Boot delay | Adjust the waiting period during startup | Change the toggle and check the behavior at the next startup |
| Display management | Select a supported display output combination | Connect the displays, select an output combination, and click Confirm. Check that the selected outputs work correctly |
| UART mode | Select RS232 or RS485 for supported ports | Select each port's mode and click Confirm. Restart the device and verify that the mode matches the connected equipment and wiring |
| Notification / automatic update settings | Adjust desktop notifications and system update behavior | Follow the toggle labels to enable or disable the options. Wait for completion and check the status |
Available display output combinations vary by product.
4.2.2 Power / CPU Core Settings
Adjust the power mode and CPU core availability to meet performance and power requirements. Available modes and the number of CPU cores vary by product.
- Open OS Enhancement → General.
- Select a mode in the power management section.
- Enable or disable the listed CPU cores as needed.
- Wait for the changes to complete. Check the selected mode, core status, and application behavior.
4.2.3 Power Saving Settings
Power saving options include sleep, HDMI, and CPU settings.
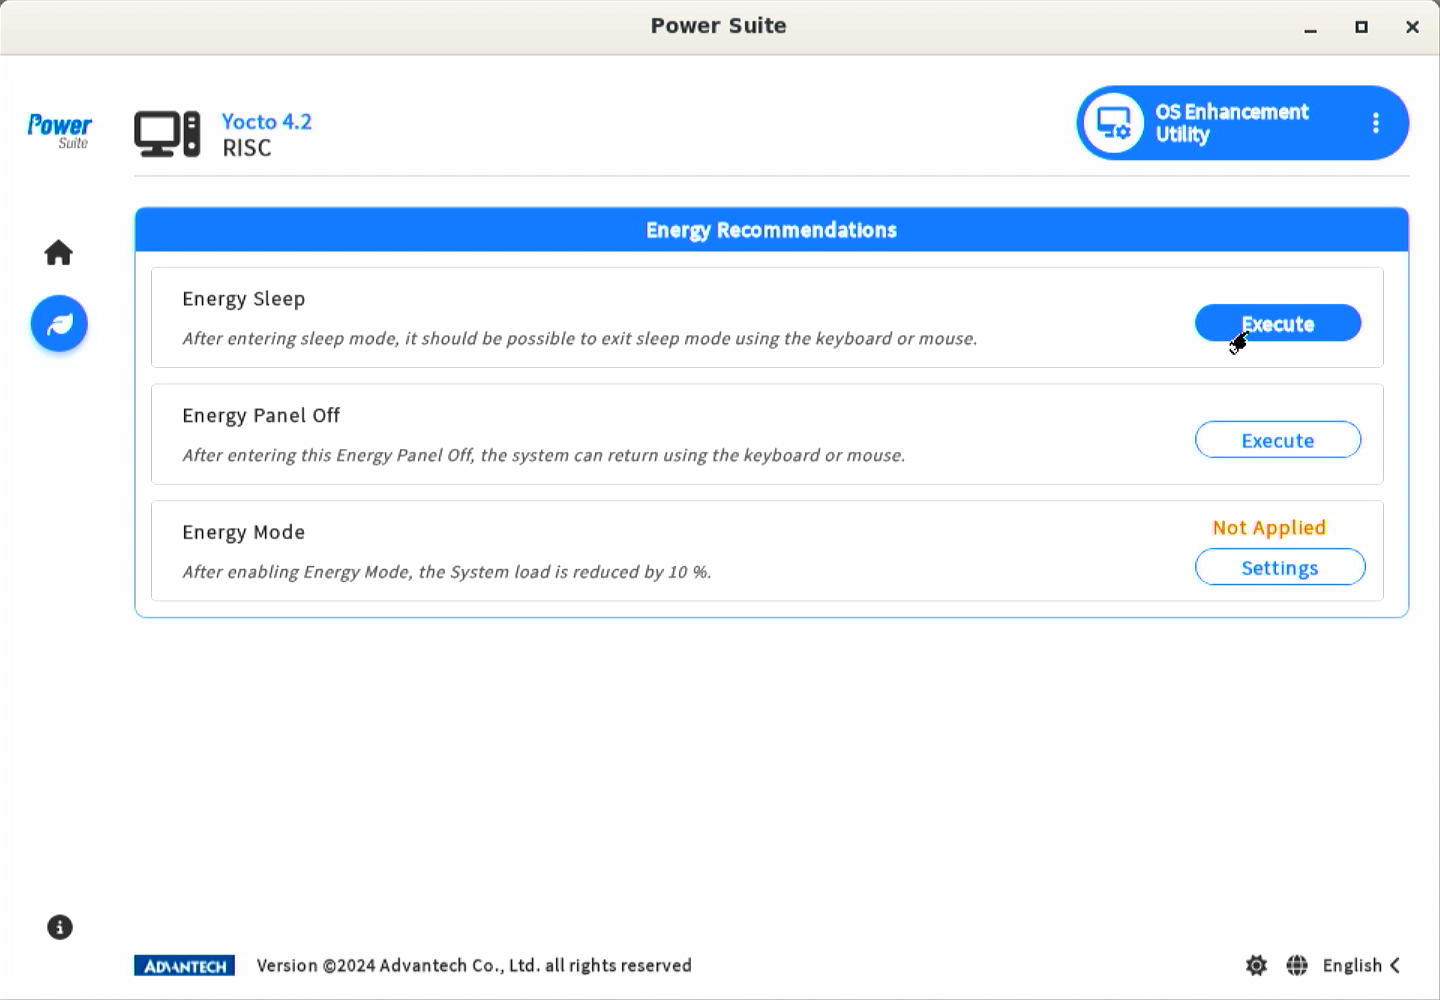
Figure 3. The Energy page provides the sleep, display, and energy mode controls available on this device.
- Open OS Enhancement → Energy.
- Select an available option, click Execute or Set, and confirm the prompt.
- Check the display, performance, and wake behavior after applying the setting.
Before putting the device to sleep, save your work and confirm how to wake it. Before turning HDMI off, make sure you have another way to operate the device or restore the display.
4.2.4 Package Information Lookup
Supported NVIDIA products can display the version and file locations of an installed package.
- Enter the package name in the package lookup section on the General page.
- Click Search to view its version and file locations.
- If no data appears, check the package name and confirm that the package is installed.
4.3 SystemTools: System Monitoring and Validation
SystemTools provides system monitoring, individual tests, project test plans, and log management.
| Page | Main Features |
|---|---|
| Home | System monitoring, CPU / memory stress tests, and the power cycle test |
| Generic | Storage and USB read/write tests |
| Sequence | Custom test plans provided for your project |
| Logs | Log retention settings, export, and history cleanup |
Qualcomm platforms currently do not provide Generic read/write tests or log export. A page tab may be visible even when some of its tools are unavailable.
4.3.1 System Monitoring
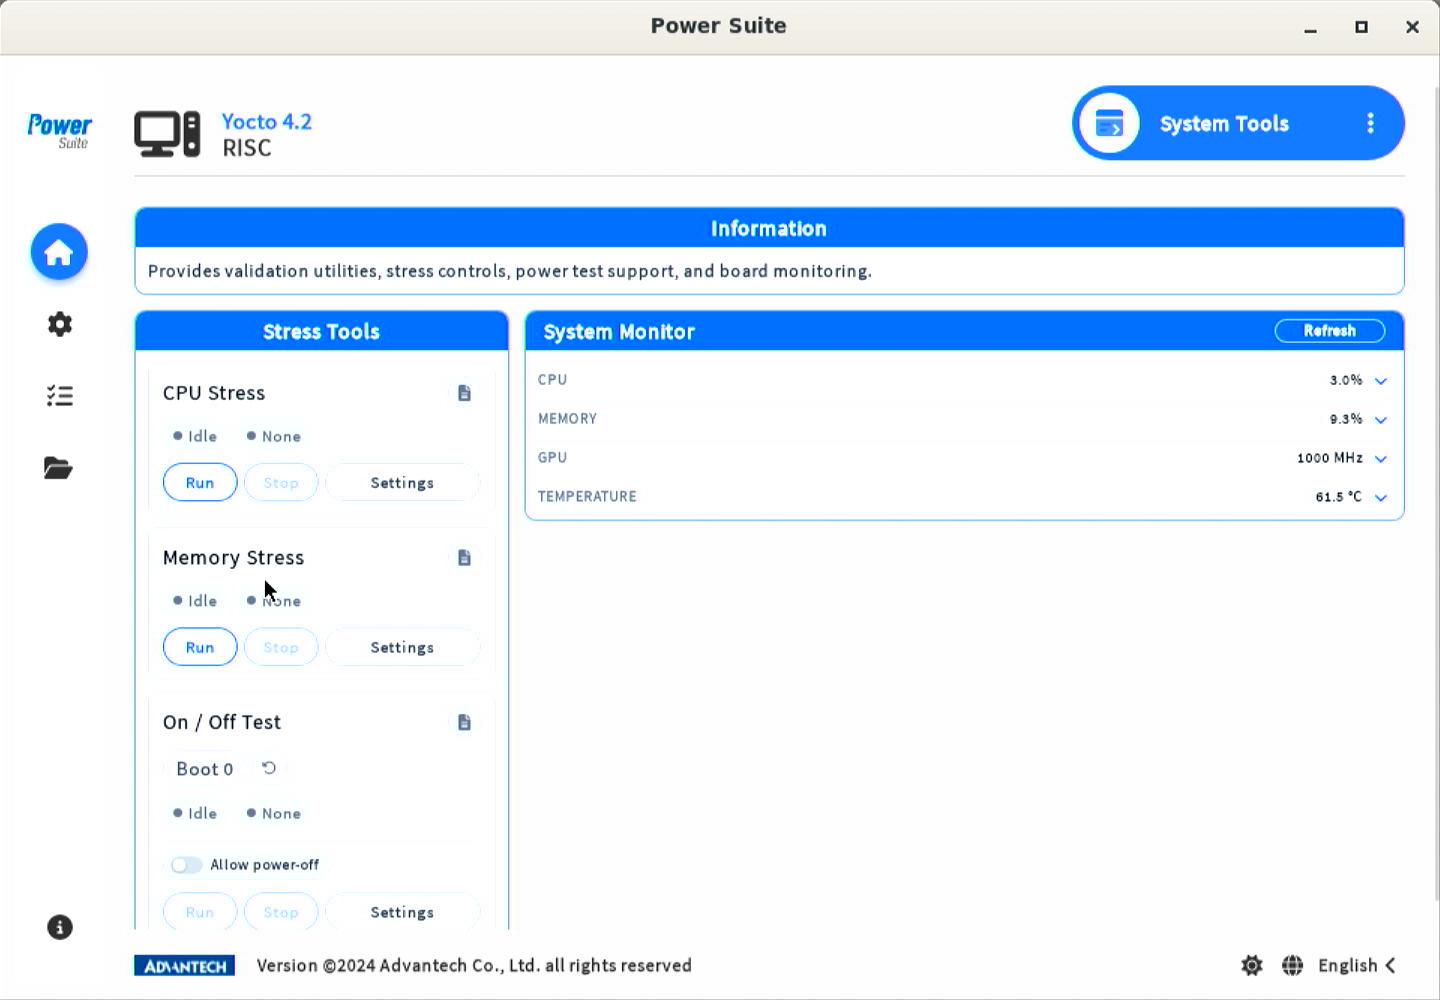
Figure 4. The Home page brings stress controls, the power cycle test, and System Monitor together.
| Item | Available Information |
|---|---|
| CPU | Usage, core frequency, and core availability |
| Memory | Memory and swap usage |
| GPU | Available GPU frequency and status data |
| Temperature | Readings from the product's temperature sensors |
Available sensors and fields vary by product. A missing reading should not be interpreted as zero.
- Open SystemTools → Home.
- Click Refresh in System Monitor and expand the sections you want to view.
- Record the idle readings, then observe load and temperature changes during testing.
4.3.2 CPU / Memory Stress Tests
Stress tests help assess system stability under increased load. Use system and temperature monitoring to observe the device during a test.
| Tool | Parameter | Description |
|---|---|---|
| CPU Stress | CPU Count | Number of CPU workers to run simultaneously |
| CPU Stress | Duration | Test duration in seconds; 0 means no time limit |
| Memory Stress | Size | Amount of memory to test, such as 500M. Leave sufficient memory available for the system |
| Memory Stress | Loops | Number of test iterations; 0 runs continuously |
- Find CPU Stress or Memory Stress on the Home page.
- Click Settings and set the parameters. Start with a short duration or a single iteration.
- Return to the tool card and click Run.
- Monitor the test and system status. Click Stop if needed.
- When the test ends, check Result and the message. Save the logs if the test fails.
4.3.3 Power Cycle Test
On / Off Test works with the product's startup process and an external fixture to validate repeated power cycles. After each startup, the device waits for the configured delay before shutting down. The minimum delay is 30 seconds.
- Confirm that the fixture or control method can turn the device back on.
- Open Home → On / Off Test → Settings and set a shutdown delay of at least 30 seconds.
- Save your work, enable Allow power-off, and click Run.
- Restart the device according to your test procedure and monitor Boot count and the test status.
- When testing is complete, click Stop while the device is accessible and confirm that the test is disabled.
- If you need to reset the count, disable the test first, then use Reset boot count.
Do not enable this test without a fixture or control method that can turn the device back on.
4.3.4 Storage and USB Read/Write Tests
Storage R/W and USB R/W check storage read/write functionality. Size (MB) sets the amount of data tested per iteration, and Loops sets the number of iterations.
These tests write directly to the storage media and may cause data loss. Recovery is not guaranteed. Do not select the operating system drive or media containing important data.
- Open Generic and select Storage R/W or USB R/W.
- Click Refresh, then select and verify the test media that can be overwritten.
- Set Size (MB) and Loops. Start with a small size and a single iteration.
- Select the data overwrite acknowledgment checkbox and click Run.
- Click Refresh State to check progress, or Stop if needed.
- When the test ends, check Result and the message.
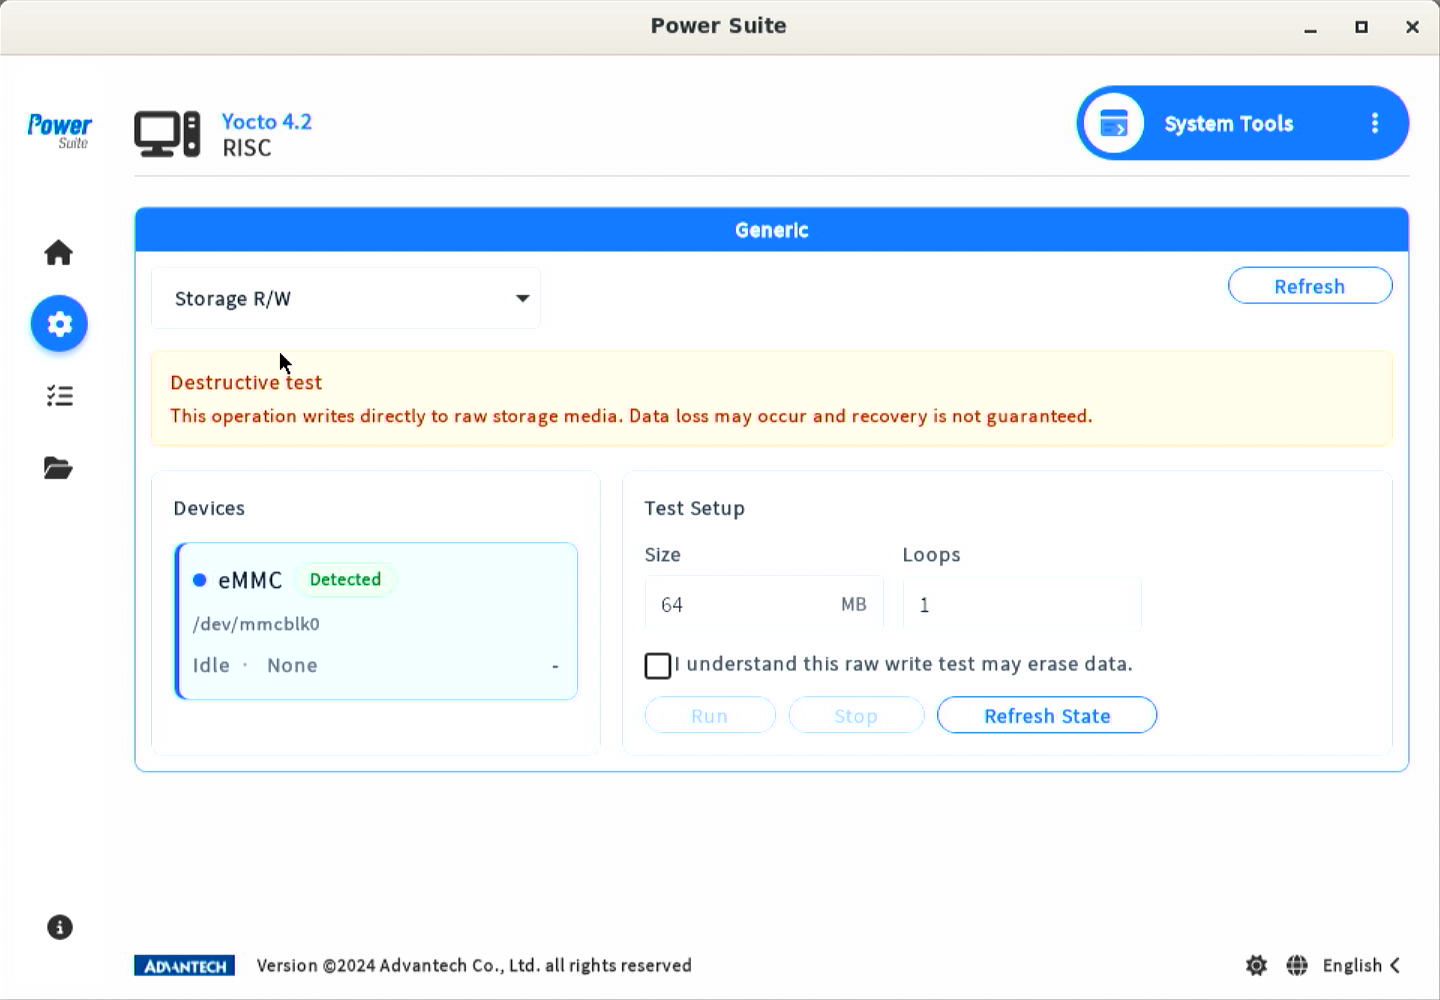
Figure 5. Storage R/W shows the detected media and test parameters. Verify the target before acknowledging the data loss risk.
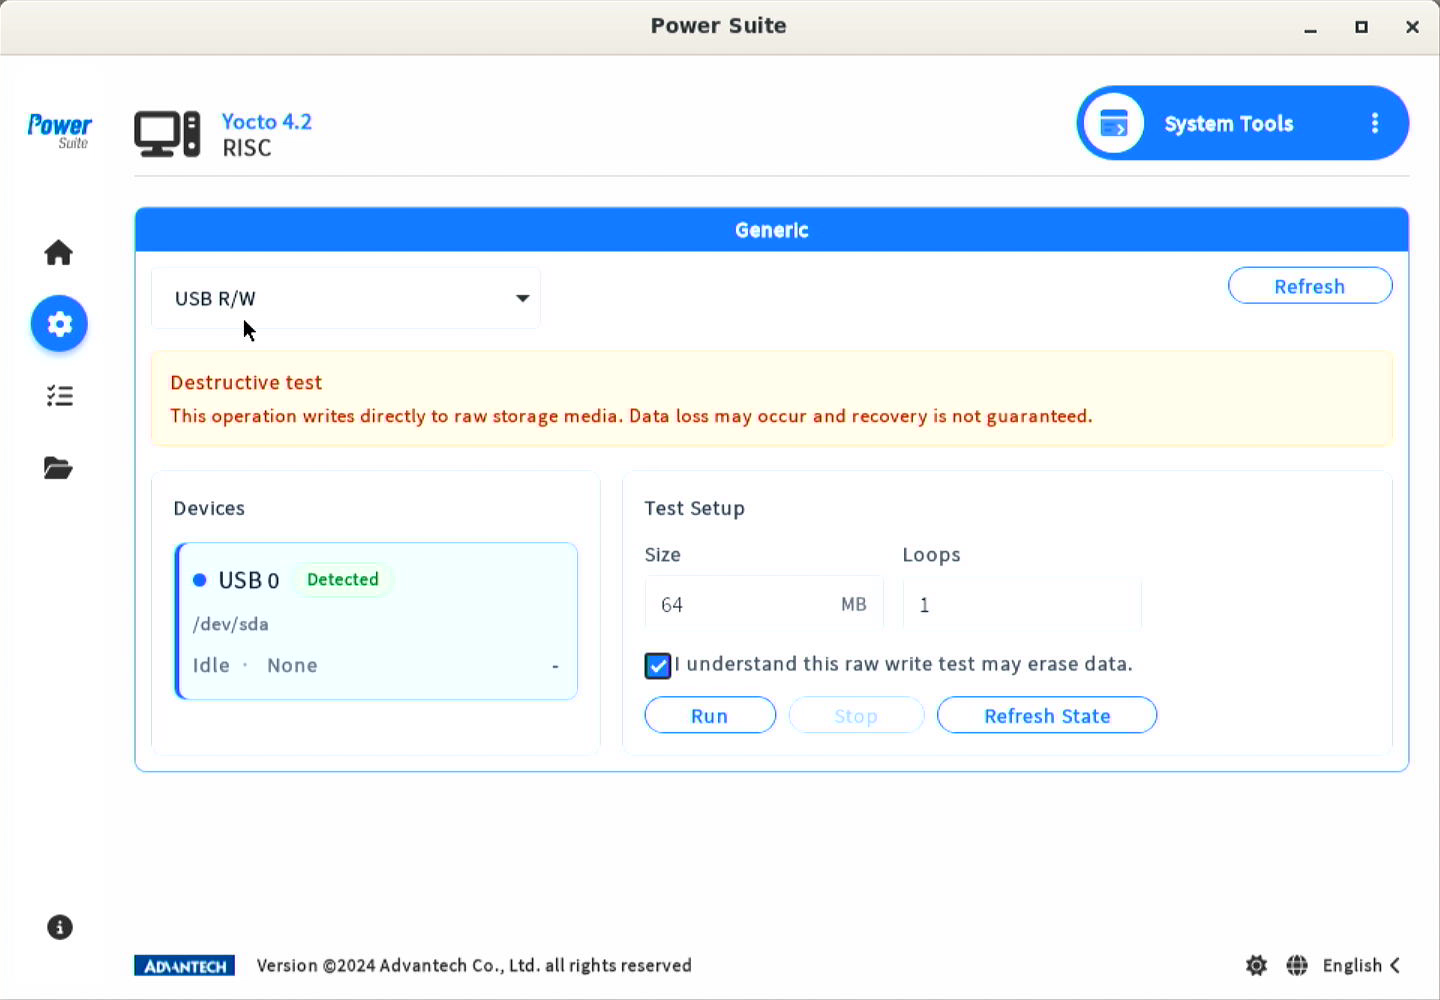
Figure 6. USB R/W uses the same test setup for detected USB storage. The example is ready to run; it does not show a completed test.
4.3.5 Custom Test Plans
Sequence groups project tests into a plan that can be repeated while tracking the results of each step. Test plans must be supplied by your product or project team.
| Parameter | Description |
|---|---|
| Loops | Number of iterations for each test step; 0 means unlimited iterations |
| Timeout | Time limit for the entire plan; 0 means no timeout |
When the timeout is reached, review the individual step results to determine the outcome.
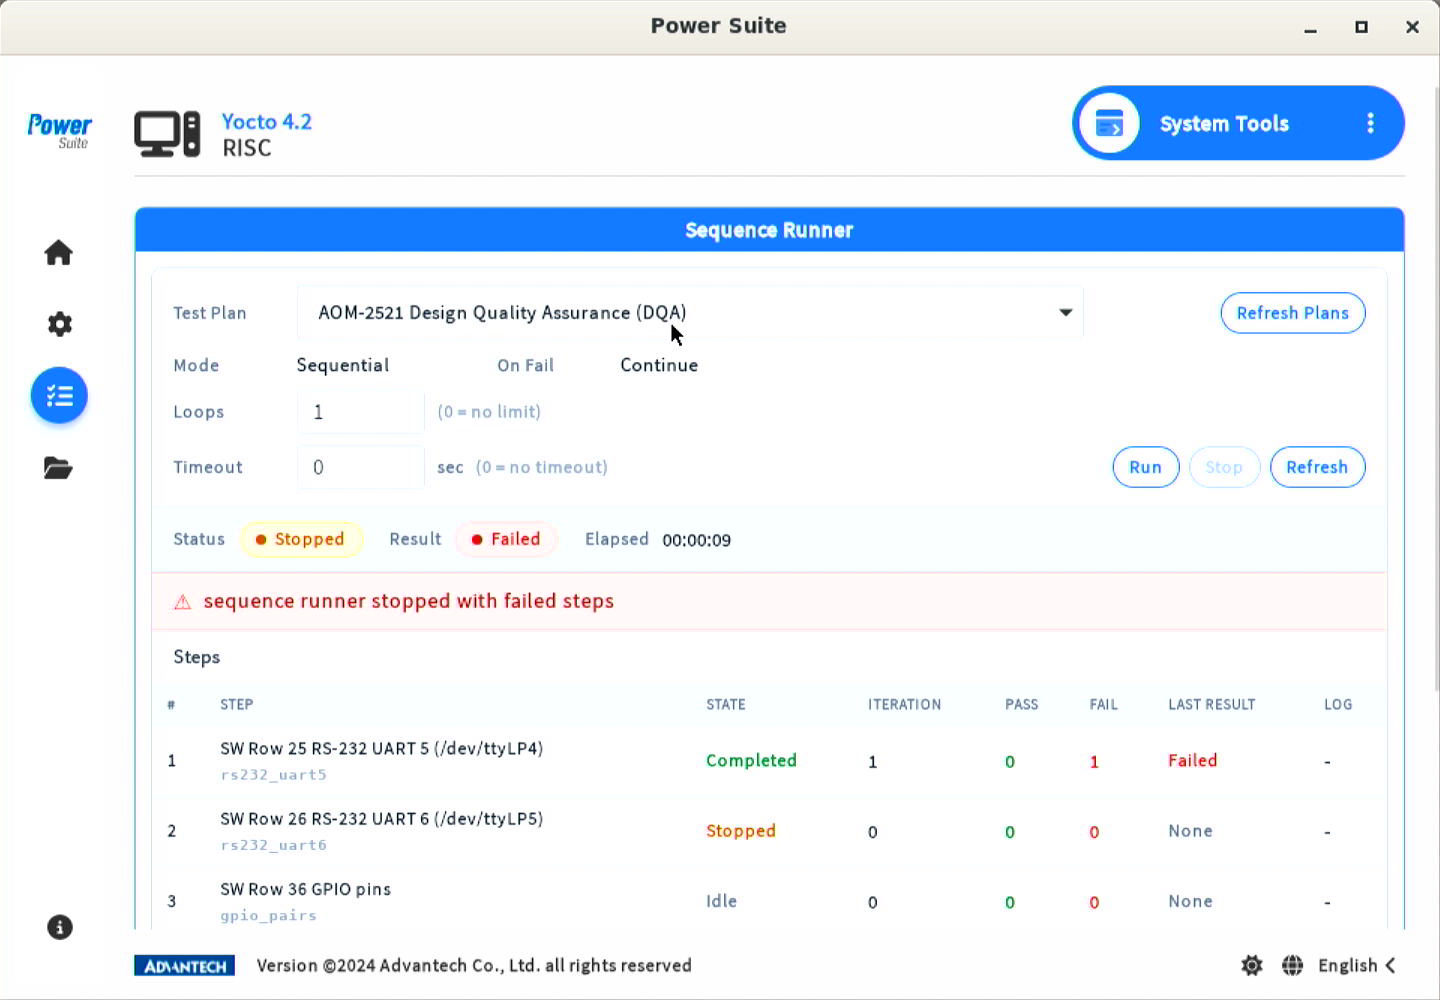
Figure 7. Sequence Runner displays the plan settings and individual step results. This example contains a failed step and an overall Failed result.
- Open Sequence and click Refresh Plans.
- Select a Test Plan and review Mode and On Fail.
- Set Loops and Timeout, then click Run.
- Monitor the overall status and each step's results. Click Stop if needed.
- When the plan ends, check Result and save any step logs you need.
If No test plan appears, ask your product or project team to provide a test plan.
4.3.6 Reading Test Results
State describes execution progress. Result provides the test outcome.
| Value | Meaning |
|---|---|
| running | The test is in progress |
| completed | Execution has finished; check Result for the outcome |
| stopped | The test has stopped and may not have a complete result |
| passed | The test passed |
| failed | The test failed; review the message or logs |
| none / unknown | No result is available, or the outcome cannot be determined. Do not treat this as a pass |
4.3.7 Log Management and Export
Logs preserve test records and help product support teams investigate issues. Download exports logs to the selected external USB storage device.
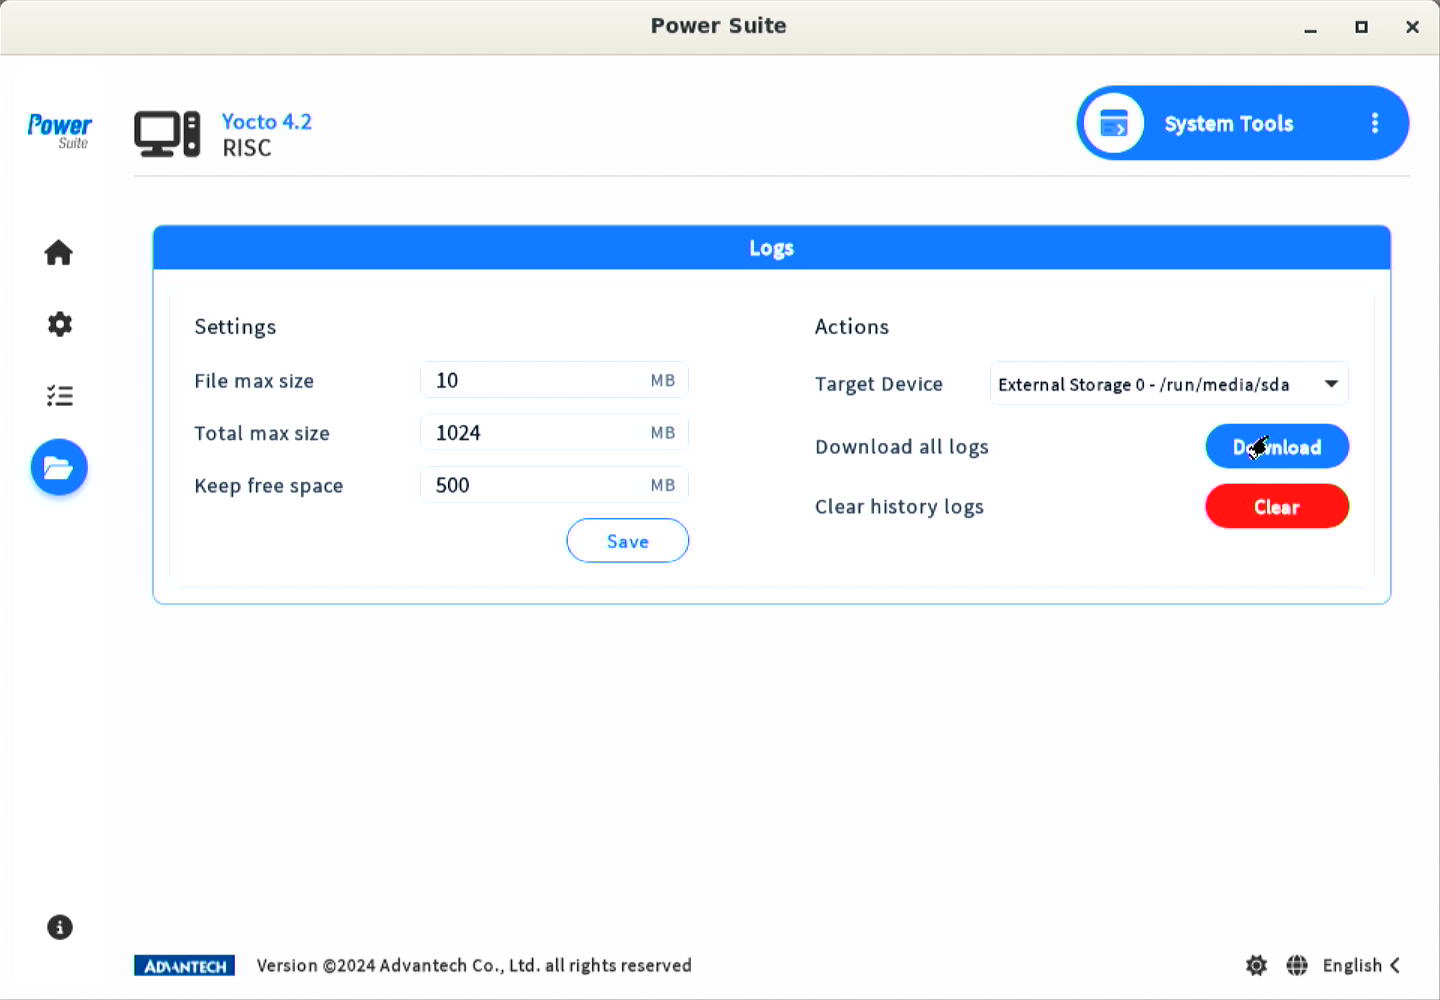
Figure 8. Set log retention limits and select an external USB device to export logs.
Exporting Test Logs
- Connect a USB storage device and confirm that the system can access it and write files to it.
- Open Logs and select the device under Target Device.
- Click Download next to Download all logs and wait for the export to finish.
- Check the output location shown in the application and confirm that the files are on the USB device.
To export logs for an individual test, use the log download button on the Home or Sequence page when available.
Log Retention Settings
| Setting | Purpose |
|---|---|
| File max size | Maximum size of an individual log file |
| Total max size | Maximum total size of retained logs |
| Keep free space | Amount of storage space to keep available |
Changing Settings and Clearing History
- Adjust the log size and free space settings under Logs → Settings, then click Save.
- Before clearing historical logs, export any records you need to keep.
- Click Clear next to Clear history logs.
5. Comparing CLI vs. Power Suite
| Aspect | Terminal Workflow | Power Suite Workflow |
|---|---|---|
| Device configuration | Use separate tools or configuration files | Select the product's available settings on plugin pages |
| System monitoring | Query CPU, memory, and temperature data separately | View the data in System Monitor on the Home page |
| Stress testing | Specify test parameters and track execution manually | Use Settings, Run, and Stop to control tests and review results |
| Test plans | Organize and run individual tests yourself | Use Sequence to execute a predefined plan |
| Log retention | Locate and copy test records manually | Export logs through Logs on supported products |
6. Enterprise Benefits
- Consistent operation: Configure and validate devices through dedicated plugins and feature pages.
- Repeatable testing: Use test parameters and project plans to repeat validation tasks.
- Clearer issue reports: Provide test status, results, messages, and logs to support further investigation.
- Flexible product coverage: Select configuration and validation tasks from the features available on each platform and product.
7. Conclusion
Power Suite brings ARM Linux device configuration, monitoring, and validation into a graphical interface. Check the platform support table and the options available on your product before use. After making changes or running tests, review the settings or results and save logs when needed for further analysis.