Yocto Linux BSP Ver.F User Guide for iMX8 series -Yocto 5.0
Contents
- 1Getting Started 1.1Building Yocto Image System Requirements 1.2Conventions 1.3Docker install and setting 1.3.1To install Docker Engine on your platform 1.3.2To pull ubuntu 20.04 image from Docker Hub 1.3.3To create container 1.4Get BSP 1.4.1Download_BSP_From_GitHub 1.4.2Copy BSP tarball to Container 1.5Downloads tarball 1.6Introducing BSP 1.6.1Naming Rule 1.6.2BSP Content 1.7Build Instructions 1.7.1To create one new build environment 1.7.2To continue an exist build environment 1.7.3To build sdcard image 1.7.4To build toolchain installer 1.7.5To build bootloader 1.7.6To build linux kernel 1.8 1.9Compile error exception handling 1.9.1Case 1. Vulkan-Loader 1.9.2 1.9.3Case 2. nnshark 1.10 1.11Creating boot-up on-board flash from prebuilt image 1.11.1To create one boot-up SD card 1.12Creating boot-up on-board flash from built sdcard image 1.12.1To create one boot-up SD card 1.13Debug console information 1.13.1Preparing for processors device 1.13.2Preparing for software tool 1.14One step build image
- 2Customization 2.1Setting up SDK 2.2Setting up cross compiling environment 2.3Build U-Boot in standalone environment 2.3.1Config u-boot 2.3.2Build u-boot 2.4Build imx-boot image by using imx-mkimage for imx8 2.5Build imx-boot image by using imx-mkimage for imx93 2.5.1Replace imx-boot 2.6Building & updating kernel/modules/dtb manually 2.6.1Copy BSP tarball to Container 2.6.2Config kernel 2.6.3Replace kernel & dts 2.7Improve boot speed
- 3System Recovery
- 4Reflash EMMC from Boot SD CARD
- 5Package List
- 6How to get the MAC, Serial Number, and Manufacture Date in the QSPI flash
Getting Started
Building Yocto Image System Requirements
- CPU Cores: Quad-core processor (or higher recommended)
- Memory: 8GB RAM (more is recommended for better performance)
- Disk Space: 400GB (more is recommended and SSD is suggested for better performance)
Conventions
${PREBUILT_IMAGE} : compressed prebuilt image (*.img.gz)
${CONTAINER_NAME} : container name (e.g. imx8LBVD0027)
${BSP_TARBALL} : BSP tarball (*.tgz)
${BSP_HOME} : home directory of the BSP
${BDIR} : build directory (e.g. build_xwayland)
${MX8PROC} : i.MX8 Processor
mx8mq for iMX8M Dual Core mx8mm for iMX8MM mx8mp for iMX8MP mx8qm for iMX8QM mx8qxp for iMX8QXP mx8ulp for iMX8ULP
${IMX8PROC} : i.MX8 Processor
imx8mq / imx8mm / imx8qm /imx8qxp /imx8mp /imx8ulp
${BOARD} : available target boards list below
rom5720 rom5721 rom7720 rom5620 rom3620 rom5722 rsb3720 rom2620 rsb3730
${BOARD_REV} : board revision
a1
${MC} : machine code combined with ${IMX8PROC}${BOARD}${BOARD_REV}
for example,
imx8mqrom5720a1 for ROM-5720 A1
imx8qmrom7720a1 for ROM-7720 A1
imx8qxprom5620a1 for ROM-5620 A1
imx8qxprom3620a1 for ROM-3620 A1
imx8mmrom5721a1 for ROM-5721 A1
imx8mprom5722a2 for ROM-5722 A1
imx8mprsb3720a1 for RSB-3720 A1
imx8mprsb3720a2 for RSB-3720 A2 <--(used this version)
imx8ulprom2620a1 for ROM-2620 A1
imx8mmrsb3730a2 for RSB-3730 A2
You can also use the command below to check supported machines on BSP
$ source setup-environment
${MEM_SIZE} : memory size
1G/2G/4G/6G
${UC} : u-boot config
1G/2G/4G/6G/FSPI_1G/FSPI_2G/FSPI_4G/FSPI_6G...
${SD_DEVICE} : device name of SD card in Linux (e.g. /dev/sdf)
${SDCARD_IMAGE} : sdcard image built by bitbake (*.wic.zst)
${WORKSPACE} : host workspace folders
${UBOOT} :u-boot version(e.g. v2024.04_6.6.23_2.0.0)
${KERNEL} : linux kernel version(e.g. 6.6.23_2.0.0)
${TOOLCHAIN} : toolchain installed directory(e.g. opt/fsl-imx-wayland/6.1-mickledore/environment)
debug console / serial console
serial terminal program (e.g. minicom, putty, teraterm ...) that serial port is configured to 115200 8N1
terminal console
terminal program (e.g. gnome-terminal, xfce4-terminal ...)
Docker install and setting
If you don't have docker in your system, then you can follow the below steps to install docker and run it first.
To install Docker Engine on your platform
Please refer to Docker Installation Guide for details
To pull ubuntu 20.04 image from Docker Hub
$ docker pull advrisc/u20.04-imx8lbv1
To create container
$ docker run --privileged -it --name ${CONTAINER_NAME} -v ${WORKSPACE}:/home/adv/adv-release-bsp -v /dev:/dev advrisc/u20.04-imx8lbv1 /bin/bash
Get BSP
You have two methods to put BSP into container created above
Download_BSP_From_GitHub
The following example shows how to download the Advantech Yocto BSP from GitHub. For this example, a directory called adv-release-bsp is created for the project. Refer to IoTGateway/BSP/Linux/iMX8/OS_Support_List , Official version " imx8LBVD0XXX" is taken as an example :
$ git config --global user.name "Your Name"
$ git config --global user.email you@example.com
$ sudo chown adv:adv adv-release-bsp
$ cd adv-release-bsp
$ repo init -u git://github.com/ADVANTECH-Corp/adv-arm-yocto-bsp.git -b imx-linux-scarthgap -m adv-6.6.23-2.0.0.xml
$ repo sync
If you suffer "server certificate verification failed", you can use the following command to disable SSL verification in git repositories with self-signed certificates.
$ export GIT_SSL_NO_VERIFY=1
or
$ git config --global http.sslverify false
If you get "The unauthenticated git protocol on port 9418 is no longer supported.", you can try it.
$ git config --global url."https://".insteadOf git://
Copy BSP tarball to Container
If you have BSP tarball (eg. imx8LBVD0027_2023-10-25.tgz), then you have to copy it into container.
Follow the steps below:
1.Exit container and back to local machine
$ exit
2.Copy BSP tarball to ${WORKSPACE} , and change owner
$ cp imx8LBVD0027_2023-10-25.tgz ${WORKSPACE}
$ sudo chown adv:adv ${WORKSPACE}/imx8LBVD0027_2023-10-25.tgz
3.Back to container
$ docker start ${CONTAINER_NAME}
$ docker attach ${CONTAINER_NAME}
4.Unpack BSP tarball
$ tar zxvf imx8LBVD0027_2023-10-25.tgz
Downloads tarball
Not necessarily step During building Yocto image , it will generate downloads folder which includes all packages we need , but it usually can't fetch normally, so we keep this downloads folder. Then we can reduce some fetch failed issue. You can get Downloads tarball (downloads_imx9_6.6.36_2.1.0.tar) from following URL: [downloads_imx9_6.6.36_2.1.0.tar ] If you get downloads tarball, you can copy to your ${WORKSPACE}
Follow the steps below:
1.Exit container and back to local machine
$ exit
2.Copy Downloads tarball to ${WORKSPACE} , and change owner
$ cp downloads_imx9_6.6.36_2.1.0.tar ${WORKSPACE}
$ sudo chown adv:adv ${WORKSPACE}/downloads_imx9_6.6.36_2.1.0.tar
3.Back to container
$ docker start ${CONTAINER_NAME}
$ docker attach ${CONTAINER_NAME}
4.Unpack Downloads tarball
$ tar zxvf downloads_imx9_6.6.36_2.1.0.tar
5.make link to downloads folder
$ cd adv-release-bsp
$ ln -s ${WORKSPACE}/downloads_imx9_6.6.36_2.1.0.tar downloads
Introducing BSP
The BSP is based on Yocto Project with Freescale enhanced features for i.MX8, plus specific target board features from Advantech Inc.. The Advantech Yocto Project BSP Release directory contains a "sources" directory, which contains the recipes used to build,
one or more build directories, and a set of scripts used to set up the environment.
The recipes used to build the project come from both the community and Advantech. The Yocto Project layers are downloaded
to the sources directory. This sets up the recipes that are used to build the project.
Naming Rule
The tarball/prebuilt image name is consist of the model name followed by "LB" or "LI" plus version number and released date. For example, BSP file name: imx8LBVD0027_2023-10-25.tgz which , "LB" is acronym of L inux B SP, "VD0010" stands for V ersion D . 0027 For example, Yocto image name: ' 3720A2AIM36LIVD0027_iMX8MP_6G_2023-10-25.img.gz' which "3720A2" stands for RSB-3720 A2 "LI" is acronym for prebuilt L inux I mage "6G" is DDR size
BSP Content
The description of some important folders list below: sources/ meta-advantech/ : meta layer by Advantech meta-fsl-*/ : meta layer by Freescale fsl-setup-release.sh : to create one new build environment setup-environment : to continue an exist build environment
Build Instructions
To create one new build environment
Perform the following commands in terminal console
$ cd ${BSP_HOME}
$ MACHINE=${MC}
DISTRO=fsl-imx-xwayland
source imx-setup-release.sh -b ${BDIR}
We can specify u-boot default config like below
$ MACHINE=${MC}
UBOOT_CONFIG=${UC}
DISTRO=fsl-imx-xwayland
source imx-setup-release.sh -b ${BDIR}
Example if your board is 3720A2 6G version
MACHINE=imx8mprsb3720a2 UBOOT_CONFIG=6G DISTRO=fsl-imx-xwayland source imx-setup-release.sh -b build_x11
Example if your board is 3720A2 4G version
MACHINE=imx8mprsb3720a2 UBOOT_CONFIG=4G DISTRO=fsl-imx-xwayland source imx-setup-release.sh -b build_x11
Example if your board is 3720A2 2G version
MACHINE=imx8mprsb3720a2 UBOOT_CONFIG=2G DISTRO=fsl-imx-xwayland source imx-setup-release.sh -b build_x11
You need to read and accept the EULA.
![]()
To continue an exist build environment
Perform the following commands in terminal console
$ cd ${BSP_HOME}
$ source setup-environment ${BDIR}
To build sdcard image
To create/continue a build environment
Perform the following command in terminal console
$ bitbake imx-image-full
The two files, imx-image-full-
${MC}
.wic.zst and ...wic.bmap, will be located in directory, ./tmp/deploy/images/
${MC}
, while building process finished successfully.
To build toolchain installer
SDK inculde QT
$ bitbake imx-image-full -c populate_sdk
To create/continue a build environment
Perform the following command in terminal console
$ bitbake meta-toolchain
The below installer will be located in the directory "./tmp/deploy/sdk".
fsl-imx-wayland-glibc-x86_64-meta-toolchain-armv8a-imx8mp-lpddr4-evk-toolchain-
${KERNEL}
-scarthgap.sh
To build bootloader
To create/continue a build environment
Perform the following command in terminal console
$ bitbake imx-boot
To build linux kernel
To create/continue a build environment
If you operate on docker images, please install tmux application before running this command
$ sudo apt-get install tmux
Type following command to enter tmux
$ tmux
Perform the following command in terminal console to show up menuconfig
$ bitbake linux-imx -c menuconfig
After edit menuconfig, type following command to exit tmux windows
$ exit
to build kernel image
$ bitbake linux-imx
The two files, Image & Image-
${IMX8PROC}
${BOARD}
${BOARD _REV } .dtb, will be located in the directory, ./tmp/deploy/images/ ${MC} .
Compile error exception handling
Case 1. Vulkan-Loader
Change directory to 'vulkan' meta-layer folder
$ cd ${BSP_HOME}/sources/meta-freescale/recipes-downgrade/vulkan/
Modify 'vulkan-loader' bb file to change '
SRC_URL'
branch name from
master
to
main
$ vim vulkan-loader_1.2.182.0.bb
Case 2. nnshark
Creating boot-up on-board flash from prebuilt image
To create one boot-up SD card
Perform the following command in terminal console
# gunzip -c ${PREBUILT_IMAGE} | dd of=${SD_DEVICE} bs=1M
# sync
Creating boot-up on-board flash from built sdcard image
To create one boot-up SD card
Perform the following commands in terminal console
$ pushd ${BSP_HOME}/${BDIR}/tmp/deploy/images/${MC}
$ zstd -cd ${SDCARD_IMAGE} | sudo dd of=${SD_DEVICE} bs=1M
( or using bmaptool to take less time elapsed)
$ sudo bmaptool copy --bmap ${SDCARD_IMAGE/zst/bmap} ${SDCARD_IMAGE} ${SD_DEVICE}
$ sync
$ popd
Debug console information
If you want to see debug message from device, you need to prepare for processors device and software tool.
Preparing for processors device
- The following URL provides information about the debug port slot and the debug port line for each device
Debug Port Information
Preparing for software tool
- You need to prepare the debug console tool. For example: "minicom" tool or "putty" tool.
- Baud rate: 115200
One step build image
Our machine must be pre-installed docker
Download the following script can quickly build our image.
$ wget https://raw.githubusercontent.com/ADVANTECH-Corp/RISC_tools_scripts/mickledore/imx8/adv_imx8_build.sh
$ sudo chmod a+x adv_imx8_build.sh
Build image
$ sudo ./adv_imx8_build.sh ${BOARD}
$ sudo ./adv_imx8_build.sh rom5720
Our image will be in workspace folder.
workspace/${BDIR}/tmp/deploy/images/${MC}
Then refer to Creating_boot-up_on-board_flash_from_built_sdcard_image to build SD card.
Customization
Setting up SDK
Please follow the section,
To build toolchain installer
, to build one toolchain installer
Perform the following command in terminal console
$ cd ${BSP_HOME}/${BDIR}/tmp/deploy/sdk
$ sudo ./fsl-imx-xwayland-glibc-x86_64-meta-toolchain-armv8a-imx8mprsb3720a2-toolchain-6.6-scarthgap.sh
Enter new installed directory or just press
Enter
to use default directory.
While
Proceed[y/n]?
shows up, please enter the correct one.
Waiting for the SDK installed (while the following messages show up completely)
Download SDK Link (Just Only reference),
[downloads_SDK
]

Setting up cross compiling environment
SDK has been set up (ref.
Setting up SDK
)
Perform the following command in terminal console
$ source ${TOOLCHAIN}/environment-setup-aarch64-poky-linux
Build U-Boot in standalone environment
Config u-boot
make ${IMX8PROC}_${BOARD}${BOARD_REV}_${MEM_SIZE}_defconfig
eg.
make imx8mp_rsb3720a2_6G_defconfig
Build u-boot
make -j4
Build imx-boot image by using imx-mkimage for imx8
Get imx-boot tarball from our server Here we take rom5721 as an example:
tar zxvf 3720A2AIM36LIVD0027_iMX8MP_6G_imx-boot.tgz
cd 3720A2AIM36LIVD0027_iMX8MP_6G_imx-boot/
In this folder , we have two script as below: Copy necessary files to imx-mkimage folder
./cp_uboot.sh ${uboot path} ${IMX8PROC}
Make imx-boot image
./mk_imx-boot.sh ${IMX8PROC}
eg.
./cp_uboot.sh ../uboot-imx imx8mp
./mk_imx-boot.sh imx8mp
Build imx-boot image by using imx-mkimage for imx93
Get imx-boot tarball from our server Here we take rom2820 as an example:
tar zxvf 3720A2AIM36LIVD0027_iMX8MP_6G_imx-boot.tgz
cd 3720A2AIM36LIVD0027_iMX8MP_6G_imx-boot/
In this folder , we have two script as below: Copy necessary files to imx-mkimage folder
./cp_uboot.sh ${uboot path} ${IMX8PROC}
Make imx-boot image
./mk_imx-boot.sh ${IMX8PROC}
eg.
./cp_uboot.sh ../uboot-imx imx8mp
./mk_imx-boot.sh imx8mp
Replace imx-boot
Perform the following command to transfer to on-board flash
$ dd if=flash.bin of=/dev/mmcblk0 bs=1K seek=<offset> conv=fsync
Where offset is: 33 - for i.MAX 8QuadMax A0, i.Mx 8QuadXPlus A0, i.MX 8M Quad, and i.MX 8M Mini 32 - for iMX 8M PLUS, i.MAX 8QuadXPlus B0/C0, i.Mx 8QuadMax B0 and i.MX 8ulp
Building & updating kernel/modules/dtb manually
The cross compiling environment has been set up. (ref. Setting up cross compiling environment )
Copy BSP tarball to Container
Refer to Copy_BSP_tarball_to_Container , copy kernel tarball to ${WORKSPACE} and back to container
change owner & unpack tarball
$ sudo chown adv:adv imx8LBVD0027_2023-10-25_linux-imx.tgz
$ tar zxvf imx8LBVD0027_2023-10-25_linux-imx.tgz
Config kernel
Configure linux kernel
$ cd linux-imx
$ make distclean
$ make imx_v8_adv_defconfig
$ make menuconfig
Start building linux kernel
$ make -j4 Image
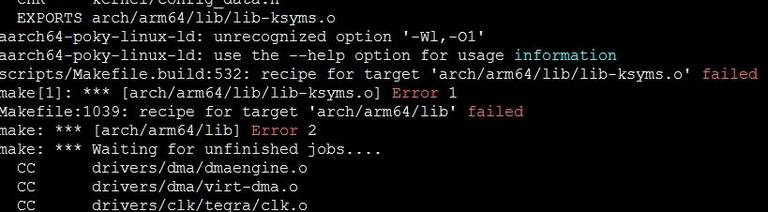
When you get error like below run command then rebuild
$ unset LDFLAGS
The kernel image file, Image, is located in the directory "./arch/arm64/boot/". Start building kernel modules
$ make -j4 modules
Copy all modules to a temporary rootfs directory, "~/temp/rootfs"
$ make modules_install INSTALL_MOD_PATH=~/temp/rootfs
Building device tree blob
$ make -j4 freescale/${IMX8PROC}-${BOARD}-${BOARD_REV}.dtb
eg.
$ make -j4 freescale/imx8mp-rsb3720-a2.dtb
The device tree blob, ${IMX8PROC}
${BOARD}
${BOARD_REV} .dtb, is located in the directory "./arch/arm64/boot/dts/freescale/".
Replace kernel & dts
Replace kernel copy Image to SDcard or emmc Replace dtb file copy dtb file to SDcard or emmc
Improve boot speed
- Bootloader
1.bootdelay time
We can cancel the bootdelay time by setting bootloader environment value.
setenv bootdelay 0
env save
reset
2.Disable console
Disable debug message output can also improve boot speed
Disable kernel message
setenv mmcargs setenv bootargs ${jh_clk} console=${console} modprobe.blacklist=${modprobe.blacklist} root=${mmcroot} video=HDMI-A-1:${videores} quiet
env save
reset
Or
Disable debug port
setenv console
env save
reset
- Rootfs
TBD
- Services
- Using systemctl disable remove ,we can remove unnecessary services.
systemctl disable <services>
eg.
systemctl disable boottimes
System Recovery
This section provides detail procedures of restoring the eMMC image.
For more usage ( https://github.com/NXPmicro/mfgtools/wiki )
Reflash EMMC from Boot SD CARD
Download mksd-linux.sh in https://github.com/ADVANTECH-Corp/RISC_tools_scripts/blob/mickledore/imx8/mksd-linux.sh
Download "Product_AIM_Release_version"_flash_tool.tgz
Unzip the "Product_AIM_Release_version"_flash_tool.tgz
Copy the mksd-linux.sh to mk_inand folder.
Run mksd-linux.sh
Package List
How to get the MAC, Serial Number, and Manufacture Date in the QSPI flash
MAC 0:
READ_DATA=`dd if=/dev/mtdblock0 bs=1 skip=$((0xd0000)) count=6 2> /dev/null | hexdump -e '16/1 "%02x " "\n"' | sed 's/ /:/g' | cut -c 1-17`

echo $READ_DATA
MAC 1:
READ_DATA=`dd if=/dev/mtdblock0 bs=1 skip=$((0xd0400)) count=6 2> /dev/null | hexdump -e '16/1 "%02x " "\n"' | sed 's/ /:/g' | cut -c 1-17`

echo $READ_DATA
Serial Number:
READ_DATA=`dd if=/dev/mtdblock0 bs=1 skip=$((0xd0006)) count=10 2> /dev/null | cut -c 1-10`

echo $READ_DATA
Manufacture Date:
READ_DATA=`dd if=/dev/mtdblock0 bs=1 skip=$((0xd0010)) count=14 2> /dev/null | cut -c 1-14`

READ_DATA=`echo $READ_DATA | cut -c 1-4`-`echo $READ_DATA | cut -c 5-6`-`echo $READ_DATA | cut -c 7-8`_`echo $READ_DATA | cut -c 9-10`-`echo $READ_DATA | cut -c 11-12`-`echo $READ_DATA | cut -c 13-14`

echo $READ_DATA