RSB-4810 Android12 OS User Guide
Contents
- 1資源特性(Features)
- 2訂購資訊(Ordering Information)
- 3接口布局和尺寸(Layout and Sizes) 3.1接口布局圖 Board Layout 3.2接口尺寸 Board Dimension
資源特性(Features)
- Rockchip RK3568 Arm Quad Cortex-A55, up to 2.0GHz
- Built-in NPU with processing performance of up to 0.8 TOPS
- Onboard 2/4GB LPDDR4 memory and 16/32GB eMMC
- Supports 1 x HDMI 2.0 4K, 1 x LVDS/MIPI-DSI, and 1 x eDP
- Supports 4K H.264/H.265 video decoder
- Provides 2 x GbE, 1 x SATA 3.0, 6 x UART, 2 x USB 3.0, 2 x USB 2.0, 1 x USB OTG, and 2 x CAN FD
- Provides a M.2 E Key with PCIE 3.0/USB 2.0/SDIO/UART signal for Wi-Fi 5/6 Modules, and a MINI-PCIE with PCIE 3.0/USB 2.0 signal for LTE/5G Modules
- Supports Linux and Android OS
訂購資訊(Ordering Information)

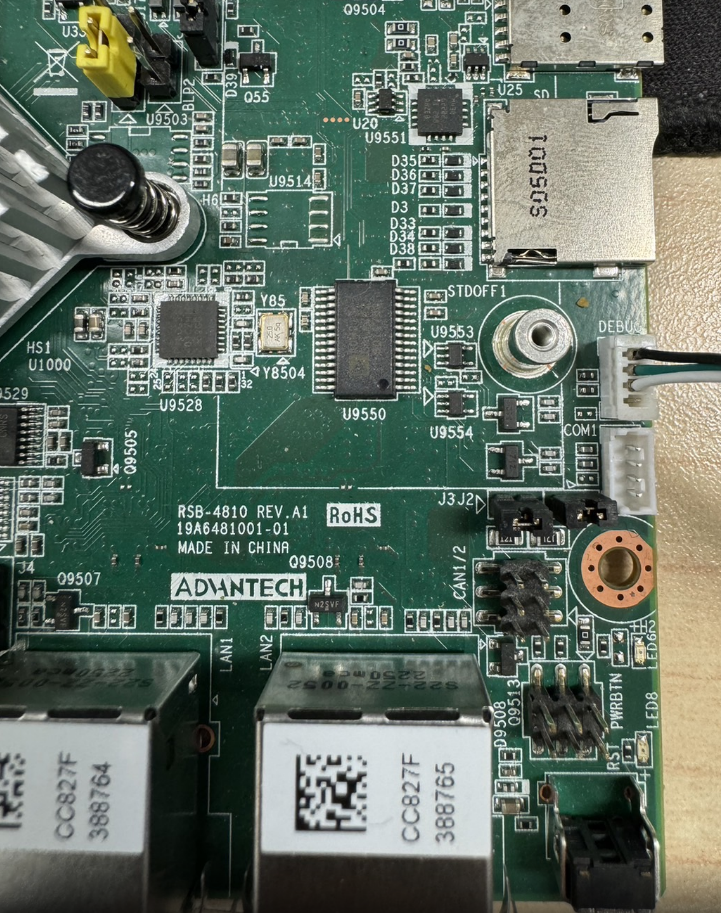
接口布局和尺寸(Layout and Sizes)
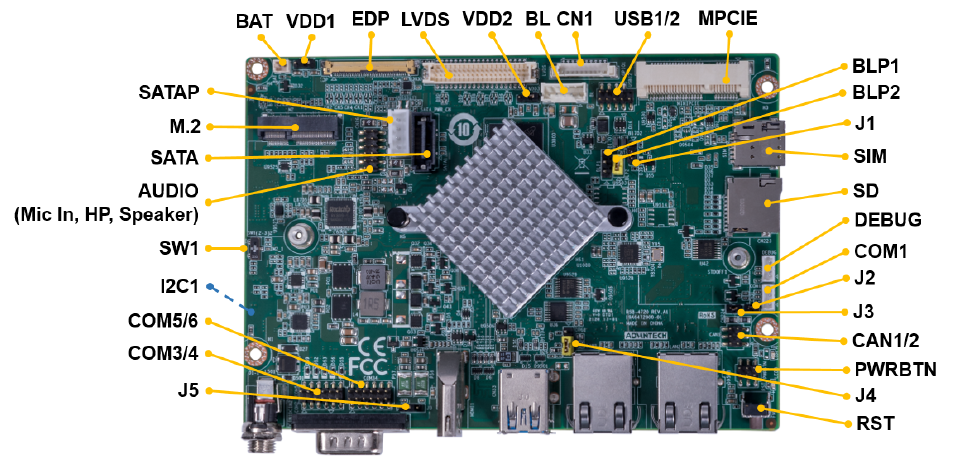
接口布局圖 Board Layout
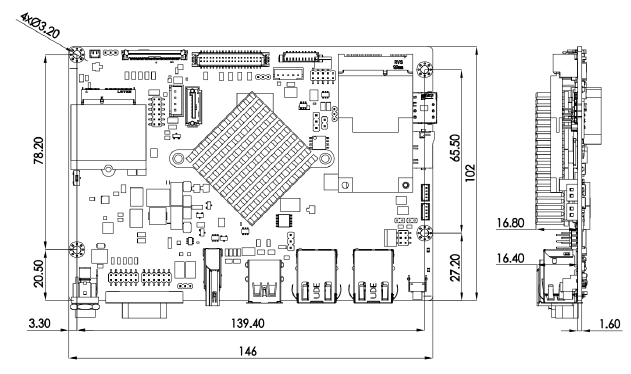
接口尺寸 Board Dimension
Connector List
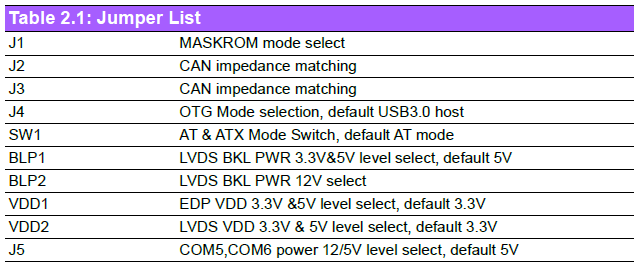
Jumper List
接口引脚定義 (Pin definitions)
| Jumper List | |
|---|---|
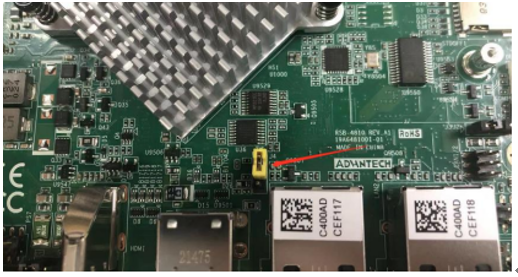
| J1 | MASKROM mode select Short pin 12 and power on the RSB-4810 to enter MASKROM mode. Change back to pin 23 before click "Run" to flash image |
| J2 | CAN impedance matching |
| J3 | CAN impedance matching |
| J4 | OTG Mode selection, default USB3.0 host |
| SW1 | AT & ATX Mode Switch, default AT mode |
| BLP1 | LVDS BKL PWR 3.3V&5V level select, default 5V |
| BLP2 | LVDS BKL PWR 12V select |
| VDD1 | EDP VDD 3.3V &5V level select, default 3.3V |
| VDD2 | LVDS VDD 3.3V & 5V level select, default 3.3V |
| J5 | COM5,COM6 power 12/5V level select, default 5V |
Connector List
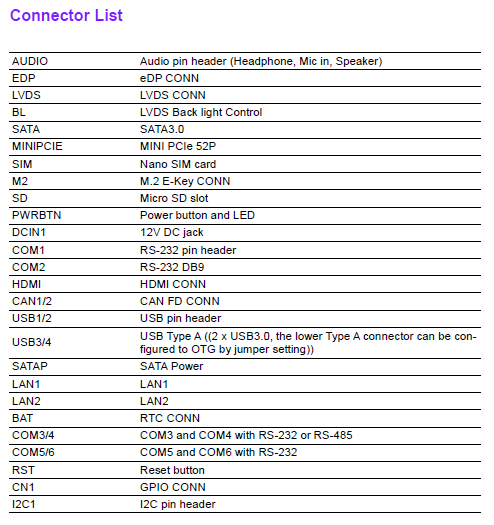
| AUDIO | Audio pin header (Headphone, Mic in, Speaker) |
|---|---|
| EDP | eDP CONN |
| LVDS | LVDS CONN |
| BL | LVDS Back light Control |
| SATA | SATA3.0 |
| MINIPCIE | MINI PCIe 52P |
| SIM | Nano SIM card |
| M2 | M.2 E-Key CONN |
| SD | Micro SD slot |
| PWRBTN | Power button and LED |
| DCIN1 | 12V DC jack |
| COM1 | RS-232 pin header |
| COM2 | RS-232 DB9 |
| HDMI | HDMI CONN |
| CAN1/2 | CAN FD CONN |
| USB1/2 | USB pin header |
| USB3/4 | USB Type A ((2 x USB3.0, the lower Type A connector can be configured to OTG by jumper setting)) |
| SATAP | SATA Power |
| LAN1 | LAN1 |
| LAN2 | LAN2 |
| BAT | RTC CONN |
| COM3/4 | COM3 and COM4 with RS-232 or RS-485 |
| COM5/6 | COM5 and COM6 with RS-232 |
| RST | Reset button |
| CN1 | GPIO CONN |
| I2C1 | I2C pin header |
快速入门 (Quick Start)
系统下载 (OS Download)
Note: L IV= Yocto Linux , U IV=Ubuntu , D IV = Debian , A IV = Android, L B V=BSP , L I V= Image
| Platform | Product | Image Version | Release Date | Release Version | Release notes | Image Download | BSP Download Tag | Test Report | Comment |
|---|---|---|---|---|---|---|---|---|---|
| RK3568 | RSB-4810 | V12017 | 2024/05/11 | Beta | --> | Baidu Password:a887 Dropbox | RK3568_S12_AIV12017.xml | Test Report |
-
Alpha: Basic I/O function bring up by RD;
-
Beta: Basic I/O function、performance and middleware verified by RD. Peripherals integrated;
-
GA: Beta version by QE verification;
-
RTM: Beta version by SI/Power/QE verification and pre-loaded;
How to update images .
There are three ways to update images:
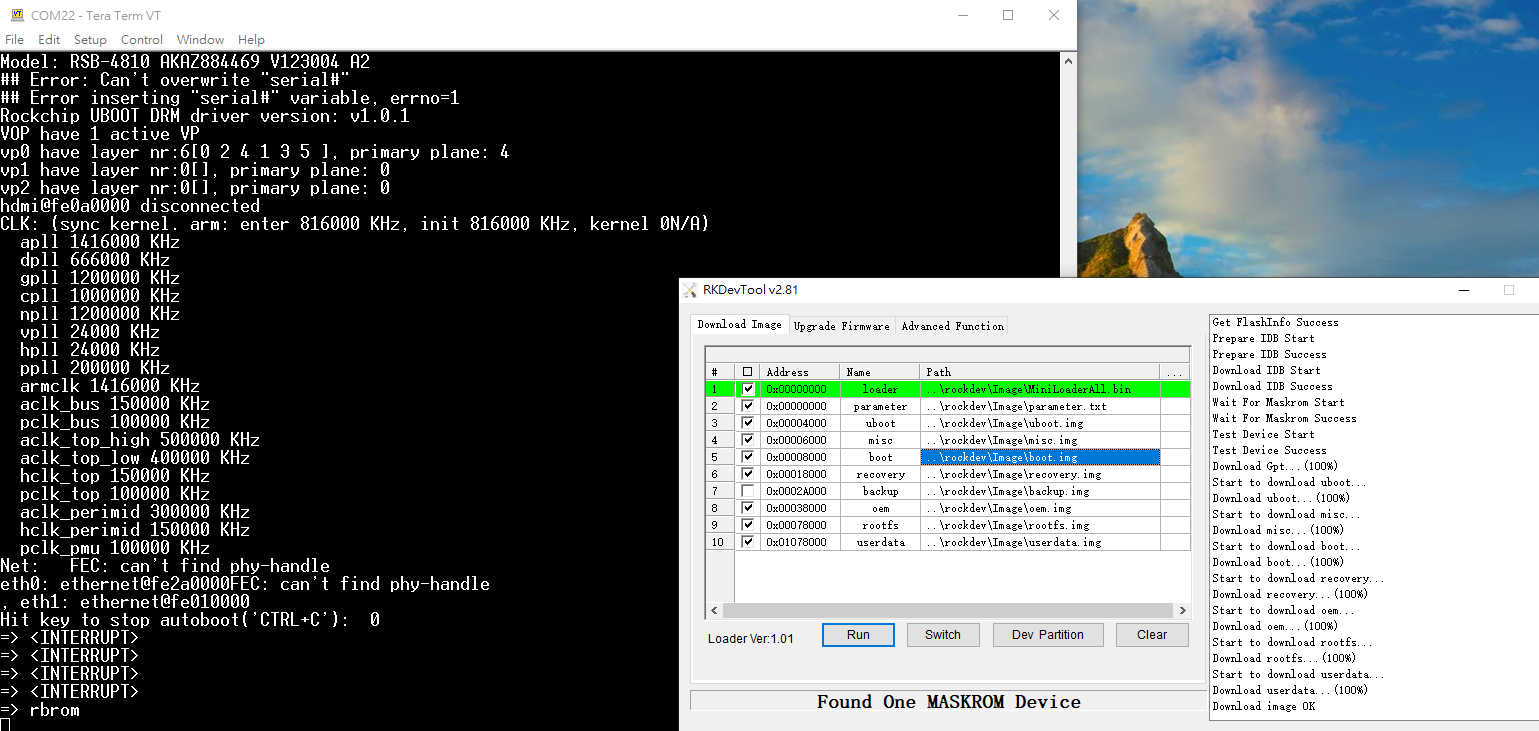
Android:
Using_RKTool.
SD_update image.
Debian :
Android
-
Change Tool language in config.ini, please change "Selected: to "2"
-
选择工具语言:Selected=1(中文)<--Chinese ;Selected=2(英文)<-- English
[Language] Kinds=2 Selected=2 LangPath=Language\

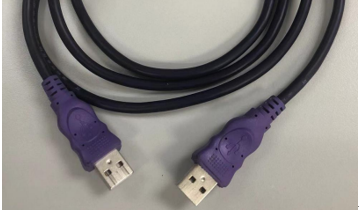
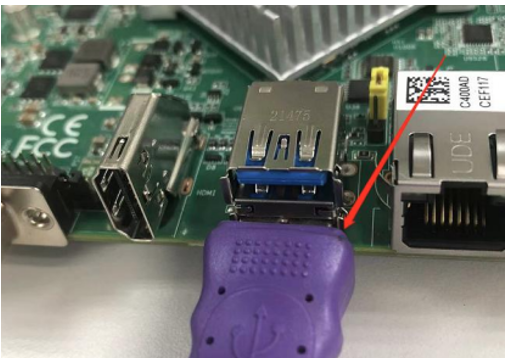
- Connect USB Type-A to Type-A cable with RSB-4810 USB Type-A connector to host PC.
- Change J4 to pin 1 & pin 2 OTG mode. (default is Pin 2 & Pin3)
- Connect with Debug port
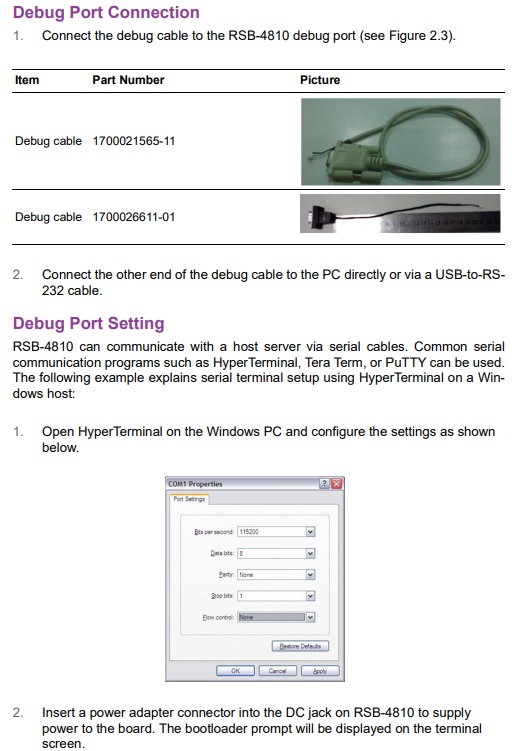
-
Power on the RSB-4810 and press “Ctrl+c” in the debug terminal to stop at u-boot
-
Type “rbrom” to reboot to MASKROM mode

-
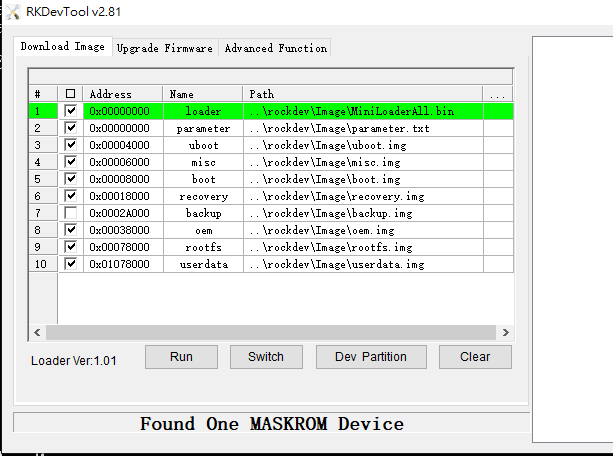
Launch RKDevTool.exe as “Administrator” and confirm it shows “Found One MASKROM device”
-
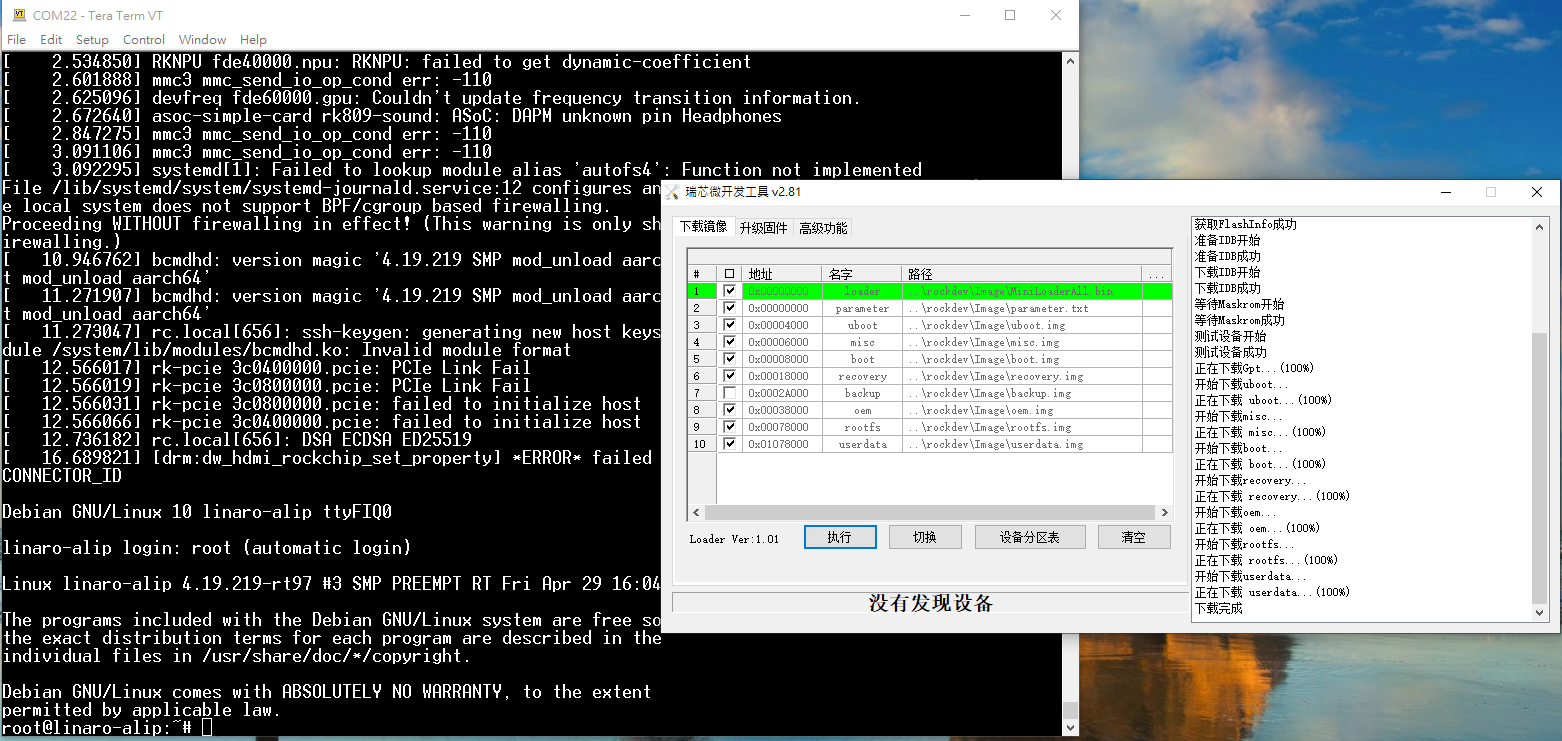
Click “Run” to start flash image to target.
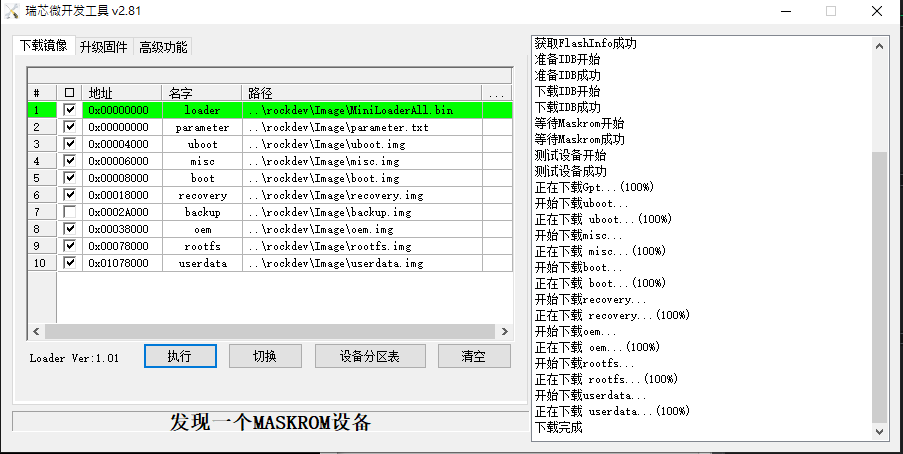
- After flashing is finished, it will reboot automatically with the new OS.
Linux系统的基本使用(Linux System Basic Operating Method)
User Guide
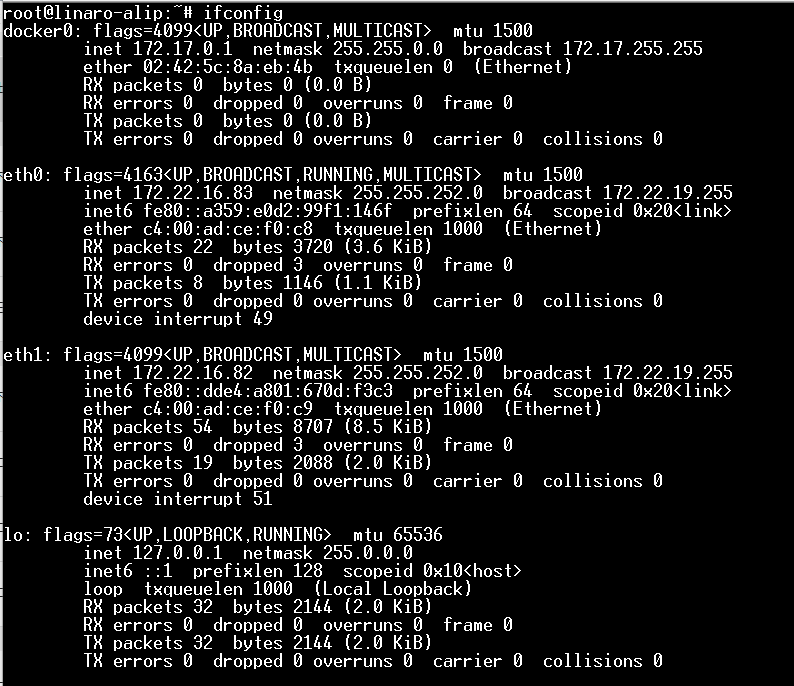
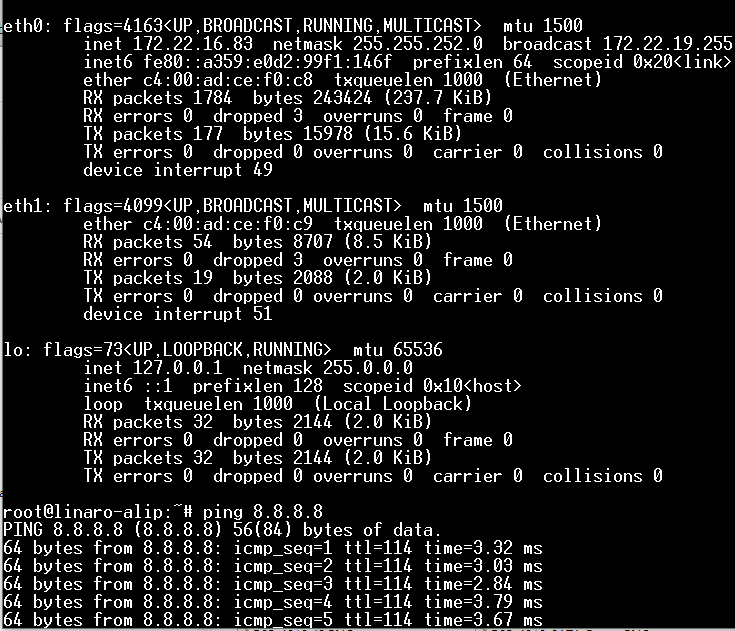
乙太網路使用方法(Ethernent Testing Method)
Command : ifconfig
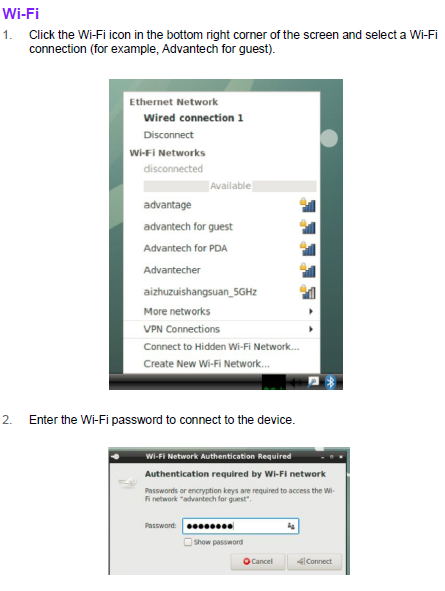
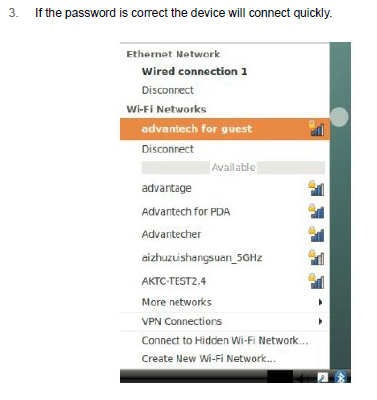
WiFi使用方法(WIFI Testing Method)
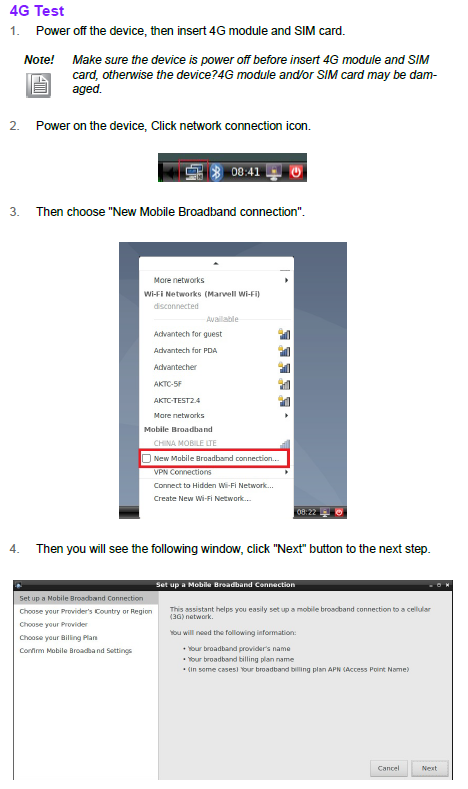
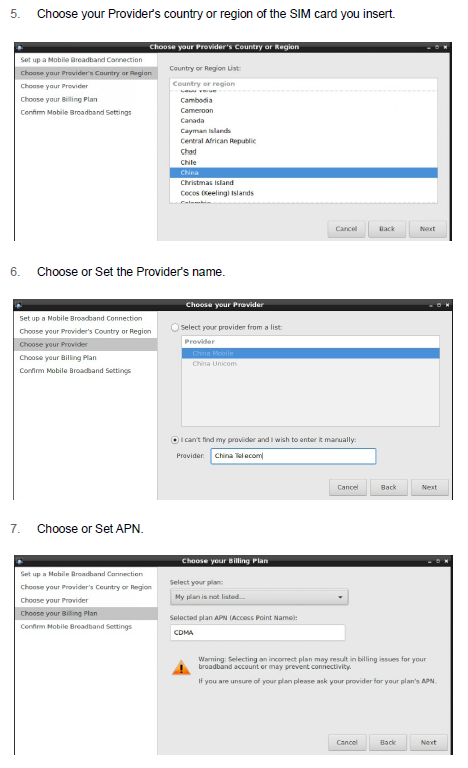
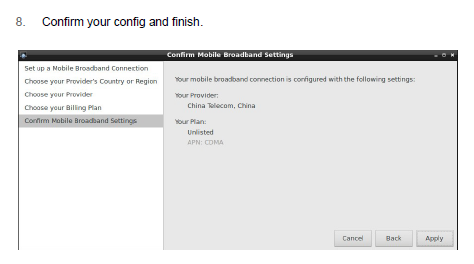
4G使用方法(4G Testing Method)
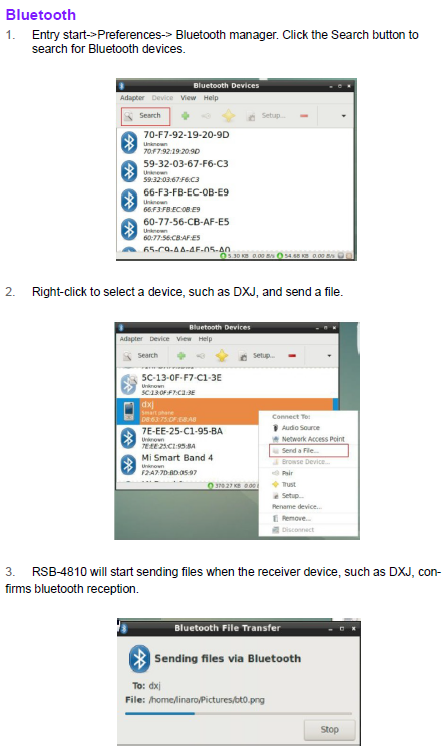
蓝牙使用方法(BlueTooth Operating Method)
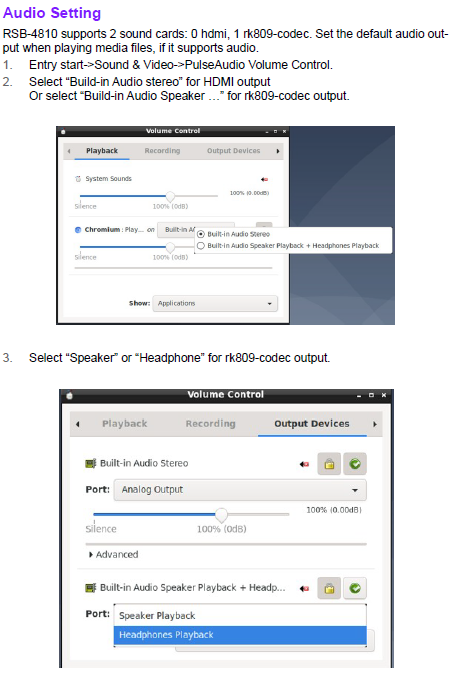
音訊使用方法(BlueTooth Operating Method)

CAN 測試( CAN Test method)
- loopback
- --> (2PCS RSB-4810)
CANFD测试
备注:使用DQA测试脚本。(DQA测试过1、3、5、8M)
测试脚本链接:
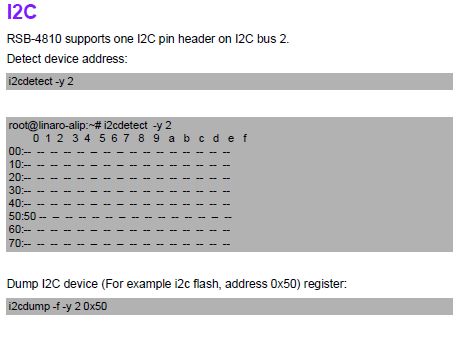
I2C 測試( I2C Test method)
看門狗測試 (Watch Dog Test method)

UART測試 (UART Test method)

How to Configure RS-232/485 Mode Enter U-boot interrupt mode. Connect the device to the debug port and open the debug console. Press “ctrl + c” before powering on the device. The following information should be displayed on the debug console: Hit any key to stop autoboot: 0 => => Then input the following command to configure the UART mode. RS-485 Mode: setenv uart_mode 0x0c saveenv reset RS-232 Mode: setenv uart_mode 0x00 saveenv reset Note: The default value is RS-232. Cp210x supports four ports, but for RSB-4810 only ttyUSB2 and ttyUSB3 support RS-485 mode. In the above command “setenv uart_mode 0x0c”, 0x0c means set bit2(ttyUSB2) and bit3(ttyUSB3) to 1 (0 means to RS-232; 1 means to RS-485). To configure just ttyUSB2 (or ttyUSB3) to RS-485 mode, change 0x0c to 0x04 (or 0x08).
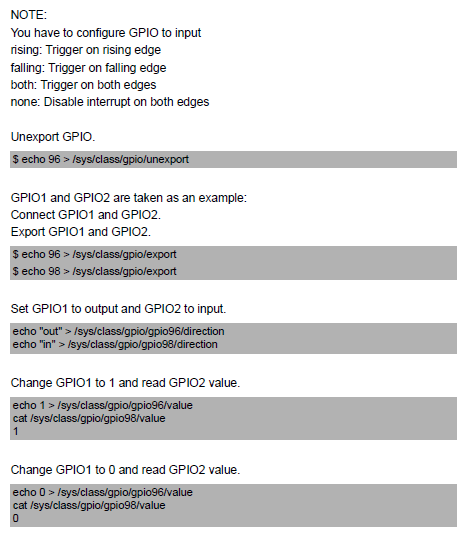
GPIO測試(GPIO Test method)

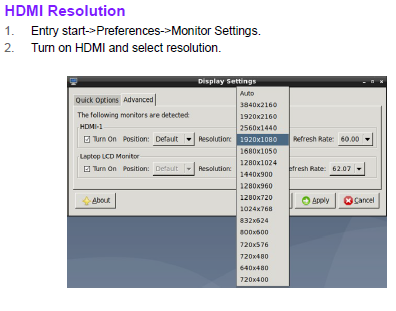
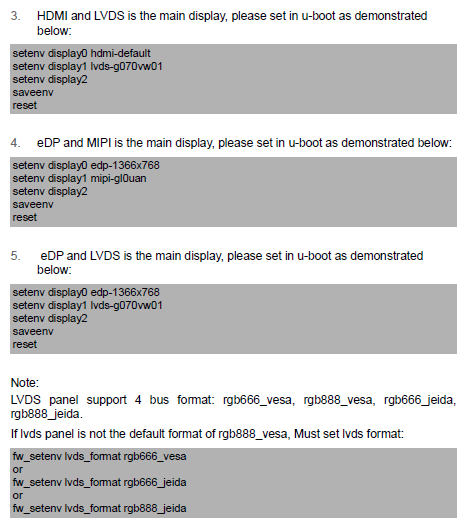
Display測試(Display Test method)
HDMI:
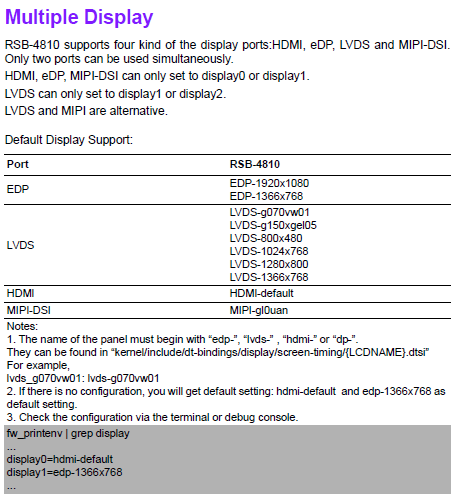
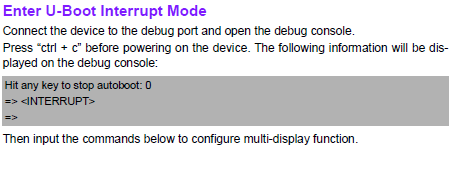
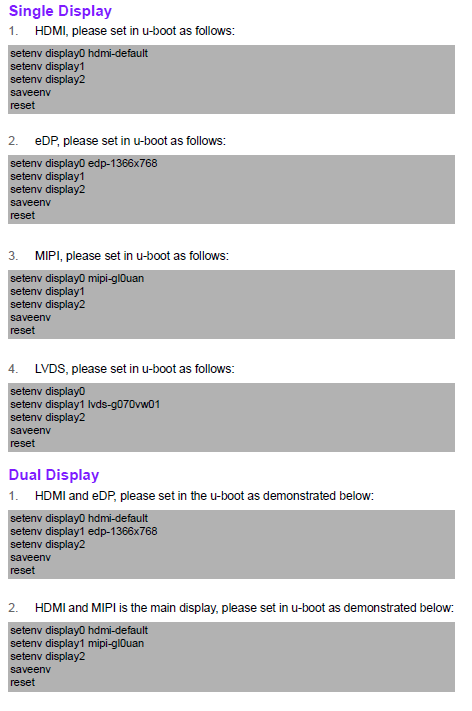
Mutiple Display:
How_to_Config_Multi-Display
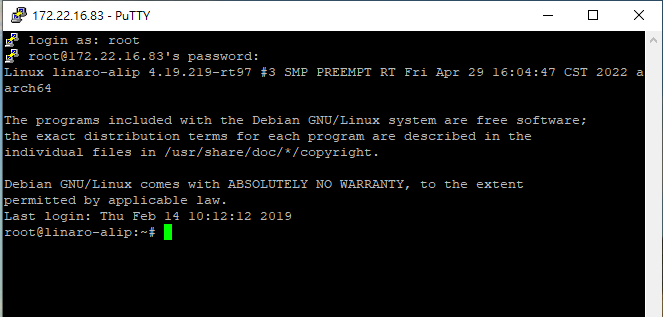
遠程訪問及文件傳輸(Remote Access and File Transimmion)
查看主板IP位址 ( Chech IP Address ):
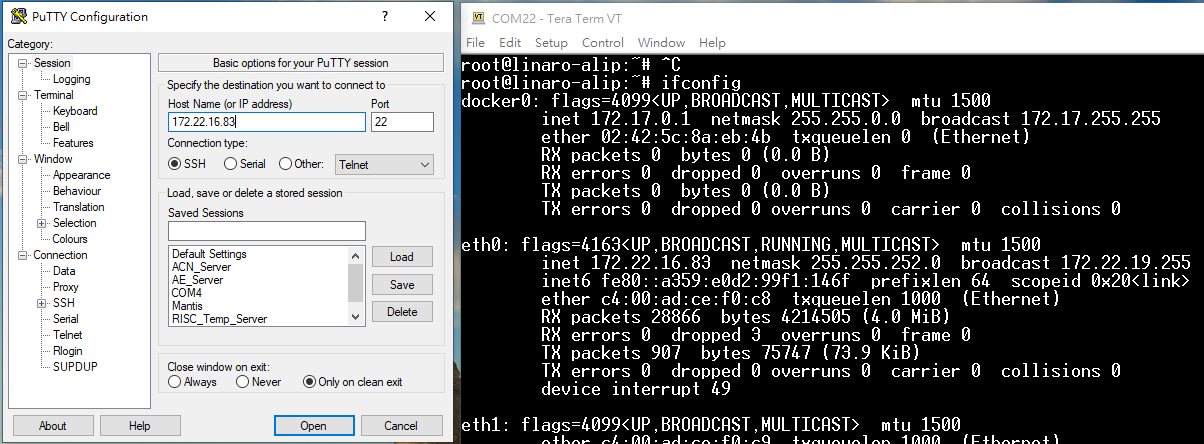
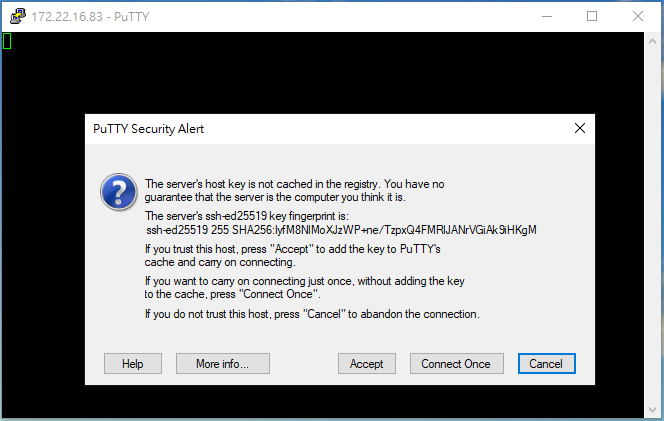

ID: root password:123456
通用方法(General Method)
=== 查看CPU温度(Check CPU Temperature) === root@xxxx:/# cat /sys/devices/virtual/thermal/thermal_zone0/temp 40000
或者直接以度爲單位顯示 echo $[$(cat /sys/class/thermal/thermal_zone0/temp)/1000]° >>> 40°
=== 查看CPU频率(Check CPU Frequency) === cat /sys/devices/system/cpu/cpu0/cpufreq/cpuinfo_cur_freq >> 1200000 cat /sys/devices/system/cpu/cpu0/cpufreq/cpuinfo_max_freq >> 1800000
=== 查看内存容量(Check Memory Capacity) === root@xxxx:/# busybox free -m
=== 查看存储容量(Check Storage Capacity) === root@xxxxx:/# busybox df -h
設置RTC (RTC Setting)
How to build Android 12 BSP (Debian 10 BSP 編譯)
Android BSP User Guide for rk3568 series 12 - ESS-WIKI (advantech.com.tw)