EPC-R5710 Yocto 4.0 User Guide
产品介绍(Product Presentation)
产品特性(Product Feature)
- NXP i.MX 8M PLUS 4xA53@1.8GHz
- Integrate 2.3 TOPS NPU and extend 8-26 TOPS AI card
- 4Kp30, 1080p60 HEVC, H.264, VP9, VP8 decoding
- 1080p60 H.265, H.264 encoding
- 1xHDMI2.0
- 5xGbE LAN, 1xGbE Fiber
- USB3.0, USB2.0, RS232, RS485, CAN FD, SATA, SD
- 8 Channels Mic Array
- Support AI card/5G/4G/GPS/Wi-Fi 5/Wi-Fi 6/BT
- Support TPM, TCM
- Linux and Android
- Embedded DeviceOn, DeviceOn.CommBridge
产品官网链接(Product official website link)
EPC-R5710 - NXP i.MX 8M Plus AI edge intelligent System
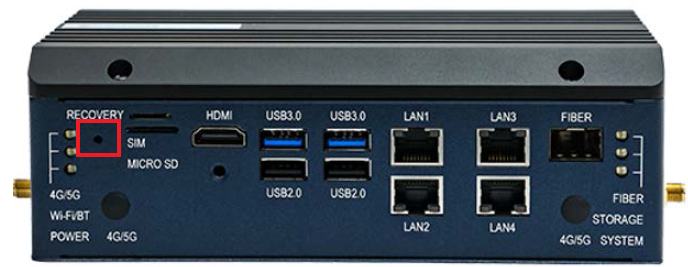
接口布局和尺寸(Layout and Sizes)
External I/O
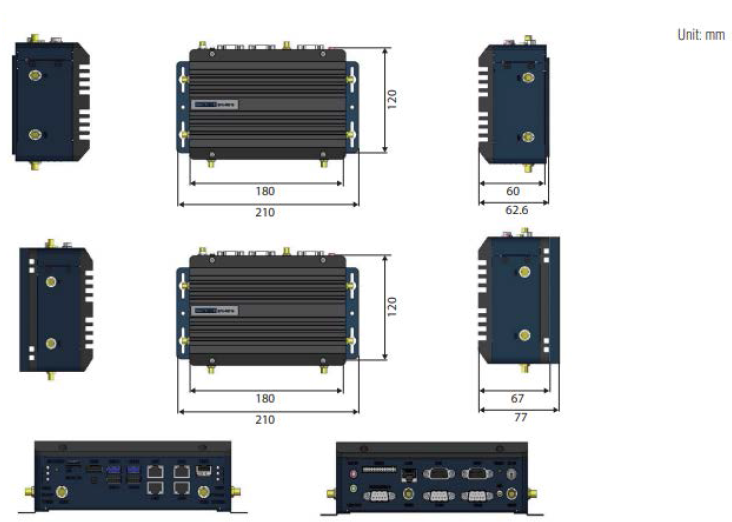
接口布局圖 Board Dimension Layout
I/O
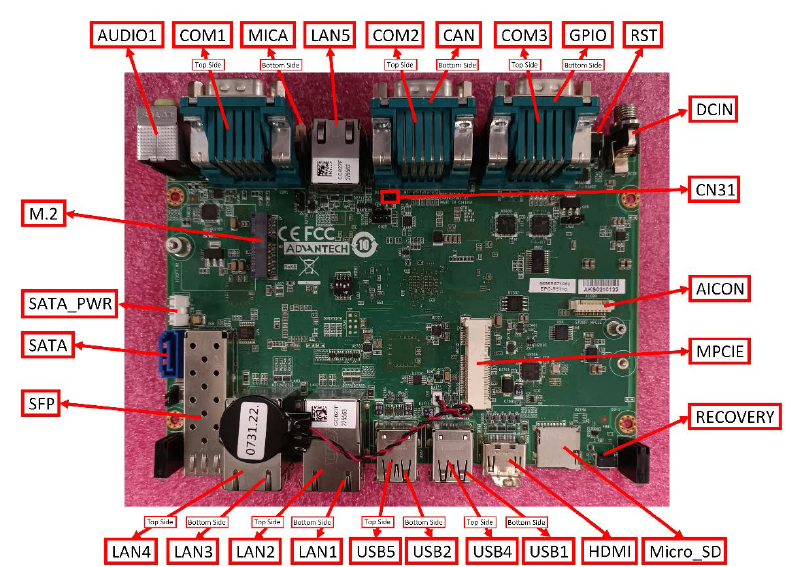
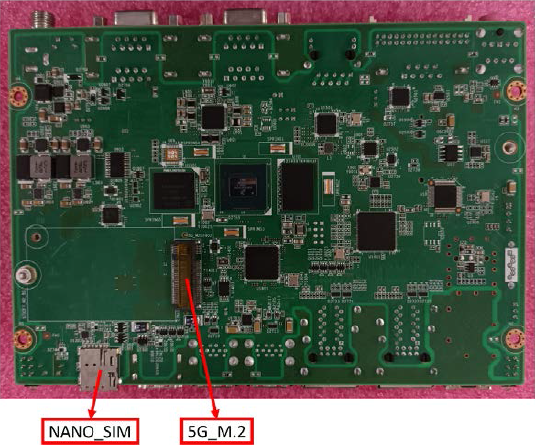
硬件接口说明(Hardware interface description)
Connector List
快速入门(Quick Start)
系统下载(Yocto 4.0 OS Download)
Note: LIV = Yocto Linux, UIV = Ubuntu, DIV = Debian, AIV = Android LBV = BSP, LIV = Image LIVA = Yocto-3.0, LIVB = Yocto-3.3, LIVC = Yocto-4.0, LIVD = Yocto-4.1…
| Product | Image Version | Release Date | Release Version | Release Notes | Image Download | BSP Download Tag | SDK |
|---|---|---|---|---|---|---|---|
| EPC-R5710 | VC0076 | 2024-06-06 | Beta | Release note | Baidu (pwd: a887) / Dropbox | imx8LBVC0076.xml | SDK |
Release status:
- Alpha: Basic I/O function bring up by RD
- Beta: Basic I/O function, performance and middleware verified by RD. Peripherals integrated
- GA: Beta version verified by QE
- RTM: Beta version verified by SI/Power/QE and pre-loaded
Linux烧录方式(Linux Flash eMMC Method)
Device routes:
| Device | Node |
|---|---|
| eMMC | /dev/mmcblk2 |
| SD | /dev/mmcblk1 |
| QSPI1 | /dev/mtd0 |
SD test example:
dd if=/dev/urandom of=data bs=1 count=1024
dd if=/dev/mmcblk1 of=backup bs=1 count=1024 skip=4096
dd if=data of=/dev/mmcblk1 bs=1 seek=4096
dd if=/dev/mmcblk1 of=data1 bs=1 count=1024 skip=4096
diff data data1
dd if=backup of=/dev/mmcblk1 bs=1 seek=4096
Install the system from SD card:
- Copy
imx-image-full-imx8mpepcr5710a1-xxxxxx.rootfs.sdcardto your desktop. - Insert SD card to PC.
- Make a bootable SD card (e.g. SD card node is
/dev/sdv):
umount /dev/sdv*
dd if=./imx-image-full-imx8mpepcr5710a1-xxxx.rootfs.sdcard of=/dev/sdv bs=1M ;sync
- Copy
imx-image-full-imx8mpepcr5710a1-xxxxxx.rootfs.sdcardto USB disk. - Insert USB disk and SD card, then boot from SD card by changing SW1 to 1-2 ON, 3-4 OFF.
- Enter USB disk folder, flash to eMMC:
cd /run/media/sda1/
umount /dev/mmcblk2*
dd if=./imx-image-full-imx8mpepcr5710a1-xxxx.rootfs.sdcard of=/dev/mmcblk2 bs=1M ;sync
Button for System Recovery With SD Card
Function: used to upgrade or use the operating system in the SD card.
Operation method: press the recovery button, plug in the power supply, power on the machine, press it for 2 seconds, and start it from the SD card.
After starting from the SD card, whether the customer needs to upgrade or use the SD card system is customized by the customer (by modifying the files in the SD card).