RSB-4680 How to debug.
Contents
- 1USB2UART Bridge
- 2Hardware PIN define
- 3UART parameter
- 4Debug on windows
- 5Debug on Ubuntu 5.1Kermit
- 6MiniCom
USB2UART Bridge
There are plenty types of usb to uart bridge in the market . Most of them use the following chip :
Hardware PIN define
RSB4680 debug port pin define :
| PIN | PIN Name |
|---|---|
| 1 | NC |
| 2 | TX |
| 3 | RX |
| 4 | GND |
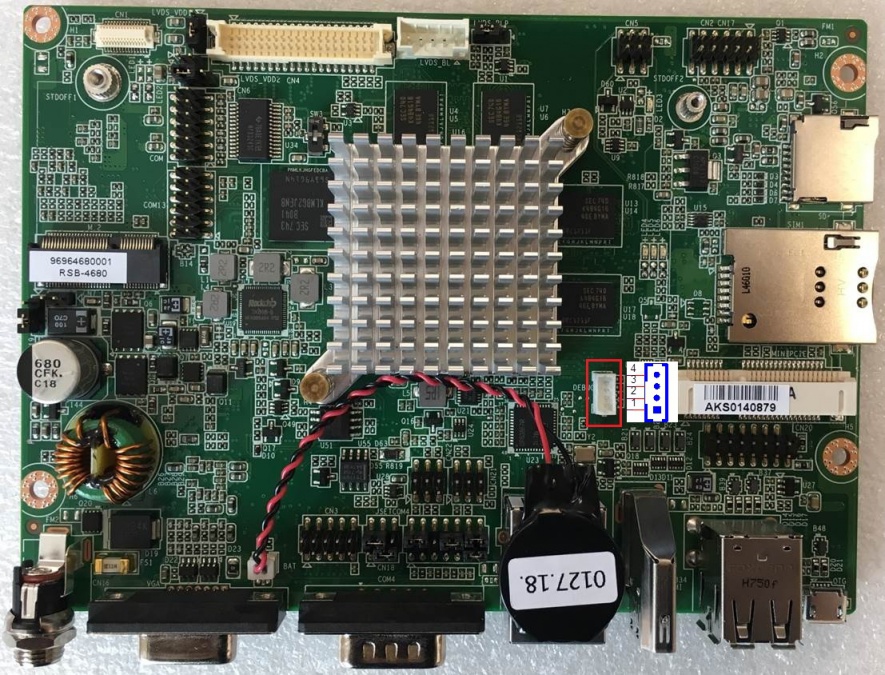
Note :
Please connect device's TX to usb2uart adapter's RX and device's RX to usb2uart adapter's TX .
UART parameter
- BaudRate:115200
- DataBits :8
- StopBits :1
- Parity :None
- FlowControl:None or XON/XOFF
Debug on windows
Install usb2uart adapter's driver. Connect adapter to PC , you will find COM port like :

Putty is very populate tool on Windows. Download putty here.
Run PUTTY.exe, select Connection type of "Serial" , input COM port found in Device Manager.
Set Parameter like :

Then Click "Open" to start debug console.
Debug on Ubuntu
"Kermit" and "MiniCom" are very famous tools on Ubuntu.
Connect adapter to PC , find COM port :
$ ls /dev/ttyUSB*
/dev/ttyUSB0
Kermit
Install Kermit :
sudo apt-get update
sudo apt-get install ckermit
Config Kermit :
vi $HOME/.kermrc;
Input the following content :
set line /dev/ttyUSB0
set speed 115200
set carrier-watch off
set handshake none
set flow-control none
robust
set file type bin
set file name lit
set rec  pack 1000
set send pack 1000
set window 5
Note :
Change "/dev/ttyUSB0" according your system, Use Command "ls /dev/ttyUSB*" .
Run kermit
sudo kermit
MiniCom
Install MiniCom:
sudo apt-get update
sudo apt-get install minicom
Run kermit
$ sudo minicom
Welcome to minicom 2.7
OPTIONS: I18n
Compiled on Jan  1 2014, 17:13:19.
Port /dev/ttyUSB0, 15:57:00
Press CTRL-A Z for help on special keys
According the tips, press CTRL-A, then press Z to show help.
  +-------------------------------------------------------------------+
                          Minicom Command Summary                      |
  |                                                                    |
  |              Commands can be called by CTRL-A <key>                |
  |                                                                    |
  |               Main Functions                  Other Functions      |
  |                                                                    |
  | Dialing directory..D  run script (Go)....G | Clear Screen.......C  |
  | Send files.........S  Receive files......R | cOnfigure Minicom..O  |
  | comm Parameters....P  Add linefeed.......A | Suspend minicom....J  |
  | Capture on/off.....L  Hangup.............H | eXit and reset.....X  |
  | send break.........F  initialize Modem...M | Quit with no reset.Q  |
  | Terminal settings..T  run Kermit.........K | Cursor key mode....I  |
  | lineWrap on/off....W  local Echo on/off..E | Help screen........Z  |
  | Paste file.........Y  Timestamp toggle...N | scroll Back........B  |
  | Add Carriage Ret...U                                               |
  |                                                                    |
  |             Select function or press Enter for none.               |
  +--------------------------------------------------------------------+
According the tips, press O to show configuration.
 +-----[configuration]------+
           | Filenames and paths      |
           | File transfer protocols  |
           | Serial port setup        |
           | Modem and dialing        |
           | Screen and keyboard      |
           | Save setup as dfl        |
           | Save setup as..          |
           | Exit                     |
           +--------------------------+
Press "↓", move cursor to "Serial port setup" to Config parameter.
Then press "A"-"G" to set relative content as following :
 +-----------------------------------------------------------------------+
   | A -    Serial Device      : /dev/ttyUSB0                              |
   | B - Lockfile Location     : /var/lock                                 |
   | C -   Callin Program      :                                           |
   | D -  Callout Program      :                                           |
   | E -    Bps/Par/Bits       : 115200 8N1                                |
   | F - Hardware Flow Control : No                                        |
   | G - Software Flow Control : No                                        |
   |                                                                       |
   |    Change which setting?                                              |
   +-----------------------------------------------------------------------+
When configuration is done, back to choose "Save setup as dfl" to save as default configuration.